Achtung
This page is not maintained anymore and contains information referring to features or functions from earlier versions of Kdenlive that are deprecated or have been superseded by something else.
How to Produce 4K and 2K Videos for YouTube
This guide shows how to
Produce a 4K video as adherent as possible to the standards for this format
Publish the video on YouTube, that supports resolutions up to both 4K and 2K
Specifications
YouTube is describing quite accurately all the minimum requirements for uploading your material with the YouTube recommended upload encoding settings.
Briefly, for the 4K and 2K cases we have:
Type |
Video Bitrate |
Mono Audio Bitrate |
Stereo Audio Bitrate |
5.1. Audio Bitrate |
Resolution and Aspect Ratio |
|---|---|---|---|---|---|
2160p (4K) |
35-45 Mbps |
128 kbps |
384 kbps |
512 kbps |
3840x2160 (16:9) |
1440p (2K) |
10 Mbps |
128 kbps |
384 kbps |
512 kbps |
2560x1440 (16:9) |
Bemerkung
Newer versions of Kdenlive already have 2K project profiles (QHD) and 4K project profiles for UHD and DCI with a variety of frame rates. Therefore, the following steps are only needed if your Kdenlive version does not have them (seriously consider an upgrade) or if you want to change certain parameters.
Step 1: Create Custom Project Settings
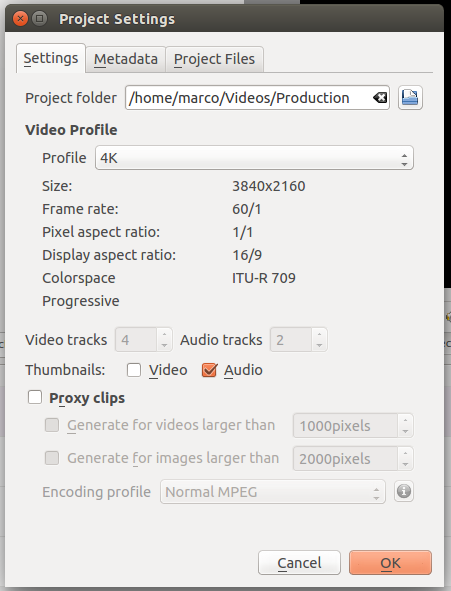
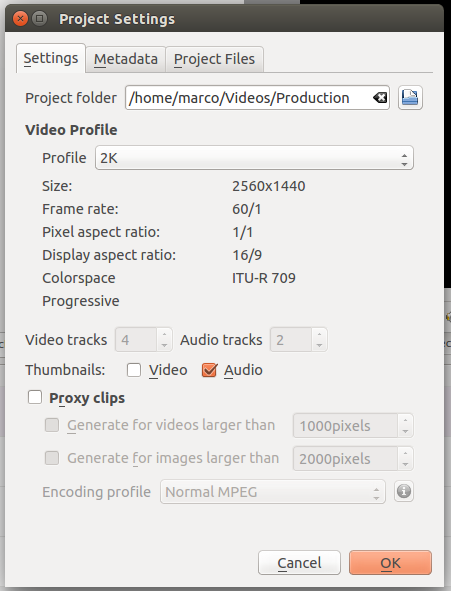
Under create a new custom project settings as follows.
- For 4K
Size: 3840x2160
Frame rate: 60/1
Pixel aspect ratio: 1/1
Display aspect ratio: 16/9
Colorspace: ITU-R 709
- For 2K
Size: 2560x1440
Frame rate: 60/1
Pixel aspect ratio: 1/1
Display aspect ratio: 16/9
Colorspace: ITU-R 709
Notice that the settings for Project Folder, Video Tracks, Audio Tracks and Thumbnail should reflect your personal needs.
Step 2: Create Custom Consumer Profile
We are going to create a total of four profiles: two for 4K and two for 2K. This is necessary because despite their recommendations YouTube will not display videos in 2K nor 4K unless they are rendered at 30fps. Therefore, it is recommended to keep separate profiles for 2K and 4K, one each for 30 and 60fps.
Bemerkung
The profiles have been created for Ubuntu 14.10 64bit, other distributions may have a different default directory for storing consumer profiles.
Under /usr/share/mlt/presets/consumer/avformat/Youtube_Advanced (Linux) or C:\Program Files\kdenlive\share\mlt\presets\consumer\avformat\ (Windows) create the following files:
4K_60fps
description=4K 60fps
f=mp4
frame_rate_num=60
frame_rate_den=1
width=3840
height=2160
progressive=1
vcodec=libx264
vb=40M
g=30
bf=2
acodec=aac
ab=384k
pix_fmt=yuv420p
threads=4
coder=1
movflags=+faststart
meta.preset.extension=mp4
meta.preset.name=4K 60fps
4K_YouTube
description=4K Youtube
f=m4
frame_rate_num=30  <-- Pay attention here (30fps is crucial
frame_rate_den=1
width=3840
height=2160
progressive=1
vcodec=libx264
vb=40M
g=15 <-- Pay attention here (this has to be half the frame rate)
bf=2
acodec=aac
ab=384k
pix_fmt=yuv420p
threads=4
coder=1
movflags=+faststart
meta.preset.extension=mp4
4meta.preset.name=4K Youtube
2K_60fps
description=2K 60fps
f=mp4
frame_rate_num=60
frame_rate_den=1
width=2560
height=1440
progressive=1
vcodec=libx264
vb=10M
g=30
bf=2
acodec=aac
ab=384k
pix_fmt=yuv420p
threads=4
coder=1
movflags=+faststart
meta.preset.extension=mp4
meta.preset.name=2K 60fps
2K_YouTube
description=2K YouTube
f=mp4
frame_rate_num=30 <-- Pay attention here (30fps is crucial)
frame_rate_den=1
width=2560
height=1440
progressive=1
vcodec=libx264
vb=10M
g=15 <-- Pay attention here (this has to be half the frame rate)
bf=2
acodec=aac
ab=384k
pix_fmt=yuv420p
threads=4
coder=1
movflags=+faststart
meta.preset.extension=mp4
meta.preset.name=2K YouTube
Step 3: Create Custom Rendering Profile
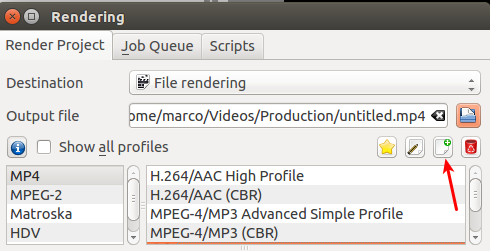
In the Rendering window create a new profile.

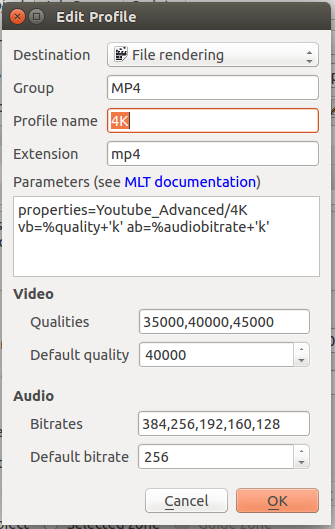
In the Profile window write the following values:
For 4K 60fps rendering
Parameter |
Value |
|---|---|
Destination |
File rendering |
Group |
MP4 |
Profile Name |
4K 60fps |
Extension |
mp4 |
Parameters |
properties=4K_60fps vb=%quality+‘k‘ ab=%audiobitrate+‘k‘ |
Video qualities |
35000,40000,45000 |
Default quality |
40000 |
Audio Bitrates |
384,256,192,160,128 |
Default Audio Bitrate |
256 |
For 4K Youtube standard (30fps) rendering
Parameter |
Value |
|---|---|
Destination |
File rendering |
Group |
MP4 |
Profile Name |
4K Youtube |
Extension |
mp4 |
Parameters |
properties=4K_YouTube vb=%quality+‘k‘ ab=%audiobitrate+‘k‘ |
Video qualities |
35000,40000,45000 |
Default quality |
40000 |
Audio Bitrates |
384,256,192,160,128 |
Default Audio Bitrate |
256 |
For 2K 60fps rendering
Parameter |
Value |
|---|---|
Destination |
File rendering |
Group |
MP4 |
Profile Name |
2K 60fps |
Extension |
mp4 |
Parameters |
properties=2K_60fps vb=%quality+‘k‘ ab=%audiobitrate+‘k‘ |
Video qualities |
10000 |
Default quality |
10000 |
Audio Bitrates |
384,256,192,160,128 |
Default Audio Bitrate |
256 |
For 2K Youtube standard (30fps) rendering
Parameter |
Value |
|---|---|
Destination |
File rendering |
Group |
MP4 |
Profile Name |
2K YouTube |
Extension |
mp4 |
Parameters |
properties=2K_YouTube vb=%quality+‘k‘ ab=%audiobitrate+‘k‘ |
Video qualities |
10000 |
Default quality |
10000 |
Audio Bitrates |
384,256,192,160,128 |
Default Audio Bitrate |
256 |

To see the results of using the above project and render profiles watch this video.
Notes
- Sources
This How-to was written and published in the KDE Kdenlive forum on February 8th, 2015 by user marcozambi. It was adapted slightly to fit the style of this documentation.

