Speech to Text
Neu in Version 21.04.0.
Warnung
Speech to text does not work with version 21.04.2 due to Vosk API issues. Use version 21.04.1 or 21.04.3 and later versions.
Install Python
Python 3 needs to be installed on your computer (details see below for Linux and Windows). Once Python is installed, follow these steps to put Python into a virtual environment (afterwards Python is copied to the venv folder)
De-install Python
To remove the installed venv package got to and Delete venv.
It will completely remove the venv folder with all installed packages. Note that this does not remove the downloaded models (vosk/whisper) that can still take quite some HD space
Linux
On most Linux distributions python is installed by default. You can check if that is the case for you too by running python3 -V in a terminal. If python is missing just search the internet, there are lots of instructions around.
Windows
Download python from https://www.python.org/downloads/ for installation on your computer.
Speech Engines
To install the speech engines go to .
VOSK
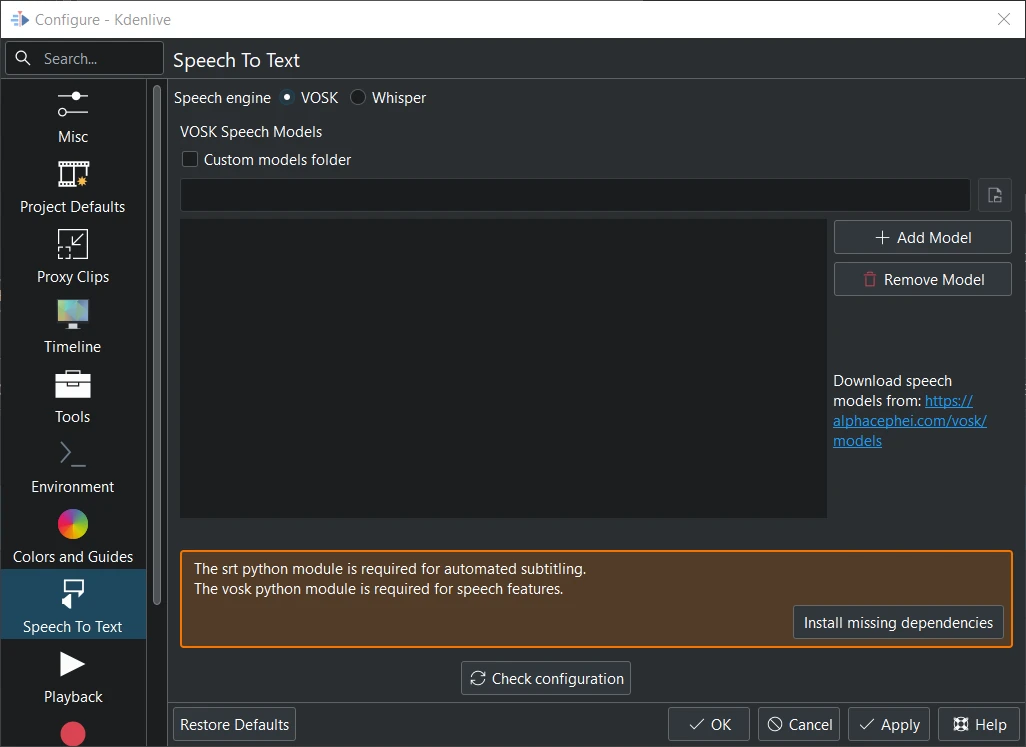
Vosk is not installed
When you switch to VOSK for the first time you have to install the missing dependencies first.
Path where VOSK is installed:
Linux:
~/.local/share/kdenlive/venv/LibWindows:
%LocalAppData%\kdenlive\venv\Lib
If you have installed VOSK in an earlier Kdenlive version already and now you have chosen the venv folder for Python, you can delete the past installed VOSK libraries by using following command in a console: pip uninstall vosk srt
Install a Language
Goto and select the speech engine VOSK.
Click on the link Download speech models from: to get a language model.
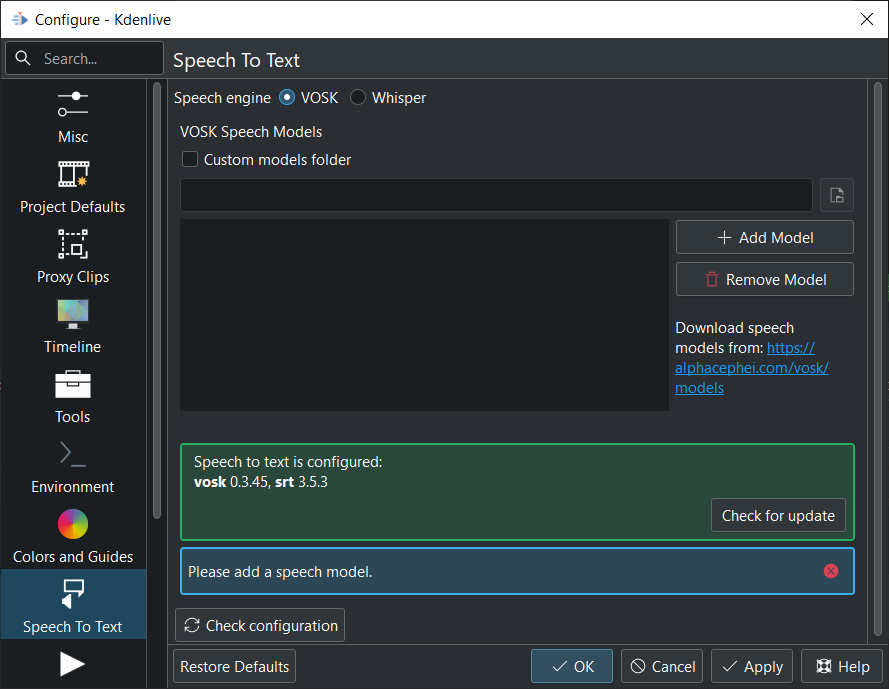
Drag & drop the language you want from the vosk-model download page to the model window, and it will download and extract it for you.

If you have problems or check for updates click on the Check configuration button.
Models folder Show the size of the installed models. Click on the link opens the model folder.
The VOSK speech models are stored here:
Linux: ~/.local/share/kdenlive/speechmodels
Windows: %AppData%\kdenlive\speechmodels
Whisper
Neu in Version 23.04.
OpenAI-Whisper is a speech recognition model for general use. It is trained on a large dataset of diverse audio and is capable of performing speech translation, and language identification.
Whisper is slower than VOSK on CPU, but it is more accurate than VOSK. Whisper creates sentences with punctuation marks, even in Base mode.
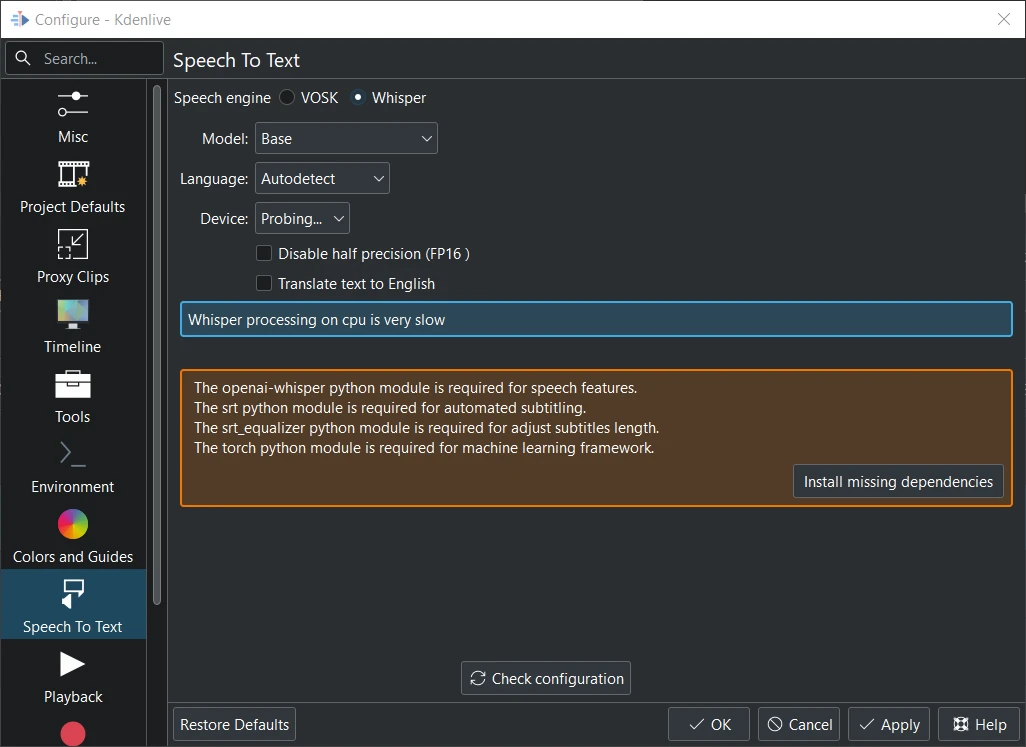
Whisper is not installed
When you switch to Whisper for the first time you have to install the missing dependencies first (about 2GB to download).
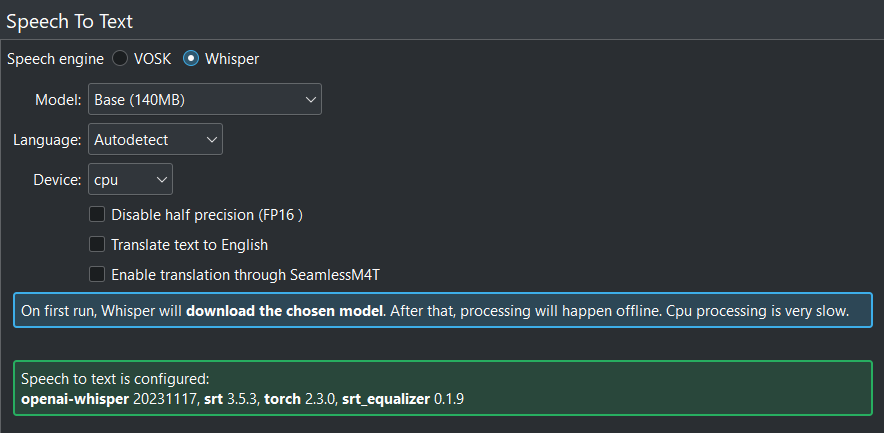
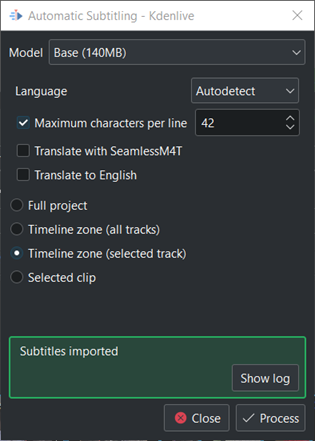
When all is correct configured, you get this screen.
Path where Whisper is installed:
Linux:
~/.local/share/kdenlive/venv/LibWindows:
%LocalAppData%\kdenlive\venv\Lib
The Whisper speech models are stored here:
Linux: ~/.local/share/kdenlive/opencvmodels
Windows: %AppData%\kdenlive\opencvmodels
Model Select the model. More details on the Whisper source code page (default: Base).
Language Select the language if Autodetect is not accurate (default: Autodetect)
Device For compatibility purposes only CPU is available
Disable half precision (FP16) Only for GPU. When Kdenlive detects a NVIDIA GTX 16xx graphic card it disables half precision (FP16) automatically. If you have issues with using GPU you can switch off half precision.
Translate text to english This translates non-English text to English during recognition
Enable translation through SeamlessM4T This will only enable/disable facebook/seamless-m4t-v2-large. To download and start subtitle translation follow these steps.
You can check for updates by clicking on Check configuration
If you have installed Whisper in an earlier Kdenlive version already and now you have chosen the venv folder for Python, you can delete the past installed Whisper libraries by using following command in a console: pip uninstall openai-whisper
Speech recognition
Select the speech engine
Neu in Version 23.04.
Enable menu item.
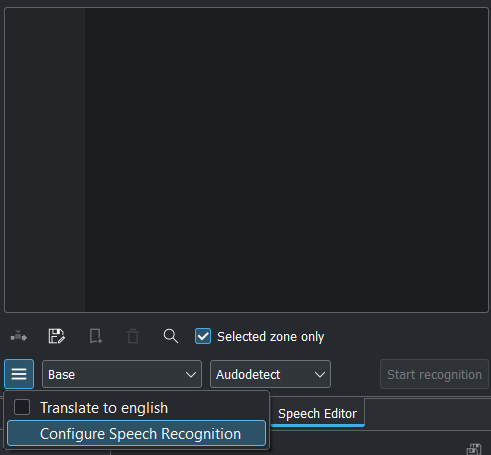
Click on the Hamburger Menu  and select Configure Speech Recognition. This brings you to Configure Speech to Text, select the engine and click OK.
Translate to english is only available with the Whisper speech engine. It translates non-English text to English during recognition.
If some error or important message happen. Click on the Show log and the log get visible.
Creating subtitle by VOSK speech recognition

Shown with the VOSK engine
Mark the timeline zone you want to recognize (adjust the blue line) (1)
Click on the Speech recognition icon (2)
Choose the Language (3)
Choose which part of the timeline should be applied for recognition (4)
Process Start the recognition (5)
The subtitle gets created and inserted automatically.
Remark to 4: The default is to analyze only the Timeline zone (all tracks) (the blue bar in the timeline ruler). Set the zone in the timeline to what you want to analyze (use I and O to set in and out points). Selected clips option analyses the selected clip only.
Creating subtitle by WHISPER speech recognition
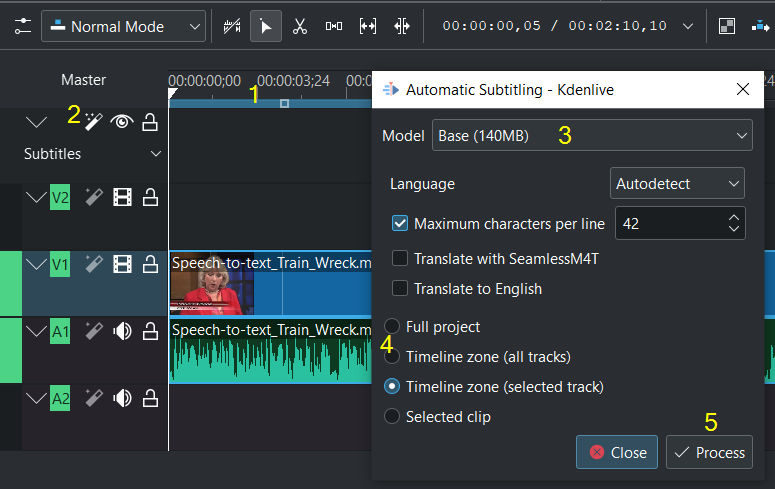
Shown with the Whisper engine
Mark the timeline zone you want to recognize (adjust the blue line) (1)
Click on the Speech recognition icon (2)
Choose the Model (3)
Choose which part of the timeline should be applied for recognition (4)
Process Start the recognition (5)
The subtitle gets created and inserted automatically.
Remark to 4: The default is to analyze only the Timeline zone (all tracks) (the blue bar in the timeline ruler). Set the zone in the timeline to what you want to analyze (use I and O to set in and out points). Selected clips option analyses the selected clip only.
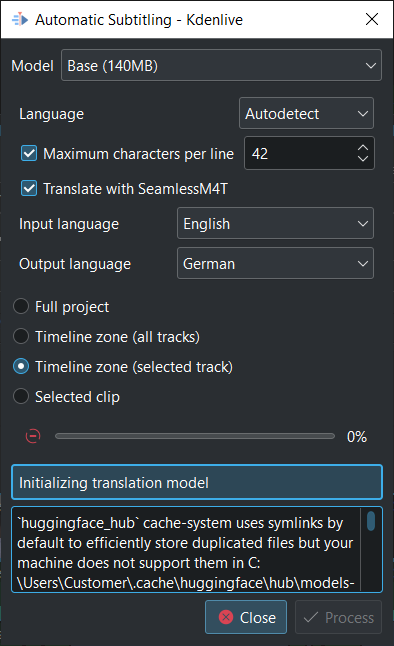
Language If Autodetect doesn’t choose the correct language you can manually set the language
Maximum character per line Adjust the number of character per line in the subtitle
Translate with SeamlessM4T First you have to enable Enable translation through SeamlessM4T in .
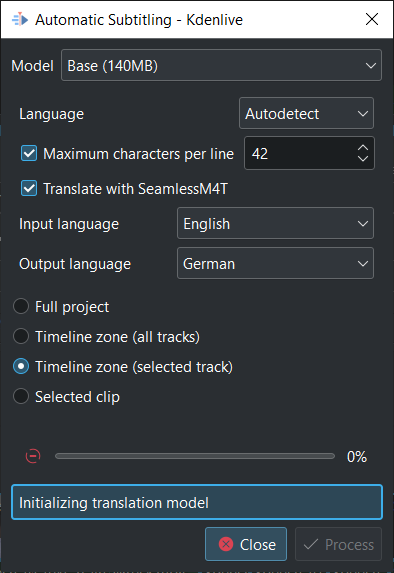
Attention If you use SeamlessM4T the first time it downloads about 9GB of data in the background
Select Input Language and Output Language and click Process. This will first process the audio using whisper, then start the SeamlessM4T translation. Translation can occupy 100% RAM, 100% CPU and 100% disk access.
Achtung
If the 9GB model has not yet been downloaded, it will be downloaded now. With a 100MB/s download speed this will take about 12 minutes!
During download Kdenlive will react as normal. Don’t click on Close otherwise download get stopped.
Don’t worry if you see such a message on the box below Initializing translation model while downloading is running.
Once the translation model is downloaded translation will happen (be patient as download the model takes about 12 minutes with 100MB/s download speed).

SeamlessM4T is enabled and downloaded successful
The SeamlessM4T models are stored here:
Linux: $HOME/.cache/hugginface
Windows: C:\Users\<username>\.cache\huggingface
Creating clips by speech recognition
This is useful for interviews and other speech-related footage. Enable the menu item.
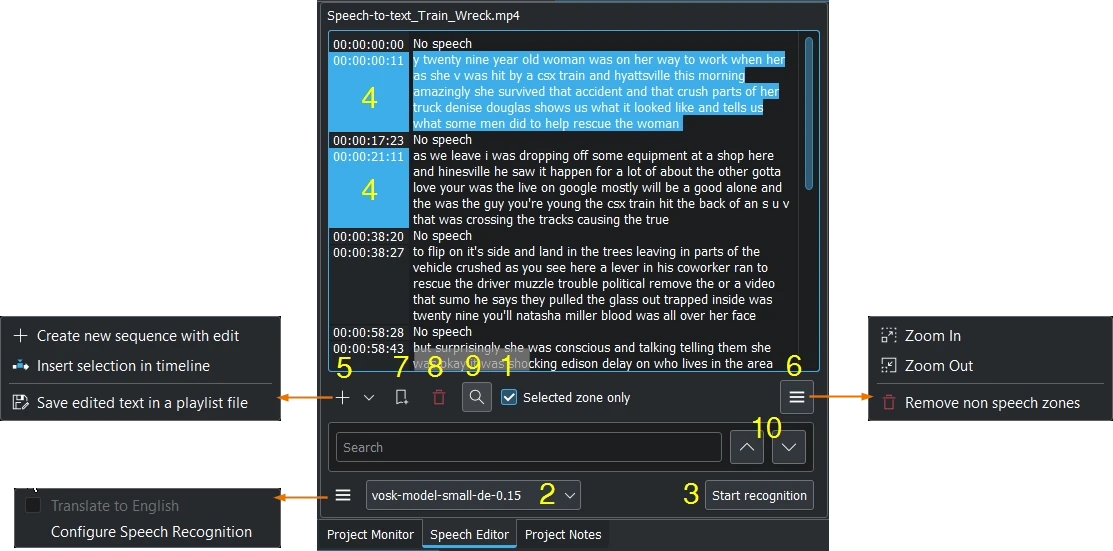
Shown with the VOSK engine and search enabled
Select a clip in the Project Bin.
If needed set in/out point in the clip monitor and enable Selected zone only selection box. This will only recognize the text inside the zone.
Choose the correct language when the VOSK engine is selected. Or choose the Whisper engine by click on Configure Speech Recognition (see configure speech to text)
Press the Start Recognition button.
Select the text you want. Holding CTRL or Shift to select several texts.
Choose: Create new sequence with edit creates a new sequence with each timecode-text as a single clip, or Insert selection in timeline at playhead position, or to Save edited text in a playlist file which appears in the project bin.
Zoom in or Zoom out of the text. Remove non speech zones deletes all „No speech“ entries at once.
Add a Bookmark. You can jump to these bookmarks in the timeline with the Alt + arrow shortcut or edit the bookmark by double click.
Delete the selected text.
Here you can search in the text.
And navigate up or down in the text.
Silence detection
This works with the VOSK engine only.
Open the clip in the clip monitor and open the speech editor window () .
Select your language or Speech Engines and download the model for it.
Then click Start Recognition button.
Once this is done, choose under point 6 from above to Remove non speech zones at once. Or click on the time-code where „No speech“ is indicated (hold Ctrl to select several items at once) and just hit the Delete key.
Repeat the operation for all the parts you want to remove, including where someone says what you do not want to include in your final edit.
Once finished, make sure Selected zone only is disabled, click on the Save edited text in a playlist file button (above under point 5) and after few seconds a new playlist is added in the Project Bin without silence and without the text you do not want.