Effects and Compositions
Effects and Compositions are very important components in video editing. In Kdenlive, effects and compositions are essentially filters provided by frei0r or avfilter (Kdenlive does not have built-in effects or compositions of its own).
Effects are used to change the appearance of or manipulate a clip. For example, the Transform effect allows to scale and move the clip; the Brightness effect changes the brightness of the clip; effects in the Alpha, Mask and Keying category provide very specific filters for masking or rotoscoping.
Compositions are used to combine several visual elements from different sources into a single video. In Kdenlive, you put the different sources into tracks in the Timeline and use compositions to tell Kdenlive how to combine them. For example, the Dissolve composition fades out one clip while fading in another over a certain number of frames. That is why Compositions are often referred to as Transitions. Keep in mind that while Compositions are very often used to transition from one video to another they can be used to create artistic and aesthetic effects when combining several clips (e.g. Darken, Dodge, Burn).
Kdenlive has two groups of effects: Video Effects and Audio Effects.
There are several ways to apply effects:
On the clip in the Project Bin, which makes the effect available in all instances of that clip in the Timeline
On the clip in the Timeline, which makes the effect only applicable for that clip in the Timeline at that point
On the track, which applies the effect to all clips in that particular track
On Master, which applies that effect to all clips in all tracks
Bemerkung
Not all effects can be used at the track or Master level nor does it make sense.
Effects Tab
Make the Effects widget visible in .
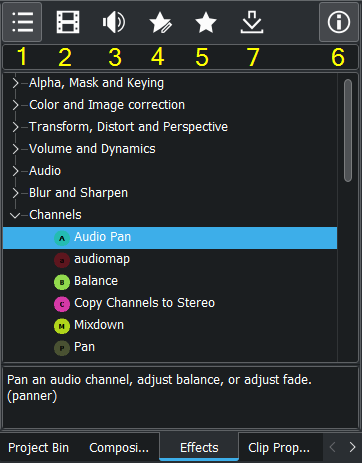
Kdenlive Effects widget as a tab in the Project Bin area
The Effects widget has seven control icons that show or hide the different effect categories:
1 - Main Effects shows all video and audio effects (default view)
2 - Video Effects shows all video effect categories. This option hides the Audio Correction category that is in the Main Effects, and adds the Misc and Motion categories.
3 - Audio Effects shows all audio effects categories
4 - Custom Effects shows all effects you have created by saving an effect stack.
5 - Favorite Effects shows all effects that were flagged as a favorite effect. This is the same list that appears when selecting Insert an effect from the right-click menu of a clip in the Timeline, or by clicking the Favorite Effects in the Timeline toolbar.
6 - Show Effect Info toggles the information display below the effect list where a short description of what the effect does is displayed when on
7 - Download Effects opens a dialog window where effect templates are listed from the KDE Store
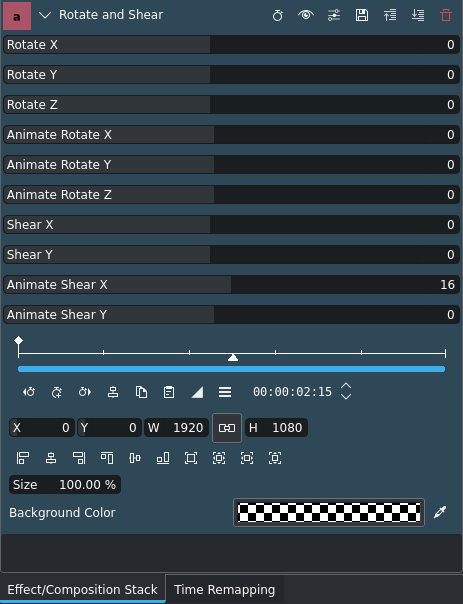
Effect/Composition Stack
This widget is also known as the Properties Tab as it lists all effects applied to the currently selected clip as well as each effect’s settings or properties. If a Composition is selected the widget displays the composition’s settings or properties.
 < effect | composition >
Bemerkung
Only Effects can be stacked, Compositions cannot.
Effect/Composition Stack Functions
Kdenlive Effect Stack
 Save Effect - Opens a dialog window for entering a name for the effect stack under which it will be listed in the Custom effect category and a comment which will be displayed in the information display
 Compare Effect - Splits the Preview Monitor vertically to do a side-by-side comparison of the clip with and without effects
 Effects enabled - Switches the effect stack on or off. This is equivalent to disabling all effects in the effect stack.
 Hide/Show keyframes in Timeline - Switches the display of keyframes in the clip in the Timeline on or off
When an effect is applied to a clip in the timeline you can click on the effect button to enable/disable the clip stack of this clip. When disabled the effect name on the clip is strikeout.
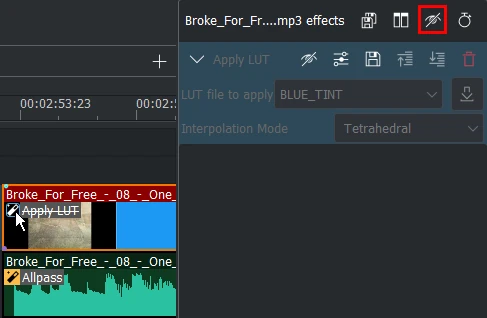
Kdenlive Effect Stack disabled by click on the effect of a clip
Effect Functions
Kdenlive Effect Panel
Hide/show keyframes - Turns the display of the keyframe ruler off or on
Disable effect - Turns the effect off or on. The effect stays in the stack but is not applied during playback or rendering.
 Presets - Opens a list of advanced options to manage presets for the effect (e.g. reset the effect to its default parameters)
 Save effect - Opens a dialog window for entering a name for the effect under which it will be listed in the Custom effect category and a comment which will be displayed in the information display
 Move effect up - Moves the effect up one notch in the list (effect sequence from top to bottom is important)
 Move effect down - Moves the effect down one notch in the list (effect sequence from top to bottom is important)
 Delete effect - Removes the effect from the effect stack
Applying an Effect
Where to apply an effect
An effect can be applied at four different levels of your project:
you can apply it on a clip in the timeline: it will affect only this clip
you can apply it on an clip in the bin: it will affect all the occurrences of this clip in the timeline
you can apply it on a track: it will affect all the clips on this track
you can apply it on the Master: it will affect your global output
How to apply an effect
For applying an effect to a clip in the Project Bin or in the Timeline, you can choose one from the Effects Tab and drag it onto the clip.
You can also double-click on an effect in the Effects Tab which adds the effect to the clip in the Project Bin which appears in the clip monitor. In the Timeline it adds the effect to the clips which are selected. So you can apply an effect to several clips at once in the timeline.
Another method is to use the  Favorite Effect icon in the Timeline toolbar and select the effect from there (you add an effect to the favorite effects by right-click on the effect in the Effects Tab and select Add to favorites).
Alternatively, you can use to select an effect from the various categories and add it to the selected clip(s) in the Timeline.
And last but not least you can copy effects with all their settings from any clip (Timeline or Project Bin) and paste them to other clips.
For applying an effect to a track, see Track Effect.
For applying an effect to the Master, see Master Effect.
Bemerkung
Effects are always added at the bottom of the effect stack, and since the effect order is important can be re-arranged.
Keyframes in Effects
Many effects use the concept of „Keyframes“. Keyframes are user-defined points in your clip where you want an effect to start, stop or change. You can set the parameters for your effects to different values at different keyframes and Kdenlive will then gradually change the parameters between the two keyframes so that by the time the video has arrived at the next keyframe it will have adjusted the parameter to match that keyframe. It interpolates between keyframes.
Keyframes types, interpolation
Select the keyframe interpolation icon for selecting the keyframe type. See Schnellstart for an example on keyframing the RGB adjustment effect.
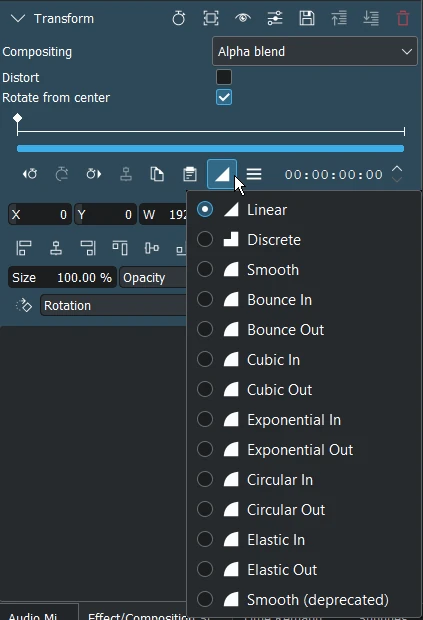
Kdenlive keyframe types
The first three keyframes are: linear, discrete and smooth (Centripetal Catmull-Rom spline interpolation). This are standard keyframes. More details about keyframes you’ll find here.
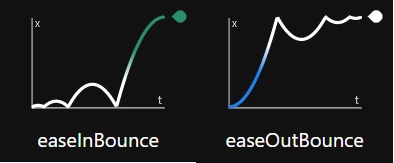
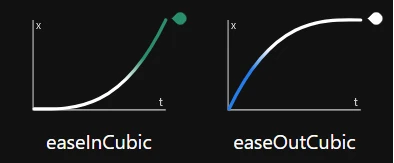
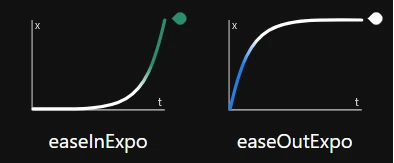
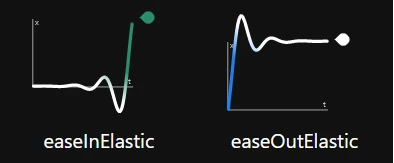
The next ten keyframes are easing keyframes which calculations are based on Robert Penners equations[2].
Objects in real life don’t just start and stop instantly, and almost never move at a constant speed. When we open a drawer, we first move it quickly, and slow it down as it comes out. Drop something on the floor, and it will first accelerate downwards, and then bounce back up after hitting the floor.
Easing keyframes: The left end is the start of the movement, and the segments in blue and green represent faster movement.

Smooth (deprecated): Is the smooth Catmull-Rom spline interpolation keyframe before Kdenlive 24.02.
Keyframe ruler
The keyframe ruler has zoom bars which makes adjusting keyframes a lot easier if the clip’s duration is relatively long and the effect stack widget is too narrow to display all keyframes nicely spaced.
Keyframes can be copied and pasted between effects and even across clips. Standard shortcuts Ctrl+C, Ctrl+V
Working with Keyframes in the Effect Stack
The effect keyframe panel has new icons, improved keyframe grabbing and new functions.
Select the keyframe you want to move
Move the cursor to the position where you want to move the keyframe to
Click on
 Move selected keyframe to cursor
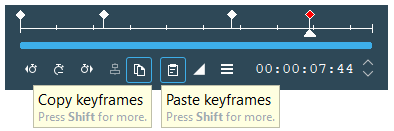
Select the keyframe you want to duplicate
Click on
 Copy keyframe
Move the cursor to the position where you want to insert the new keyframe
Click on
 Paste keyframe
Select all keyframes you want to apply the value on
Go to one of the selected keyframes and change the value(s) as you want
Click on
 Options and select Apply current position value to selected keyframes
Select the parameters you want to apply and click on OK
Select multiple individual keyframes with Ctrl+Left-click
Select contiguous keyframes with Shift+Left-click
Moving multiple keyframes at once
Keyframe types
Easing functions are based on Robert Penner’s Easing Functions: http://robertpenner.com/easing/
Exchanging Keyframes Across Effects
You can import and export keyframes from/to the clipboard. This feature is not only useful to copy keyframes from one clip to another, it can also be used for example to copy the results of the motion tracker to the Transform effect.
To export the keyframes to the clipboard click on Options in the keyframe panel[1] and choose Copy keyframes to clipboard.
Importing keyframes
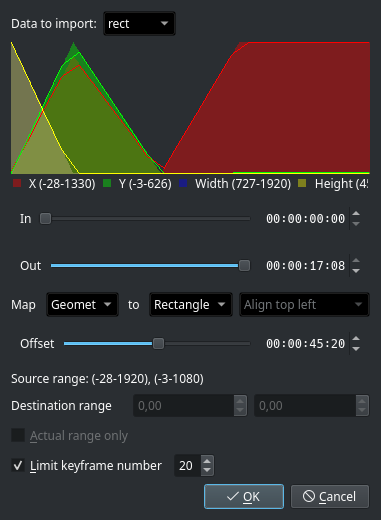
To import keyframes from the clipboard click on Options inside the keyframe panel[1] and choose Import keyframes from clipboard. If you have valid data on your clipboard you should see this dialog window where you can adjust the mapping of the data.
For most use cases the default settings suffice. But you may want to copy only a subset of the data and perhaps enter an offset value, for example.
Track Effect
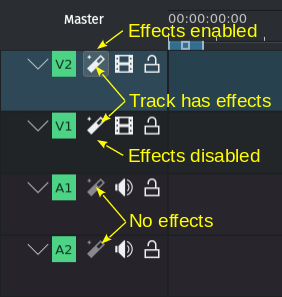
Track effect indicators
Effects can be added to an entire track affecting all clips in that track. Simply drag an effect from the Effects Tab to the header of the desired track, or click on the  Track Effect icon and drag the effect to the track’s effect stack.
Master Effect
If you want to apply audio or video effects throughout the whole video. Click on the Master button above the track headers to see the Master Effect Stack where you can add effects just like with clips or tracks.
Adding a Sepia effect to the entire video
There are specific effects and filters that work On Master only.
Effect Zones
Effect Zones allow you to apply effects to specific regions of tracks or the timeline. Zones can be set from the effect zone bar in the Timeline or from the interface in the effect panel.
Track Effect Zone
Master Effect Zone
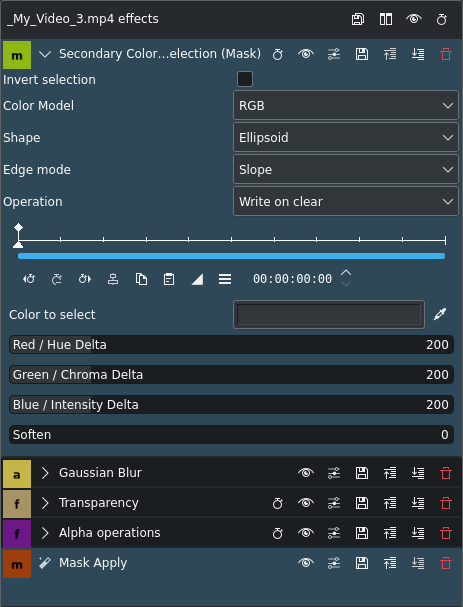
Masking Effects
This feature allows to apply effects only to specific regions of a clip by using masks. In its current implementation the process requires three steps:
Add one of the three available masks: Shape alpha (mask), Rotoscoping (mask) or Alpha shapes (mask).
Add an effect (or effects) to be applied to the masked region
Add the Mask Apply effect to activate the mask to the effects in step 2
Using Rotoscoping (mask) to apply the Saturation effect in one specific region only
You can apply more than one mask per clip by following the same three-step process.
Video Effects
The video effects are divided into the following categories:
The available effects are defined by .xml files found in .local/share/kdenlive/effects (e.g. /usr/share/kdenlive/effects).
These .xml files contain the default values for the effects parameters. So if you don’t like the default values for the effects in Kdenlive, you can modify the defaults by editing these .xml files.
See also here for an alphabetical list of effects and transitions.
Audio Effects
The audio effects are divided into the following categories:
The available effects are defined by .xml files found in .local/share/kdenlive/effects (e.g. /usr/share/kdenlive/effects).
These .xml files contain the default values for the effects parameters. So if you don’t like the default values for the effects in Kdenlive, you can modify the defaults by editing these .xml files.
See also here for an alphabetical list of effects and transitions.
Compositions
Alphabetical List of all Effects and Compositions
Audio Tools
Time Remapping
The Time Remap feature allows to keyframe the speed of a clip to achieve effects like speed ramping.
Example of using Time remapping for speed ramping
Speech-to-Text
Subtitles
Titles
Effects Demos
The following three YouTube videos display the results of a number of the video effects available in Kdenlive (Spanish captioning).
Another YouTube video (English Captions).
See also this YouTube play list from Franz M.P.
Notes