Insert and Overwrite: Advanced Timeline Editing
Kdenlive offers advanced timeline editing functions. In this chapter we are looking at the Insert and Overwrite
advanced editing functions.
When inserting or overwriting some part in the timeline with some part from a clip, we now face two zones, so how does this work out at all? We only want to deal with three points, that is, with one zone and a point (for that reason this is also sometimes called 3-Point Editing). In consequence, there are two different insert/overwrite operations:
Insert/overwrite a clip zone into the timeline at some point (cursor/playhead), or
Insert/overwrite a clip starting at some point into a timeline zone
Insert Clip Zone into Timeline at Timeline Cursor
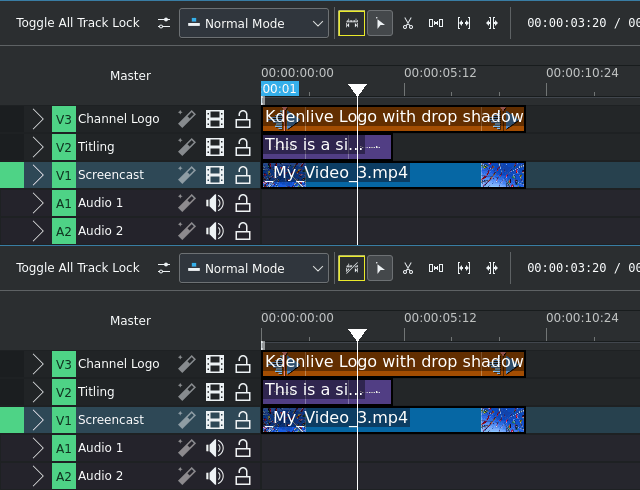
Toggle the use of the timeline zone
As we are going to insert a clip zone into the timeline, first make sure that the switch for Using Timeline Zone is crossed out (it is off).
The timeline zone bar is now dimmed and does not show the zone duration.
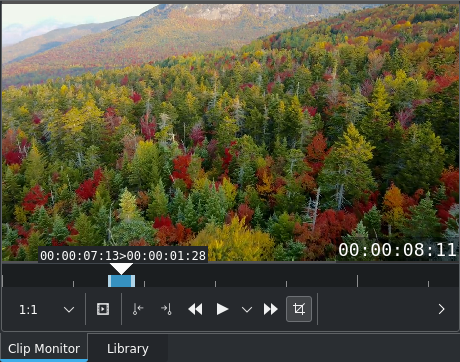
Setting the clip region for insertion
Next, mark the clip region of the source clip you want to insert into the timeline. You do this as usual, using either the I and O shortcuts, or the set Zone In / Zone Out
buttons of the clip monitor.
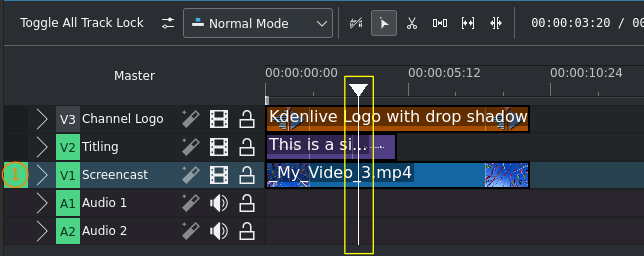
Setting the insertion point in the timeline
Now place the timeline cursor to where you want to start with the insert.
Also make sure to select the correct track using the Up and Down keys to navigate up and down the track list and then Shift+T to mark the track as the target for the operation. The currently selected track is marked with a semi-transparent selection color (depending on your particular color theme); the active track is marked with a green box (see (1) in the screenshot)
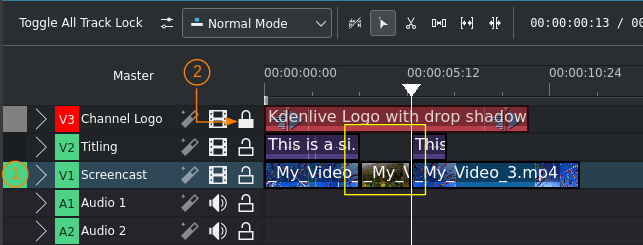
Clip region inserted in the timeline
Finally press the V shortcut, or click the Insert Clip Zone toolbar button , or use .
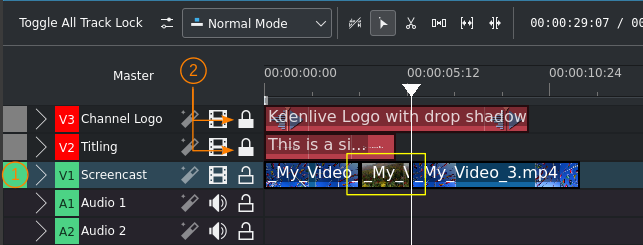
Clip region inserted in the timeline
Note that the insert shifted also not-active tracks to make room for the inserted clip. In order to avoid that, lock the other tracks by clicking on the icon in the track header (see (2) in the screenshots).
Bemerkung
Insertion starts at the timeline cursor, and not at the timeline zone start (because we chose to ignore it in our very first step).
Locked tracks are unaffected, such as the topmost track in our example.
Unlocked tracks get affected in that whatever is at the insertion point and later in the timeline gets shifted away to make room for the insertion.
Insert Clip (from In Point) into Timeline Zone

This time, we are going to insert some part of a clip to exactly fit into the timeline zone. So we now need to switch on Using the Timeline Zone .
The timeline zone bar is now bright and shows the duration of the timeline zone.
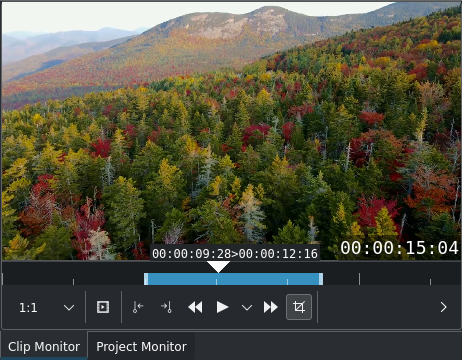
Setting the in-point in the clip for insertion
We only need to set the in point for our source clip. The out point does not matter, as it will be determined automatically by the length of the timeline zone.
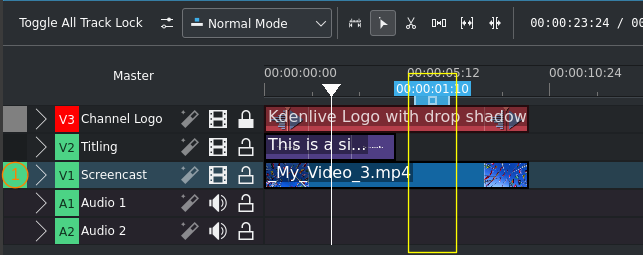
Defining the timeline zone to be overwritten
Now, mark (using I and O or or
) or place (drag the zone left or right) the timeline zone into which you want to insert a part of your source clip. The timeline cursor position now does not matter.
Make sure to select the correct track using the Up and Down keys and pressing Shift+T to mark the track as the target for the operation (see (1) in the screenshot).
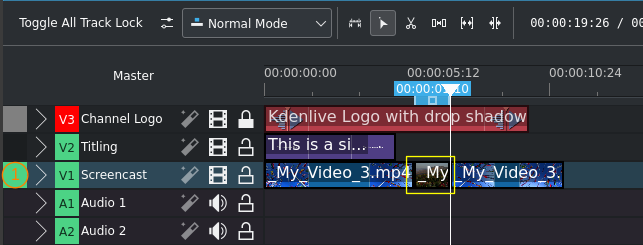
Timeline with clip inserted into and having overwritten the timeline zone
Finally press the V shortcut, or click the Insert Clip Zone toolbar button , or use .
Bemerkung
Overwrite starts at the beginning of the timeline zone, and not at the timeline cursor position (because we chose to enable the timeline zone in our very first step)
Locked tracks are unaffected, such as the top-most track in our example
Unlocked tracks get affected in that whatever is at the insertion point and later in the timeline gets shifted away to make room for the insertion
Overwrite Timeline with Clip Zone

Toggle the use of the timeline zone
As we are going to overwrite a clip zone into the timeline, first make sure that the switch for Using Timeline Zone is crossed out (it is off). This is also shown in the screenshot.
The timeline zone bar is now dimmed and does not show the zone duration.
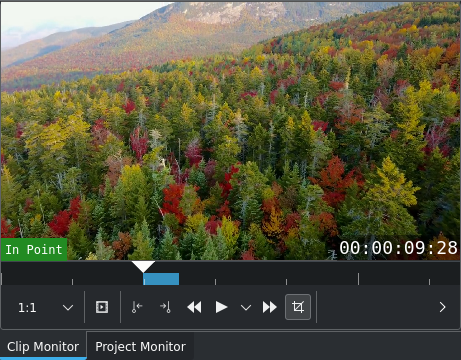
Setting the clip region for the operation
Next, mark the clip region of the source clip you want to insert and overwrite what is in the timeline. You do this as usual, using either the I and O shortcuts, or the set Zone In / Zone Out
buttons of the clip monitor.
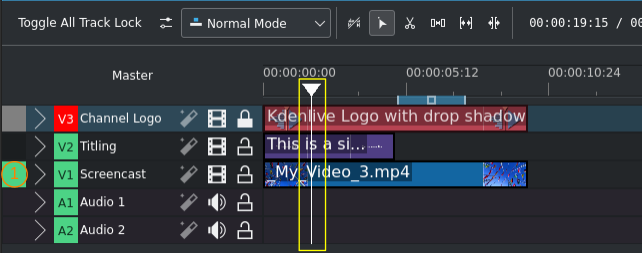
Setting the overwrite start point in the timeline
Now place the timeline cursor to where you want to start the overwrite.
Also make sure to select the correct track using the Up and Down keys to navigate up and down the track list and pressing Shift+T to mark the track as the target for the operation. The currently selected track is marked with a semi-transparent selection color (depending on your particular color theme); the active track is marked with a green box (see (1) in the screenshot)
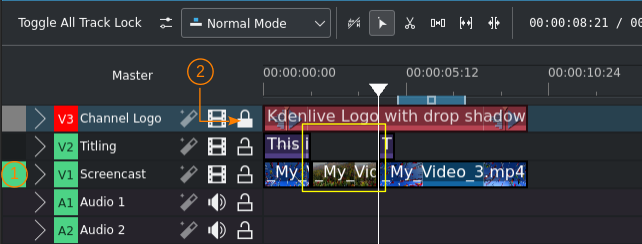
Clip region overwrote parts of the timeline
Finally press the B shortcut, or click the Overwrite Clip Zone toolbar button , or use .
Note that the overwrite removed the same portion also in not-active tracks. In order to avoid that, lock the other tracks by clicking on the icon in the track header (see (2) in the screenshots).
Bemerkung
Overwrite starts at the timeline cursor, and not at the timeline zone start (because we chose to ignore it in our very first step).
Locked tracks are unaffected, such as the topmost track in our example.
Unlocked tracks get affected in that whatever is at the insertion point and later in the timeline gets removed for the duration of the clip region.
Overwrite Timeline Zone with Clip

Toggle the use of the timeline zone
This time, we are going to insert some part of a clip to exactly fit into the timeline zone and overwrite what is in it. So we now need to switch on Using the Timeline Zone .
The timeline zone bar is now bright and shows the duration of the timeline zone.
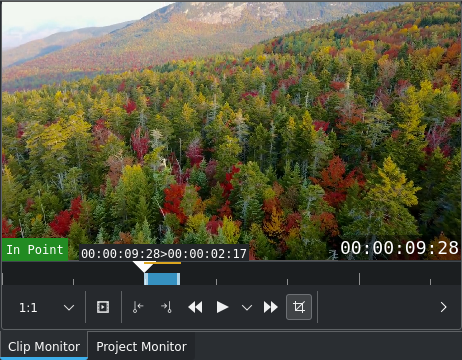
Setting the in-point in the clip for the operation
We only need to set the in point for our source clip. The out point does not matter, as it will be determined automatically by the length of the timeline zone.
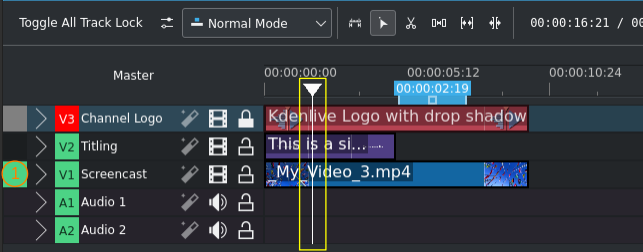
Defining the timeline zone for overwriting
Now, mark (using I and O or or
) or place (drag the zone left or right) the timeline zone that you want to overwrite with part of your source clip. The timeline cursor position now does not matter.
Make sure to select the correct track using the Up and Down keys and pressing Shift+T to mark the track as the target for the operation. The currently selected track is marked with a semi-transparent selection color (depending on your particular color theme); the active track is marked with a green box (see (1) in the screenshot).
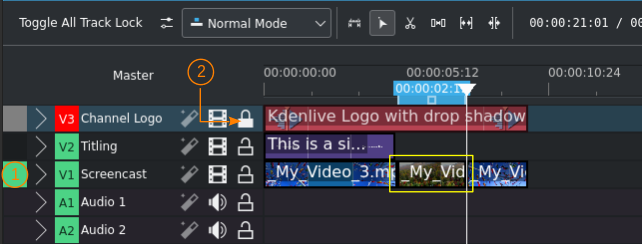
Timeline with clip having overwritten the timeline zone
Finally press the B shortcut, or click the Overwrite Clip Zone toolbar button , or use .
Bemerkung
Overwrite starts at the beginning of the timeline zone, and not from the timeline cursor position (because we chose to enable the timeline zone in our very first step)
Locked tracks are unaffected, such as the top-most track in our example (see (2) in the screenshot above)
Unlocked tracks get affected in that whatever is at the insertion point and later in the timeline gets shifted for the duration set by the timeline zone.
Notes
- Sources
The original text was submitted by user TheDiveO to the now defunct kdenlive.org blog. For this documentation it has been lifted from kdenlive.org, updated, extended and adapted to match the overall style.