Shapes
There are only two basic shapes you can add to a title clip: a rectangle and an ellipse (a square is just a special form of rectangle, like a circle is a special form of an ellipse).
Click on  , or use the keyboard shortcut Alt+R, then drag the mouse across the main workspace to create a new rectangle. To get a square, enter identical values for the W and H parameters.
Click on  , or use the keyboard shortcut Alt+E, then drag the mouse across the main workspace to create a new ellipse. If you need a circle, enter W and H values that are identical.
The shape properties can be set in the Properties tab.
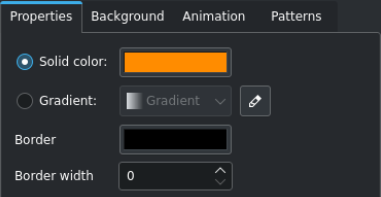
- Solid Color:
Select this if you want the shape to have one color
- Color Selection:
Click the color button to open the color selection dialog window
- Gradient:
Select this if you want the shape to have a color gradient
- Gradient Selection:
Select from the available gradients
- Gradient Editor:
 Click on this icon to open a gradient editing window. Here you can create, edit, and delete gradients.
- Border:
Click this color button to select the color for the border
- Border width:
A value of zero (0) means no border; higher values create a border (measured in pixel).
Object Zooming and Rotating
An object can be zoomed and rotated.

Sometimes zooming is easier than entering new values for W and H. Enter a zoom percentage in the Zoom field.
Rotating an object is possible by entering degrees of rotation into the Rotate X, Y, and Z fields. Note that the center of rotation is the top left corner of the object.
Object Stacking
The objects are placed on top of each other following the sequence in which they were created. If you need to bring an object/item forward that was created in the early stages, use the Z-Index field or click on the respective icon ( ,
,  ,
,  ,
,  ) in the stack toolbar. Likewise, you can also send an object/item backwards.
Object Alignment
Alignment to the project dimensions is possible using the icons in the toolbar:
 Align left or
  Align right moves the selected object towards the left or right edge stopping at the edges of each of the safety boxes with each click on the icon.
 Align top or
  Align bottom moves the selected object towards the top or bottom edge stopping at the edges of each of the safety boxes with each click on the icon.
 Align center horizontally or
  Align center vertically centers the selected object on the vertical or horizontal center axis of the outermost box.