Context Menu
Right-click on any asset or item in the Project Bin to get a context menu with several and different options depending on the asset or item you used it on. The menu is also available via .
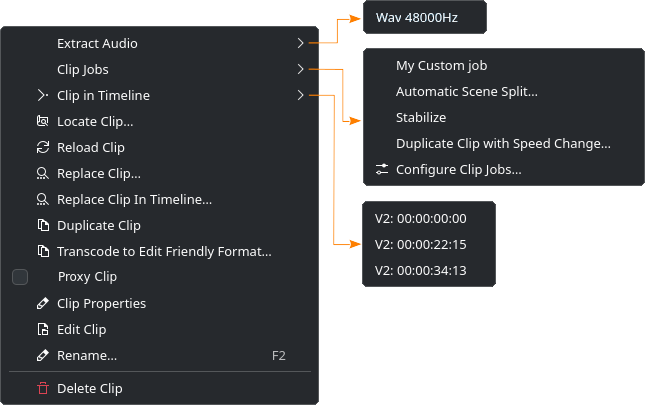
The context menu for bin items
- Extract Audio:
Extracts the audio stream of the clip and adds a
.wavfile with a sample rate of 48kHz to the project bin. Is only available if the clip is of typeaudioor a video file with an audio stream. For further details see the chapter Extract Audio.- Media Jobs:
Opens a flyout with additional options
My Custom Job runs the clip job My Custom Job
Automatic Scene Split runs a clip job that detects scene changes and creates individual clips for each detected scene. For further details see the chapter Automatic Scene Split.
Stabilize runs a stabilizer. See also the chapter Stabilize.
Duplicate Clip with Speed Change creates a copy of the selected clip and applies a speed change you can specify in a dialog window. For further details see the chapter Duplicate Clip with Speed Change.
 Configure Clip Jobs opens a window to manage clip jobs. See also the chapter Configure Clip Jobs
 Clip in Timeline:
Opens a flyout with a list of all the instances of the selected clip in the timeline. For example V2: 00:00:22:15 indicates that this clip is in video track V2 at position (timecode) 00:00:22:15 (format is hh:mm:ss:ff)
 Locate Clip:
Opens the folder in your file system where the selected clip is located in your OS default file manager. See also the chapter Locate Clip.
 Reload Clip:
Reloads the selected clip from the file system. See also the chapter Reload Clip.
 Replace Clip:
Opens your OS file manager. Select the file you want to replace the selected clip with. See also the chapter Replace Clip.
- Replace Clip in Timeline:
You need to select two clips in the bin for this action. The clip you right-clicked on will be replace by the other. See also the chapter Replace Clip.
 Duplicate Clip:
Creates a copy of the selected clip. See also the chapter Duplicate Clip.
- Transcode to Edit Friendly Format:
Opens a window with the selected clips where you can select the format to transcode the clips to. See also the chapter Transcode to Edit Friendly Format.
- Proxy Clip:
If checked indicates that the selected clip is a proxy clip* Proxy Clip. If the option is greyed out, proxy clips are not enabled for the project. Go to the Proxy Settings tab in the Project Settings () and enable proxy clips.
 Clip Properties:
Opens the widget for the Clip Properties. For more details refer to the chapter Clip Properties.
 Edit Clip:
Opens the application associated with the type of the selected clip. See also the chapter Edit Clip.
- Rename (default keyboard shortcut F2):
Opens the clip name field in the bin for editing. This does not change the filename in the file system.
 Delete Clip:
Deletes the selected clips. If the clips are being used in the timeline or in sequences, a warning windows is opened where you need to confirm that the clips’ instances in the timeline will also be deleted. See also the chapter Delete Clip.