標題素材
標題素材是內含標題的素材,通常是文字。不過它也有更多功能。
Besides text elements, Title Clips can contain rectangles, circles, and images. This is useful for creating complex titles, chevrons, lower thirds, call-outs, or other graphical elements to enhance your project. You can create template titles with limited wildcard/placeholder functionality to be used for other titles in the same project, and create patterns from selected texts and shapes that can be applied across different title clips.
A built-in animation function can be used to create scrolling text, for example for closing credits.
您也可以將任何標題儲存成標題樣板,來在其他專案中使用;它們會出現在標題編輯器的 樣板 下拉式清單當中。標題樣板也可以從 KDE Store 取得,可以直接從標題素材應用程式取得。
Title clips behave like any other video or image clips in the timeline, and you can apply any effect to them. In particular keyframes, motion tracking, and transform allow for simple yet interesting animations.
Title clips by default have an alpha channel which makes compositing rather easy. Simply put a title clip on a track above a video or image, and texts and shapes of the title clip will overlay the clips on the tracks below. Of course, you can also use a composition to create other effects.
標題素材應用程式
You create and edit title clips in the Titler App. When you select Add Title Clip or double-click an existing title clip in the Project Bin or the Timeline, or right-click a title clip in the Project Bin and select Edit, the Titler App is opened in a separate window.
You can size the window as usual but not maximize or minimize it. The focus stays on this window, and you cannot work, for example, on the timeline, or do other things with Kdenlive until you close that window.
The window’s layout consists of several areas:
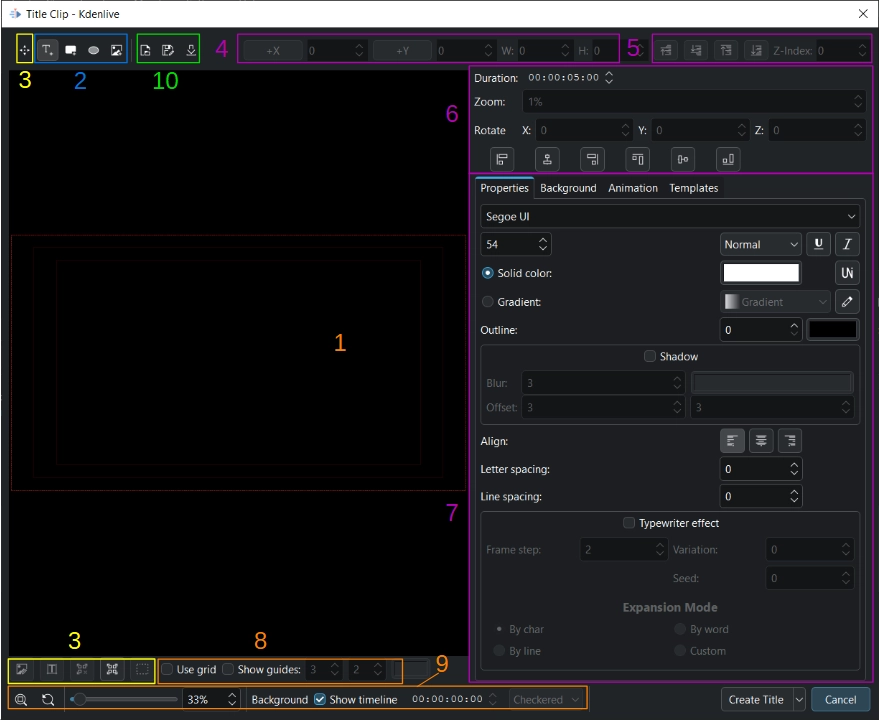
The main workspace (1)
Toolbars for adding objects (2), selecting objects (3), sizing and aligning objects (4)/(5)/(6), managing the workspace (8)/(9), and file operations (10)
Properties of the objects (7). You can adjust the width of the properties pane by dragging the line between the properties pane and the workspace left and right.
The workspace shows three boxes marked in red indicating safe zones[1]. The outermost box (bright red) shows the project dimensions. Any object outside that area will be shown only partially or not at all. The next smaller box (dark red) shows an area considered safe for action. The smallest box (dark red) shows an area considered the focus of the viewport and therefore safe for titles.
Create a Title Clip
You create a title clip using one of the following options:
In the Project Bin, click on

 Add Clip or Folder and select Add Title Clip
Right-click on empty space in the Project Bin and select Add Title Clip
Right-click an existing title clip, select Duplicate clip, and then double-click the newly created title clip (you may want to rename it first, though)
Kdenlive opens the title editor with a blank workspace (canvas). From here you can start adding objects, open a saved title, or use a title template.
Once you are done adding objects like texts, images, and shapes, click on Create Title. Kdenlive closes the window and adds a new title clip to the Project Bin. The name of the title clip is taken from the content of the text field that was created first. If needed, you can change the name of the title clip by double-clicking the name of the title clip in the Project Bin.
You can also save a title as a Title Template for use in other projects. A template is available from the Template drop-down list (see (10) in the layout description). Click on  Save as or press Ctrl+S, and specify the target folder and name for the title. Make sure that the title is saved in the
 .kdenlivetitle format for Kdenlive to recognize it properly. For a title to be used as a template, it must be saved to this folder in your filesystem:
- Linux appimage:
~/.local/share/kdenlive/titles- Linux Flatpak:
~/.var/app/org.kde.kdenlive/data/kdenlive/titles- Windows:
%AppData%/kdenlive/titles(press Win+R and copy %AppData%/kdenlive/)
Edit a Title Clip
You edit a title clip using one of the following options:
Double click the title clip in the Project Bin or in the Timeline
Right-click the title clip in the project bin and select Edit Clip
Once you are done editing the title clip, click on Update Title. Kdenlive closes the window and updates the title clip in the project bin and all occurrences of that title clip in the timeline. Your changes are available immediately.
Add Objects to a Title Clip
Click on
 , or use the keyboard shortcut Alt+T, then click in the main workspace to create a new text field
Click on
 , or use the keyboard shortcut Alt+R, then drag the mouse across the main workspace to create a rectangle
Click on
 , or use the keyboard shortcut Alt+E, then drag the mouse across the main workspace to create an ellipse
Click on
 , or use the keyboard shortcut Alt+I, to bring up the Open File dialog window where you can choose an image file to be inserted into the title clip
When the title editor window is opened the default item to be created is Text, so you can immediately start creating a text field.
A special way to add objects is to use patterns.
The objects are placed on top of each other following the sequence in which they were created. If you need to bring an object/item forward that was created in the early stages, use the Z-Index field or click on the respective icon ( ,
,  ,
,  ,
,  ) in the stack toolbar. Likewise, you can also send an object/item backwards.
Select Objects
Click on  Select/Move or use the keyboard shortcut Alt+S to be able to select the different objects.
Click on  Select All or press Ctrl+A, drag a selection frame around objects, or hold Shift and select individual objects, for example to save them as a pattern.
If you want to select all Text objects, first select all objects, then click on  Keep only text items selected or press Ctrl+T.
The same logic can be applied for image objects ( Keep only image items selected or Ctrl+I), and rectangle objects (
 Keep only rectangle items selected or Ctrl+R).
Click on  Deselect or press Ctrl+Shift+A to deselect all objects.
Adjust and Move Objects
Switch to Select mode first by clicking on the Select/Move icon or use Alt+S.
For rectangles and ellipses, you can use the mouse to change the size of the shape by dragging the edges (you cannot drag the corners, though). Alternatively, you can use the W (width) and H (height) parameter values in the toolbar.
The size of a text field is determined by the font size and weight.
Move an item around by dragging it with the mouse, or by changing the X and Y coordinate values in the toolbar.
You can restrict movement horizontally and vertically by holding Shift (only vertical movement is possible) or Shift+Alt (only horizontal movement possible).
Rotation of an object can be done by entering the desired angle of rotation directly in the Rotate X, Y, and Z parameters. Note that the rotation will always be around the top left corner of the selected object. For certain rotation effects (see the Star Wars opening scrolling title) you need to apply effects to the title clip in the timeline (for example Corners, 切變, Transform, or 3-way Rotate).
The Zoom parameter is an easy way to change the size of an object without having to change the W and H parameters.
Alignment to the project dimensions is possible using the icons in the toolbar:
 Align left or
  Align right moves the selected object towards the left or right edge stopping at the edges of each of the safety boxes with each click on the icon.
 Align top or
  Align bottom moves the selected object towards the top or bottom edge stopping at the edges of each of the safety boxes with each click on the icon.
 Align center horizontally or
  Align center vertically centers the selected object on the vertical or horizontal center axis of the outermost box.