Project Defaults
Kdenlive uses these settings for creating a new project (see Menu > File > New, or when Kdenlive starts and the option for opening the last project is not checked). To change the parameters for a currently open project, use the Project Settings. Please note that while changing parameter for the open project is possible, it is not recommended as it may break things like keyframes and cuts.

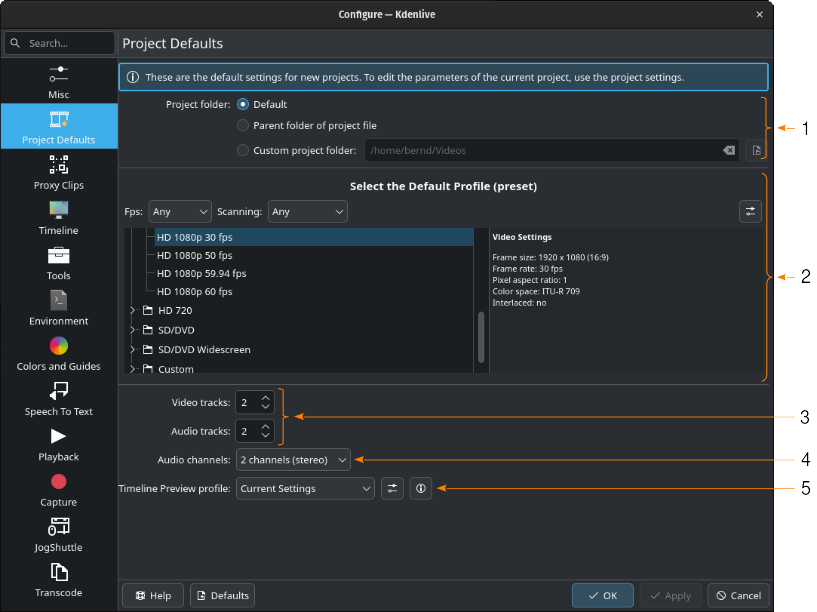
The Project Defaults section
- 1:
Project Folder. This is an important setting for keeping your projects organized and your file system shipshape. Kdenlive creates the following folders for each project:
audiothumbs,sequences,videothumbs, andworkfiles. See also Configuration Information.- 1a:
If set to Default, Kdenlive will create these folders in a special folder in the installation path. For Linux this is
/home/<username>/.var/app/org.kde.kdenlive/cache/kdenlive/<projectID>/. For Windows this is%APPDATA\Local\kdenlive\cache.- 1b:
Parent folder of project file. If this is selected, Kdenlive will create the folders for the project in the parent folder of the project file. For example, if your project file is in
/home/my/projects/project_1/, Kdenlive will create project related files in../project_1/:/home/my/projects/project_1/audiothumbs/,/home/my/projects/project_1/sequences/, etc.- 1c:
Custom project folder: You can specify a folder to use for these project folders.
- 2:
Select the Default Profile (preset). In this section you define which of the profiles to be used when creating a new project. Use the filters for Fps and Scanning (the old fashioned reference to interlaced or progressive). You can create a new profile from here by clicking on
Manage project profiles icon. For details about how to do that, please see Project Profiles / Preset.
- 3:
Video/Audio Tracks. Determines the number of video and tracks a new project has. You can add and delete tracks later at any time.
- 4:
Audio channels. Determines how many channels each audio track supports. Options are 2 channels (stereo) (default), 4 channels, and 6 channels.
- 5:
Timeline Preview profile. Select which encoding profile to use for the Preview Render function. The available options depend on your HW and installed codecs. You can manage the profiles by clicking on the
Show profile parameters icon. To see the profile parameters in the text window below the profile selection field, click on the
icon.
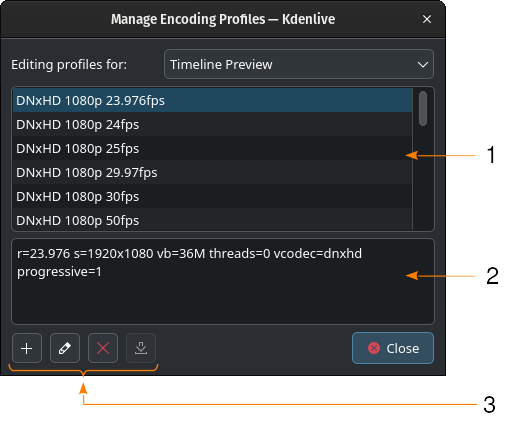
Encoding Profiles

Timeline Preview profiles
- 1:
List of available profiles
- 2:
The parameters used in the selected profile
- 3:
Click on
to create a new profile based on the selected one,
to edit the selected profile,
to delete the selected profile.
does not have a function yet.