Rendering
The rendering dialog is brought up by selecting  Render… from the , or by the Ctrl+Enter default keyboard shortcut.
Rendering Dialog
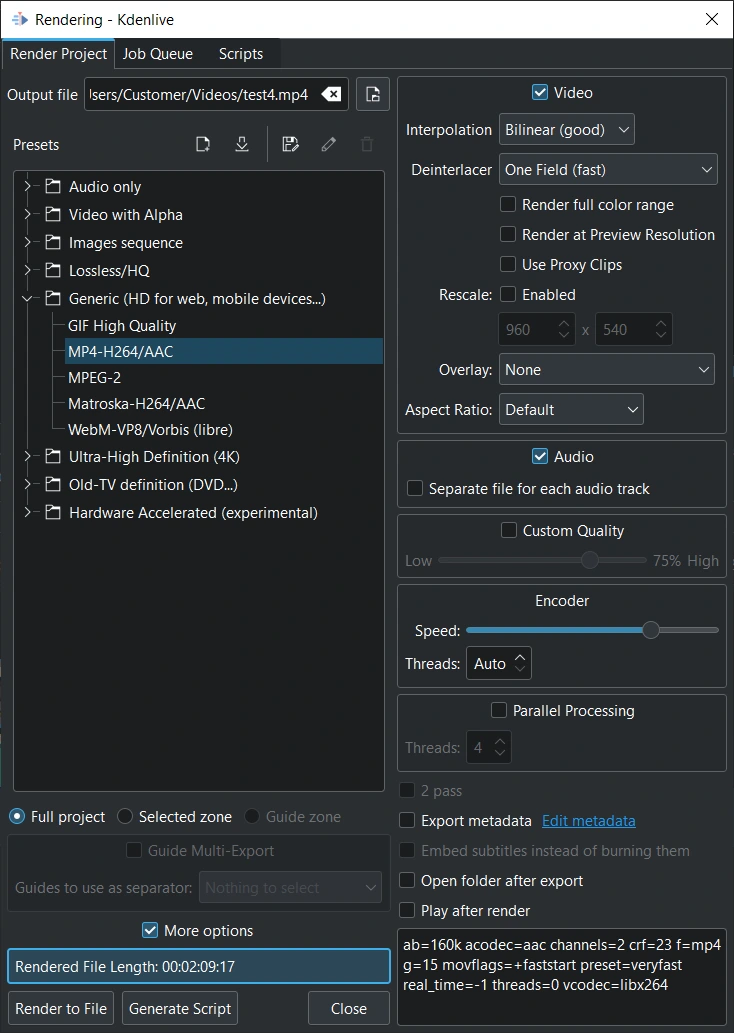
Rendering dialog window
Output file - Enter the location in your file system where the video file will be stored
 Create new preset - Opens the dialog to create a new preset based on the selected preset.
 Download New Render Presets - Opens a window displaying user-created presets available from the KDE Store for download
 Save Current Preset as New Custom Preset - Copies the selected preset and opens the dialog to modify this preset (will be saved under a new name)
 Edit Preset- Opens the dialog to modify the preset (only available for custom or downloaded presets)
 - Delete preset (only for custom or downloaded presets)
Rendering dialog window
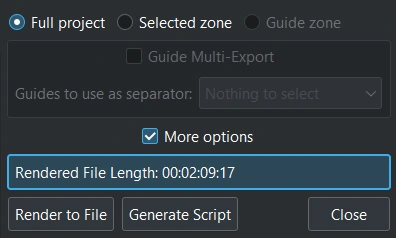
Full project - Render the entire project (default)
Selected zone - Render only the defined timeline zone
Marker Zone - Render only the zone defined by two selected timeline marker
Markers Multi-Export - Render individual files for the zones defined by the timeline marker
More Options - Folds out the dialog window to display more (advanced) options
Rendered File Length - The length of the actual project selection when rendered
Render to File - Click to start the rendering and file creation
Generate Script - Click to just generate a script for later (batch) processing
Rendering Preset Categories
Kdenlive offers many different rendering presets to choose from. They are grouped into categories.
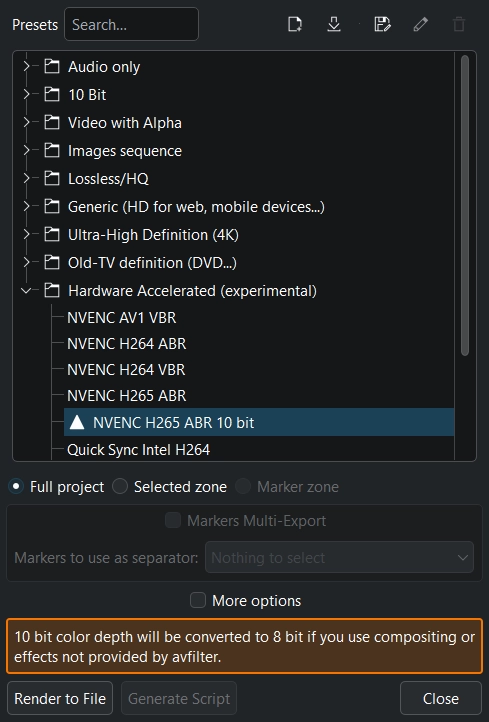
Kdenlive Rendering Presets/Profiles
Audio only - AC3, ALAC, FLAC, MP3, OGG, WAV
10 Bit [3] - AV1, DNxHR-HQ, ProRes 422, ProRes 444, ProRes HQ, SVT-AV1, x261-high10, x265-main10
Video with Alpha - Alpha MOV, Alpha VP8, Alpha VP9, Ut Video
Images sequence - BMP, DPX, GIF, JPEG, PNG, PPM, TGA, TIFF, webp
Lossless/HQ - FFV1 (ffva+flac), H.264 (libx264+aac), HuffYUV (huffyuv+flac), Ut Video (utvideo+pcm_s24le)
Generic (HD for web, mobile devices …) - GIF High Quality, MP4-H264/AAC, MPEG-2, WebM-VP8/Vorbis (libre)
Ultra-High Definition (4K) - MP4-H265 (HEVC), WebM-AV1/Opus (libre), WebM-VP9/Opus (libre)
Old-TV definition (DVD…) - MPEG4-ASP/MP3 (DivX compatible), VOB (DVD), Windows Media Player
Hardware Accelerated (experimental) - NVENC AV1 VR, NVENC H264 ABR, NVENC H264 VBR, NVENC H265 ABR, NVENC H265 ABR 10 bit [3], VAAPI AMD H264, VAAPI Intel H264, VideoToolbox H264 ABR, VideoToolbox H265 ABR
Click on to download more presets created by Kdenlive users. For more details about creating your own presets refer to the Project Profiles section of the documentation.
See also the Render Profile Parameter section for more details about the various settings in the presets.
Full Project
Full Project radio button is the default setting. Kdenlive renders from the start of the first clip until the end of the last clip in the timeline.
Selected Zone
Selected Zone radio button selected, Kdenlive will only render that portion of the project which has a selected zone created for it. See Monitors.
Marker Zone
Marker zone radio button makes use of Timeline Markers to define a region of the project that is to be rendered. For more details refer to the Rendering Using Timeline Markers section of the documentation.
Markers Multi-Export
Markers Multi-Export radio button makes use of Timeline Markers categories to be rendered. For more details refer to the Using Markers for Multi-Export section of the documentation.
More Options
Video
Check this box to get a video track in the rendered file.
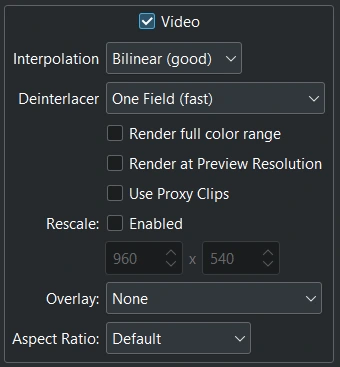
Rendering options for video
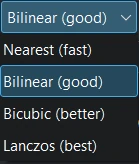
Interpolation
Interpolation - Allow setting the default interpolation method for scaling operations on rendering
Nearest-neighbour interpolation: Sharp but highly aliasing.
Bilinear interpolation: Fast and low quality. Reduces contrast.
Bicubic interpolation: Slower then Bilinear but better results.
Lanzcos interpolation: Provides the best result for scaling
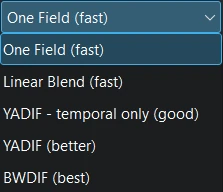
Deinterlacer
Deinterlacer - Allow setting different deinterlacing algorithm method for interlaced footage on rendering
One-Field: Render only one field so the rendered result is half in size.
Linear blend: Render each half-picture like a full picture with linear interpolation: instead of rendering each line twice, line 2 is created as the average of line 1 and 3, etc.
YADIF - temporal only: Mode of checking fields. Skips spatial interlacing check.
YADIF: (Yet Another DeInterlacing Filter) It check pixels of previous, current and next frames to re-create the missed field by some local adaptive method (edge-directed interpolation) and uses spatial check to prevent most artifacts.
BWDIF: (Bob Weaver Deinterlacing Filter): motion adaptive deinterlacing based on yadif with the use of w3fdif and cubic interpolation algorithms.
Render full color range - Check this box if you need 10-bit color instead of 8-bit color. Please note that this does not work with effects (yet).
Render at Preview Resolution - Check this box if you want to use the same resolution as set in the Project Monitor. Useful for quick renderings to check or verify things.
Use Proxy Clips - Check this box if you want the use the proxy clips for rendering. Useful for quick renderings to check or verify things.
Rescale - Select this if you want the rendered video to have a different resolution than what is set in the Project Settings. Useful for quick renderings to check or verify things.
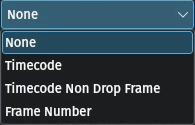
Render overlay
Render Overlay - This option overlays a time code or frame count over the rendered video. The overlay will be over the entire rendered project. Alternatively you can use the Dynamic Text effect to overlay selected regions of the video.
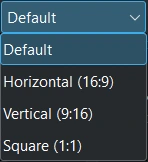
Aspect Ratio
Aspect Ratio - With this option you can choose your desired aspect ratio for the rendered video. It passes the selection to the rendering profile by cropping the video in the timeline to the desired aspect ratio.
Audio
Check this box to have audio tracks in the rendered file.

Rendering options for audio
Separate file for each audio track - By default, Kdenlive creates a stereo audio track. Use this option if you want multiple audio tracks (for example for different languages or commentary) that can be selected in the player software. Use a third-party software to put the video and audio files together.
Custom Quality

Rendering options for custom quality
Check this box if you want to manually adjust the quality settings for the rendering process. Use the slider to dial in the quality settings. This has an influence on file size and rendering time.
Encoder
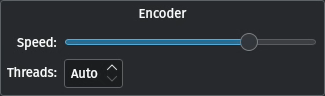
Rendering options for encoder usage
Use the slider to change the speed setting from ‘very slow’ to ‘ultra fast’.
If you have a CPU capable of multi-threading you can select the number of Encoding threads to be passed to melt[1]. For encoding with certain codecs (MPEG-2, MPEG-4, H.264, and VP8) Kdenlive can use more than one thread and thus make use of multiple cores. Increase this number to take advantage of this feature on multi-core machines.
Parallel Processing
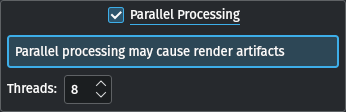
Rendering options for parallel processing
Switch this on to further reduce rendering time. Once enabled you can select the number of threads to use. A good number is 50% of what your CPU’s number of possible threads is (e.g. 8 threads for a 16-thread CPU).
Warning
Parallel Processing is still (version 23.04.1) somewhat experimental and may result in rendering artifacts, crashes during render or other unwanted effects.
Other Options
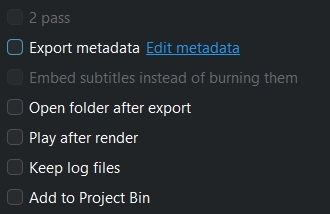
Other rendering options
2 pass - Two pass rendering allows better control over the final rendered file size. Compatible with variable bit rate, and only relevant for some video codecs.
Export metadata - Check this box to have the metadata entered in the Project Settings placed into the metadata of the rendered file.
Embed subtitles instead of burning them in - Creates a stream for subtitles in the container (container needs to support that, for example MKV)
Open folder after export - Opens the folder where the file was saved in the default file manager application
Play after render - Opens the default media player application and plays the rendered file
Keep log files - When enabled, add link to quickly open the .mlt playlist file used for rendering
Add to Project Bin - It automatically adds the resulting file to the Project Bin when successfully rendered. In some workflows, it is useful to render a part of a project and add it to the Project Bin for reuse or for adding effects.
Metadata example
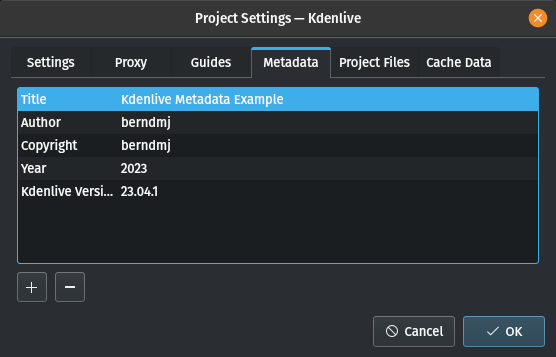
Metadata for the project
In this example, metadata was entered in the Project Settings dialog.
You can edit this by clicking on the Edit metadata link in the rendering dialog (More options must be checked). For this example a new field Kdenlive Version was added (using +) and a value of 23.04.1 entered.
You can check the metadata in the rendered video by entering this in a terminal window:
$ ffprobe <your_video>
Rendering in Batch Mode
If you have a lot of rendering jobs to do, you can use Kdenlive to create rendering scripts which you can accumulate and then execute in batch mode overnight. Kdenlive stores the scripts in the folder specified in Default folders.
Alternatively, once you have submitted a rendering job on a project and it is up and running in the Job Queue, you can drag the render window out of the way or even close it, and continue editing the project, or load a new project and render that one, too. Any subsequent render jobs will go into the Job Queue. Editing the project after a render job has been submitted will not change the settings on that job.
Rendering Using Timeline Markers
Timeline marker can help organize your project while you work on it and when you share it with the world. You can use timeline markers to keep track of areas or to generate rendering scripts that will do the mundane task for you. This feature makes exporting sections of your project quite easy.
For more details about markers, how to add and manage them, refer to the Timeline marker section of the documentation.
Using Marker Zones
Using marker zones to render a section
With this option you define the start and end point for the render by selecting specific timeline markers.
Generating Rendering Scripts
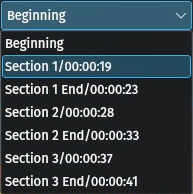
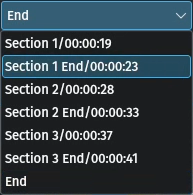
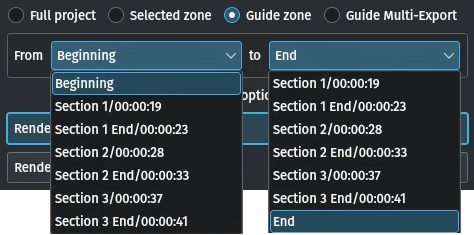
Choose which timeline markers will establish the regions of the video you want to export using the pull down menus next to From and to. In this example Section 1 to Section 1 End will be used to define the section to be rendered.
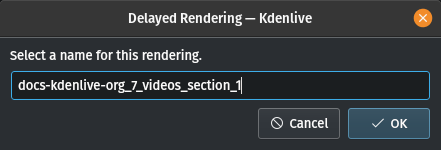
Now you can render this to a file or generate a script that will render this timeline marker zone to a file. Click Generate Script and a dialog appears asking you to name the script. Kdenlive stores the clips in the folder specified in Default Folders.
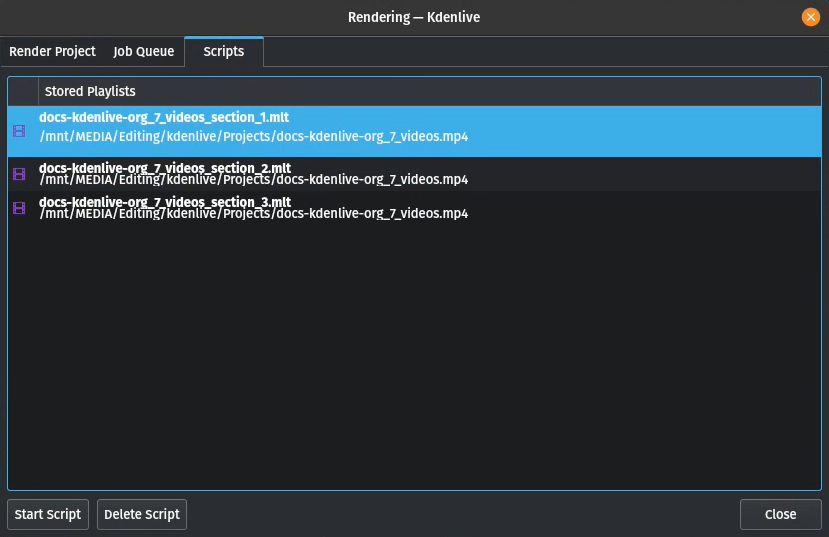
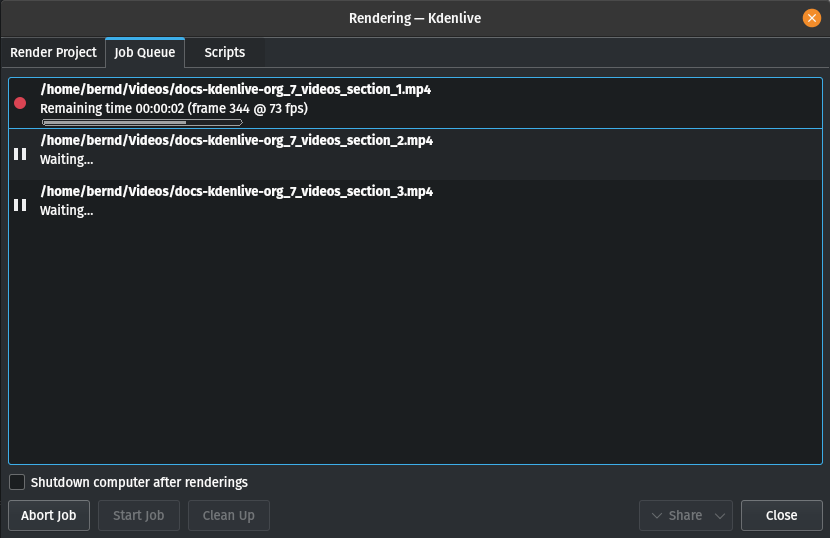
After saving the script, the top tab in the window switches to Scripts. This lists all the scripts you have generated, including scripts from other projects.
In this example three scripts were created based on the timeline markers in the timeline. Be sure and keep the .mlt extension otherwise the rendering script will not be generated.
Starting Your Rendering Scripts
Each script needs to be started individually by selecting the script and clicking the Start Script button.
After clicking each script, Kdenlive switches to the Job Queue tab. Here you will see what script is being run and how many more are waiting to be run. If you have a large queue and you want to run the rendering after hours, you can take advantage of the nifty checkbox in the bottom left: Shutdown computer after renderings
Starting Your Rendering Scripts in a Command Line Terminal
For troubleshooting purposes there could be times that you want to run the render script from the terminal prompt. Rendering in the terminal can produce error logging information that can assist in debugging rendering issues.
To render the video in the terminal …
Note the location where Kdenlive has saved the script
Open a terminal and change directories to the location of the
.mltscriptRun melt with the
.mltscript
$ cd /path/to/kdenlive/scripts

$ melt your_script.mlt
Using Markers for Multi-Export
With this option you use timeline markers to divide the timeline in pieces that will be rendered as individual files on one go. You do not need to define each section or piece individually.
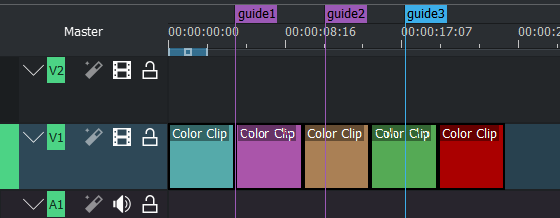
Defined timeline markers to be used for multi-export
The selection of timeline marker categories indicates which timeline markers will be considered for rendering.
In this example, there are the following options:
“All Categories”: This leads to four files:
projectname-begin.mp4 (from 00:00:00 to “guide1”)
projectname-Marker1.mp4 (from “guide1” to “guide2”)
projectname-Marker2.mp4 (from “guide2” to “guide3”)
projectname-Marker3.mp4 (from “guide3” to the end)
“Category 0 (purple)”: This leads to three files:
projectname-begin.mp4 (from 00:00:00 to “guide1”)
projectname-Marker1.mp4 (from “guide1” to “guide2”)
projectname-Marker2.mp4 (from “guide2” to the end)
“Category 1 (blue)”: This leads to two files:
projectname-begin.mp4 (from 00:00:00 to “guide3”)
projectname-Marker3.mp4 (from “guide3” to the end)
Note
If timeline markers are behind the last timeline clip, they are ignored.
If a timeline marker sits right at the beginning of the timeline, the name of that timeline marker is used instead of “begin”.
If two timeline markers have the same name, an underscore and a number will be added to the file name.
Note
As of this writing, the appimage of version 23.04.1 is having issues with the scripts generated with this function. Only one of the scripts is executed successfully but the other scripts remain in status ‘Waiting…’. Unfortunately, a manual start of the scripts is not possible either.
Sharing your Videos
If you want to share your work right after you finished rendering you can click on Share and select one of the options.
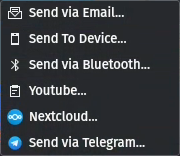
Send via Email - Opens your default email application with the video file as an attachment in a new email window
Send to Device
Send via Bluetooth
YouTube[2] - Opens a dialog window to enter your account, tags and a comment. You can upload directly from there.
Nextcloud[2] - Opens a dialog window to select your account and enter the folder to upload to. You can upload directly from there.
Send via Telegram - Opens the Telegram desktop app
Notes