Timeline Menu
The Timeline Menu functions affect the clip or clips selected in the timeline, and perform actions with relation to the timeline.
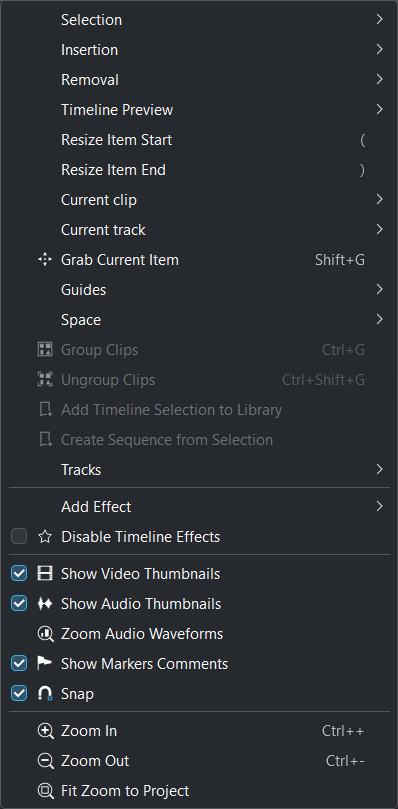
Kdenlive Timeline Menu
Selection Menu
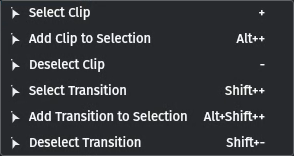
Timeline Selection Menu
The purpose of this sub-menu is to allow you to select multiple clips or compositions on the timeline for the purpose of performing operations on all of them simultaneously. However, it should be said up front that making selections this way is not very practical. That is because, in order to select a clip or transition using this menu, you must first position the playhead on it. A much quicker and easier way is to press Shift+RMB[1] on each clip you want to add to the selection. The clips do not have to be adjacent to each other to be selected using this method. If the clips you want to select are all adjacent to each other, you can press Shift+LMB[2] and hold and then drag your mouse across all the clips. A selection box (“lasso”) will appear and every clip and/or composition it touches or encompasses will be selected once you let go of the mouse.
The following illustrations show how clips can be selected and a simple move to another track is be performed.

Figure 1: Three selected clips in track V1
In Figure 1, three of the five clips on the timeline have been selected using the Shift+LMB[2] method. A selected clip has an orange outline and the highlight color of the filename text is red; not selected clips have a black outline and the filename highlight color is a semi-transparent grey.

Figure 2: Selected clip moved to track V2
Now that multiple clips have been selected, you can do things like moving (dragging), copying, pasting or deleting all of them at once. Or you can use the grouping function (; default keyboard shortcut is Ctrl+G) to group the clips together. After clips have been grouped a click on one of the grouped clips selects the entire group. Any clip function (e.g. delete, copy, extract) applies to the entire group. Figure 2 shows that the selected clips from Figure 1 have been moved to another track. This was done by grabbing any of the selected clips with the mouse and dragging them to track V2. Clicking anywhere outside of the selected clips will deselect all of them. Note however, that if you had used the Group Clips function on the selection the clips will still be grouped even though they are no longer selected.

Figure 3: Two selected compositions
Selecting multiple compositions works just like selecting clips. Click on the first one and then Shift+LMB[2] on as many others as you’d like to add to the selection. Figure 3 shows two Wipe compositions selected. These compositions can now be copied, moved (dragged), deleted, etc. just as with clips. Selected compositions have an orange outline and a bright purple semi-transparent background color.
Insertion Menu
With this menu you can insert a clip or clip zone into the Timeline or overwrite what is in the Timeline with the clip or clip zone. The default keyboard shortcuts are V for Insert, and B for Overwrite.
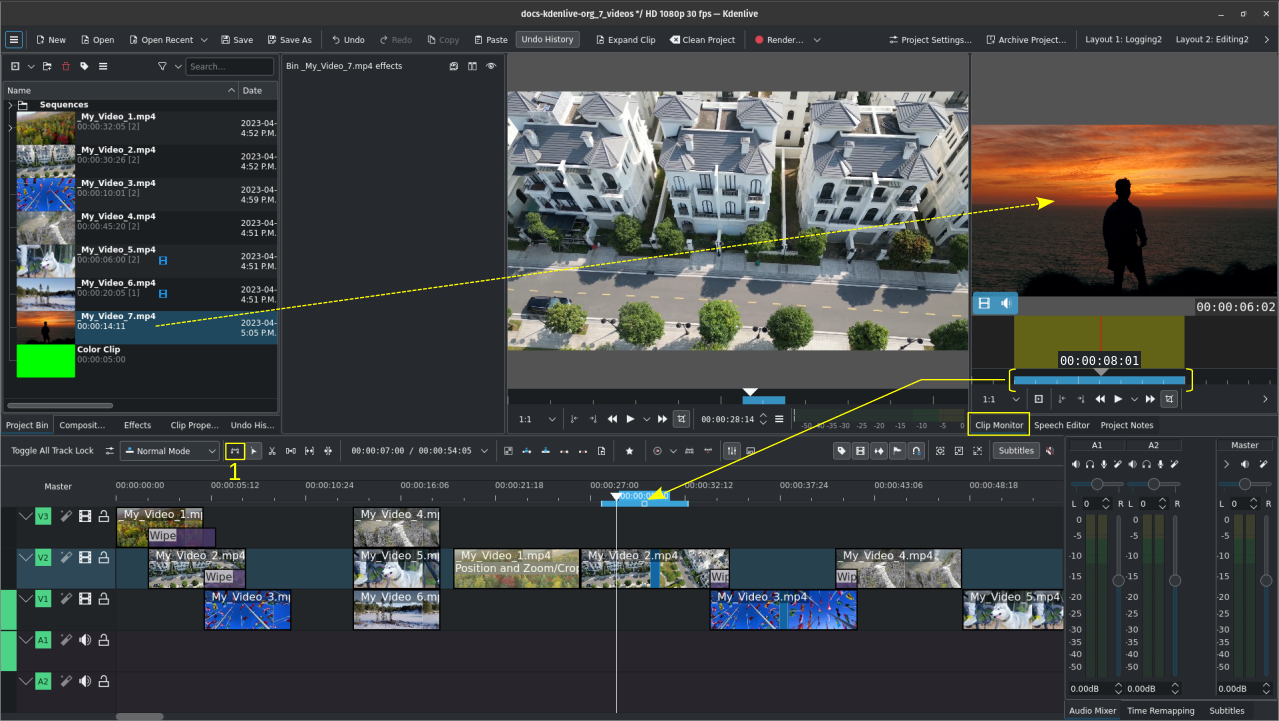
Since version 19.08 “3 point editing with keyboard shortcuts” is implemented. Source and target have to be activated for the clip to be inserted into the Timeline.
Say you have an eight second zone defined in a clip in the Clip Monitor. When you press V or select , it will insert the eight second segment of the clip from the Clip Monitor in the timeline.
Note
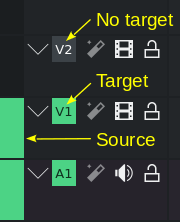
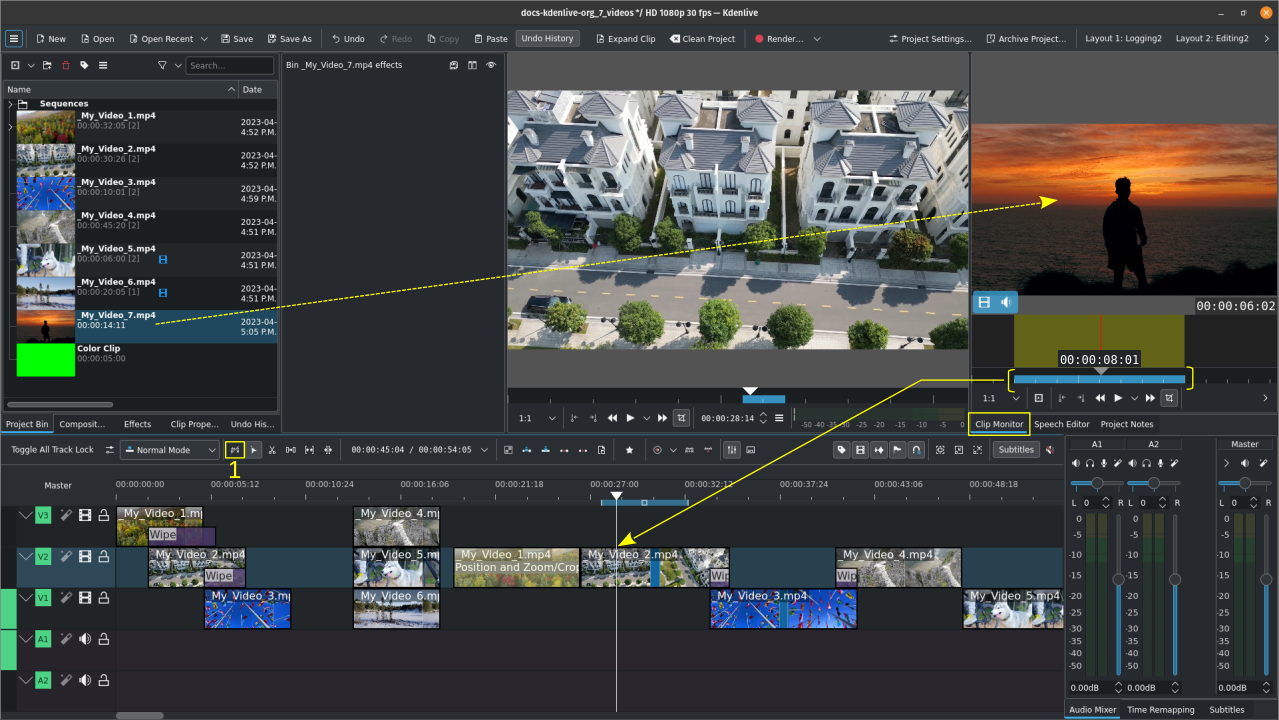
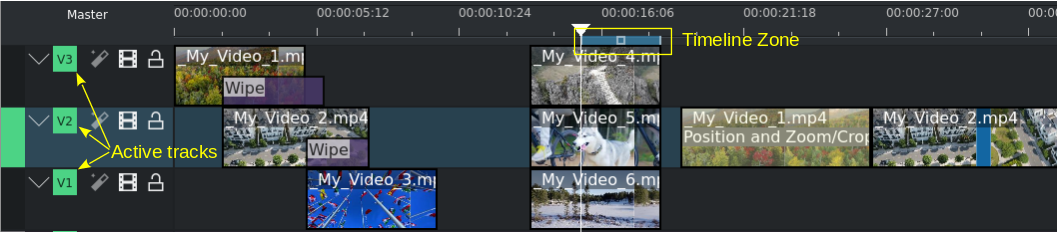
There is an important toggle switch in the Timeline toolbar that fundamentally changes the way the Insert Clip function works: Use Timeline Zone for Insert. If it is off (default) inserting a clip happens at the position of the playhead; if it is on inserting a clip happens at the Timeline Zone. See label “1” in the illustrations below.
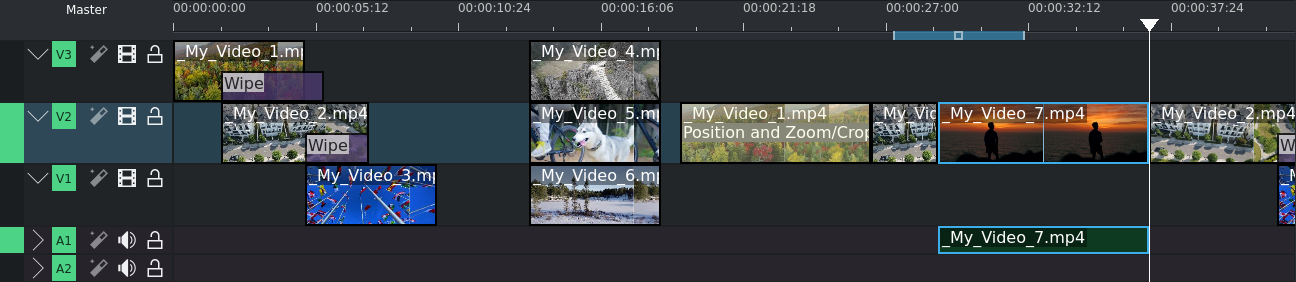
Insert clip zone from Clip Monitor to Timeline (not using the Timeline Zone)
The clip selected in the Project Bin (in this example My_Video_7.mp4) is displayed in the Clip Monitor. An eight second zone has been defined (see the blue bar between the yellow brackets). The playhead in the Timeline has been positioned where the clip zone is to be inserted. Note the setting of the Use Timeline Zone for Inserts switch (1).
Press V or select and the section in the clip is inserted in the timeline. Any clip already in the Timeline in the target track will be cut, the clip zone inserted and the cut clip pushed to the right to make room for the inserted clip.
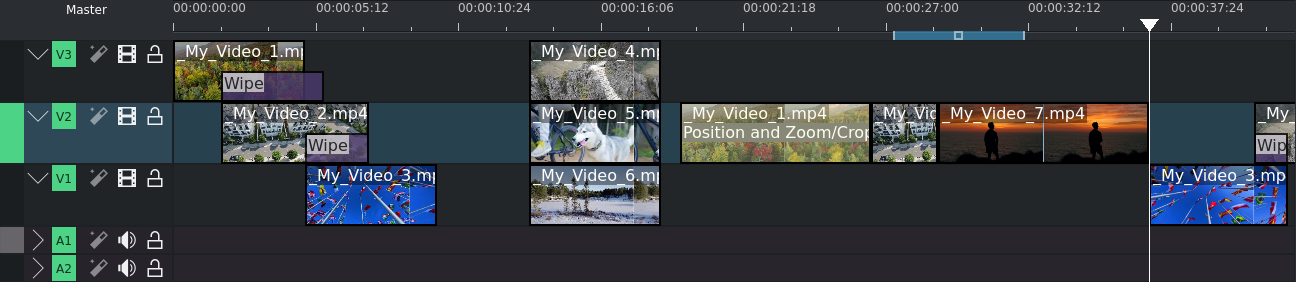
Insert clip zone from Clip Monitor to Timeline (insert mode)
Press B or select and the section in the clip is inserted in the timeline overwriting portions of the clip currently in the target track.
Insert clip zone from Clip Monitor to Timeline (overwrite mode)
Please note that in the example for the overwrite mode the target track has been changed to V2 only. This is only to demonstrate how target track settings affect the clip operation (in this case no audio stream was inserted because the necessary audio track was set to inactive).
Using the Timeline Zone for inserting the clip:
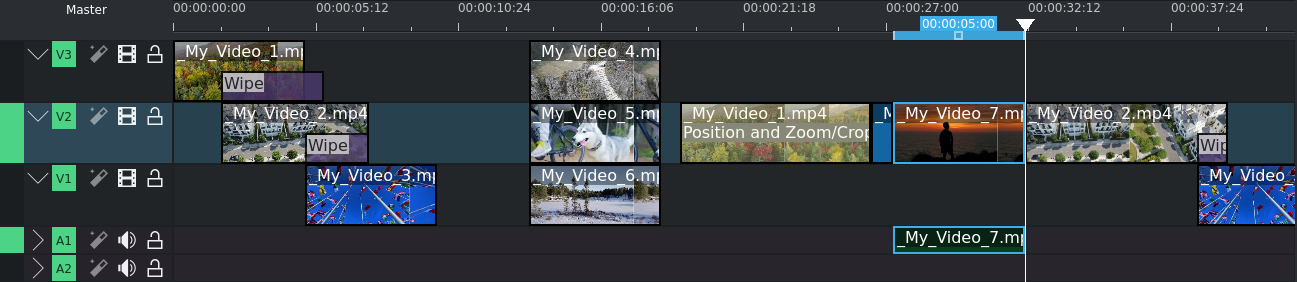
Insert clip zone from Clip Monitor to Timeline (using the Timeline Zone)
Press V or select and the section in the clip is inserted in the timeline starting where the Timeline Zone starts and only for the length of the Timeline Zone. Any clip already in the Timeline in the target track will be cut, the clip zone inserted and the cut clip pushed to the right to make room for the inserted clip.
Insert clip zone from Clip Monitor to Timeline (insert mode)
Press B or select and the section in the clip is inserted in the Timeline starting where the Timeline Zone starts and only for the length of Timeline Zone overwriting portions of the clip currently in the target track.
Insert clip zone from Clip Monitor to Timeline (overwrite mode)
Please note that in the example for the overwrite mode the target track has been changed to V2 only. This is only to demonstrate how target track settings affect the clip operation (in this case no audio stream was inserted because the necessary audio track was set to inactive).
Removal
This function extracts or lifts portions of the Timeline defined by the Timeline Zone. You set the Timeline Zone by defining the In-point and Out-point in the Timeline. Press I for the In-point, O for the Out-point. Alternatively, you can click on the Set Zone In and Set Zone Out icons in the Project Monitor toolbar.
Hint
You can also drag the Timeline Zone by grabbing the little square in the middle of the zone bar. This is useful if you want to use the zone with the same length in other places in your project.
Extract Timeline Zone means to delete that section in the Timeline and moving to the left all clips that are to the right to fill the gap; Lift Timeline Zone means to delete that section in the Timeline but leave a gap where the lifted section was.
Note
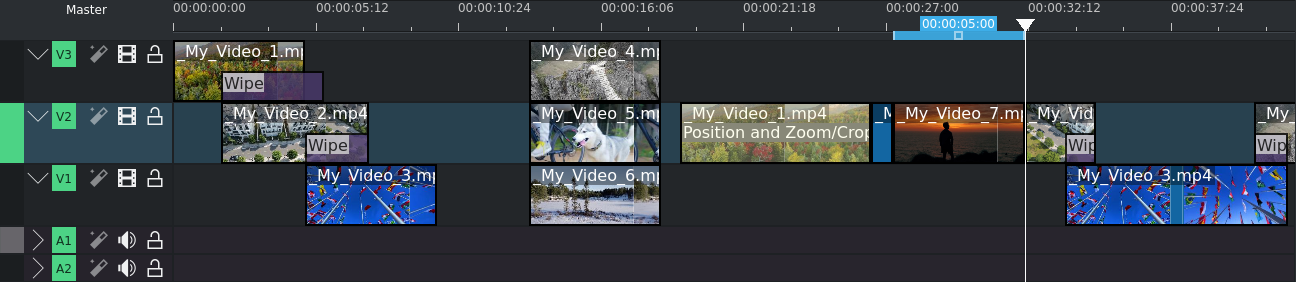
This function takes into account all active tracks. Make sure to make active only those tracks where you want the Timeline Zone to be extracted or lifted from.
Timeline Removal: Timeline Zone and active tracks
Pressing Shift+X or selecting will cut the clips where the Timeline Zone starts and ends, delete that portion and move all clips that are to the right in the Timeline left to close the gap.
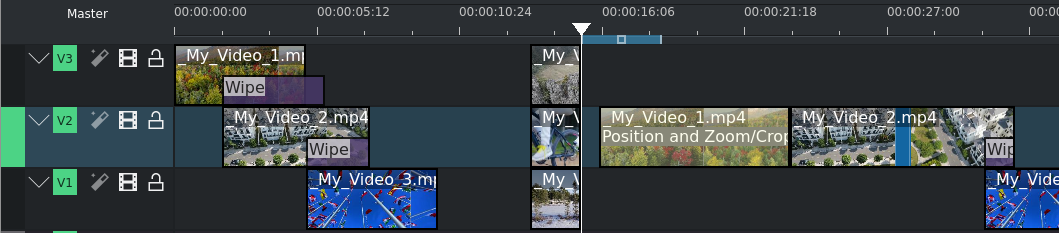
Timeline Zone extracted from the Timeline
Pressing Z or selecting will cut the clips where the Timeline Zone starts and ends, delete that portion but leave all clips that are to the right in the Timeline thus creating a gap.
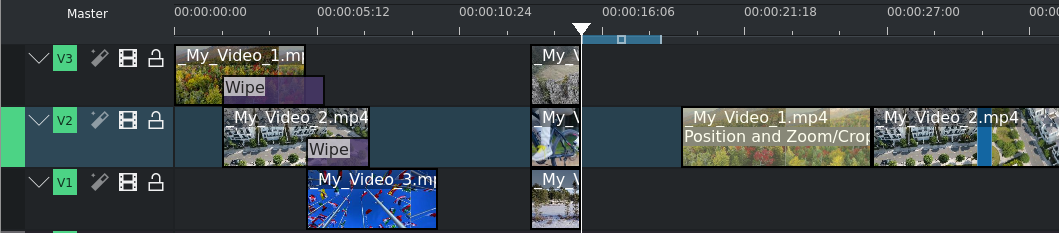
Timeline Zone lifted from the Timeline
If you want only one track to be affected by this function switch all the other tracks to inactive.
Timeline Zone extracted from the Timeline on only one track (V2)
Timeline Zone lifted from the Timeline on only one track (V2)
Timeline Preview
This menu item opens a flyout with options for preview rendering:
Start Preview Render: Starts the rendering process for all defined preview render zones where a change took place (e.g. cut, effect added, deleted or changed). Default shortcut Shift+Return
Stop Preview Render: Stops a running preview render process
Add Preview Zone: Adds the currently defined Timeline Zone as a preview render zone
Remove Preview Zone: Removes the currently defined Timeline Zone from the preview zones
Remove All Preview Zones: Removes all preview render zones. A preview render can only be started if at least one preview zone is defined.
Resize Item Start
This function (default keyboard shortcut: () trims the start of the clip in the current track to where the playhead is.
Resize Item End
This function (default keyboard shortcut: )) trims the end of the clip in the current track to where the playhead is.
Current clip
This menu item opens a flyout with actions for the currently selected clip(s) in the Timeline:
Cut Clip: Cuts the clip at the point where the playhead is in the Timeline. Default shortcut: Shift+R
Delete Selected Item: Deletes the selected items (e.g. clip, composition). Default shortcut: Del
Edit Duration: Opens a dialog window where the duration of the clip can be changed with frame-precision.
Mix Clips: Creates a same-track-transition between the selected clips. Only works if they are adjacent to each other and on the same track. Default shortcut: U
Change Speed: Opens a dialog window where the speed change can be entered in %.
Restore Audio: If the clip had been added to the Timeline without the audio stream, or the audio stream was deleted, this function brings the audio stream back. It also groups the video stream and audio stream clips. You need a corresponding audio track for this function to work.
Disable clip: Makes the clip invisible for playback or rendering purposes. The clip remains in the Timeline but will not be rendered. A disabled clip is greyed out in the Timeline.
Clip in Project Bin: Opens the Project Bin and highlights the clip.
Extract Clip: Removes the clip from the Timeline and removes the gap Shift+Del. If the track is set to inactive the clips to the right of the extracted clip will not be moved to fill the gap.
Save Clip Part to Bin: If the selected clip is part of a larger clip (e.g. a cut section) the selected clip part will be saved to the project bin as a new zone under the original clip.
Expand Clip: If the selected clip is a library clip it will be expanded to show all of its components. Make sure you have enough video and audio tracks to hold all of its components.
Current track
This menu item opens a flyout with the following functions for the current track:
Remove All Spaces After Cursor: This function will close any gaps between the clips to the right of the cursor.
Remove All Clips After Cursor: This function will remove all clips to the right of the cursor including the one the cursor is on.
Note
In this context ‘Cursor’ means the playhead in the Timeline.
Grab Current Item
This function will make the currently selected item available for moving around with the keyboard arrow keys. The grabbed item will have a thick orange outline. Default shortcut: Shift+G
Guides
This menu item will open a flyout with several actions for managing Guides. For more details about Guides and managing them refer to the Guides section of the documentation.
Add/Remove Guide: This will add or remove a Guide in the Timeline at the current position of the playhead. Default shortcut: G
Edit Guide: This will open a dialog window for the current Guide where you can change the position in the Timeline, the name and the category.
Search Guide: This will bring the focus to the Search field in the Guides widget.
Delete Guide: This will delete the Guide at the current playhead position.
Delete All Guides: This will delete all Guides from the timeline without any further warning. Use Undo or or Ctrl+Z to undo this action.
Export Guides: This will open a dialog window in which you can specify the export options for Guides. Use this function to create chapters for YouTube uploads.
Guides Locked: This will lock the Guides in the Timeline so that specific actions do not move the Guides.
Space
This menu item will open a flyout with actions for inserting or removing space in the Timeline.
Insert Space: This will open a dialog window where you can specify the duration of the space to be inserted and whether space is inserted in all tracks.
Insert Space
This function can be used when you want to push all the existing clips on the timeline aside to make room for new clips but also want to preserve the relationships among all the clips that were shifted, including their transitions.
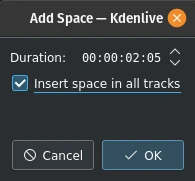
Figure 1: Insert space
In addition to invoking this menu from , you can also bring it up by right-clicking on an empty spot on a track in the timeline. There are a couple of important differences how Insert Space behaves, though, depending on which method you choose. Using brings up the Add Space dialog shown in Figure 1. Note that the default choice for Insert space in all tracks is un-checked.
In case you are wondering why the default Duration for the inserted space is 00:00:02:05 (hh:mm:ss:ff) which is not configurable in the Kdenlive or Project Settings. 00:00:02:05 for a project with 30 fps means 65 frames. This default value of 65 frames for inserting space is hard-coded in Kdenlive and will equate to different amounts of time depending on the frame rate set in your project profile. For example, in a project with a rate of 25 frames per second this works out to be 00:00:02:10 - 2 seconds and 10 frames.
Let’s look at an example, albeit an unrealistic one, of how inserting space from the playhead position will affect clips and compositions on different tracks. In general, inserting a space will shift any clips that the playhead is touching as well as all clips to the right of the playhead on the affected track(s). Compositions are a little trickier because they span two tracks. They are assumed to “belong” to the higher track (regardless of the direction of the composition) and so if the playhead is touching them they will go only if the higher track is included in the shift.

Figure 3: Timeline before inserting space. Compare this with the illustrations below.
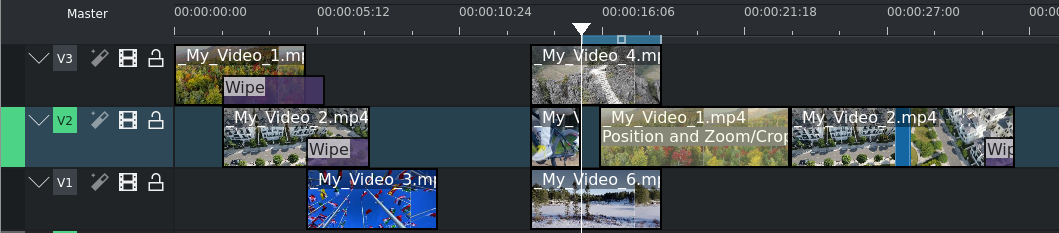
Figure 3 shows a scenario with clips on three video tracks before inserting a space. All of the following examples assume we are starting from this position.

Figure 4:
In Figure 4 we have chosen to Insert a space on all tracks. Since the playhead was touching both compositions and the clips on tracks V1 and V2, it shifted them along with all the clips to the right of the playhead. It did not shift the clip on track V3 because it was to the left of the playhead.

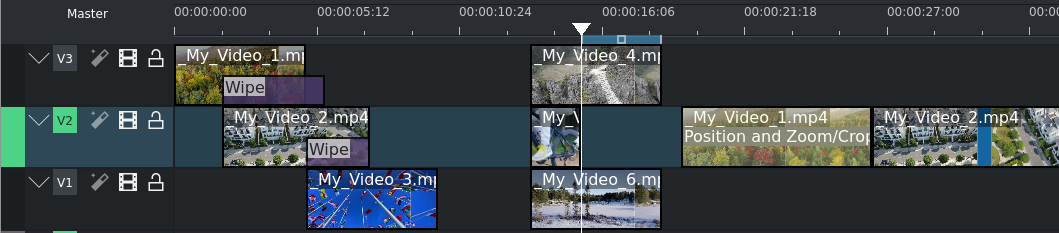
Figure 5
In Figure 5 we chose track V3. The composition went because it “belongs” to the clip on track V3, but the clip itself did not go because it was to the left of the playhead. The clip My_Video_4.mp4 on track V3 also went because it was to the right of the playhead.

Figure 6
In Figure 6 we shifted the clips on track V2. Now the Wipe composition between tracks V3 and V2 does not shift, even though the playhead was touching it, because it belongs to track V3. The other transition does go because it belongs to the higher track V2.

Figure 7
Finally, in Figure 7, we chose track V1 and just the clips move.
If we had started this process by right-clicking on a spot on track V1 or V3 which corresponds to the playhead position in the example the results would have been the same.
Remove Space / Remove Space in All Tracks
Remove Space is not the exact opposite of Insert Space.
The similarities are:
If you access Remove Space from , the playhead governs where the removal will happen. When using right-click in a track in the Timeline it happens at the mouse cursor.
Transitions will move with clips on the higher track
There are the following differences:
If you accessed Remove Space from , the playhead must be on an empty space in the track where the space is to be removed.
You cannot set the duration of the space to be removed – all the empty space between clips is removed. All the clips and transitions to the right of the playhead or mouse cursor will be shifted left until the first clip encounters another clip or the beginning of the track.
Group Clips
This groups the selected items (e.g. clips, compositions) in the Timeline. Default shortcut: Ctrl+G. Once grouped together a click on one of the grouped clips selects the entire group.
Ungroup Clips
This ungroups a group of items. Default shortcut: Ctrl+Shift+G. The group items are still selected after that. Click anywhere outside of the group to deselect the items.
Add Timeline Selection to Library
This function opens a dialog window to enter a name for the library item. Kdenlive will create a .mlt clip in the Library from where it can be added to any project. This is useful for intros, outros, logos, watermarks or any other asset that will be used in many projects.
Create Sequence from Selection
This creates a new sequence with the selected clips.
Tracks
This menu item opens a flyout with the following functions:
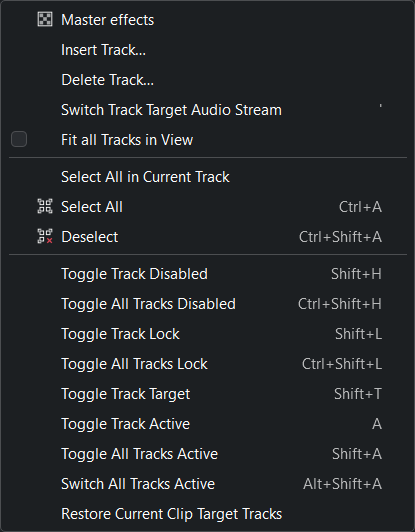
Timeline Menu Tracks
Master effects: Lets you quickly apply audio or video effects to all tracks. This can be useful if you want one or more effects to be applied throughout the video. Click the Master button above track headers to see the Master Effect Stack. For more details see the Master Effect section of the documentation.
Insert Track: Displays a dialog which lets you choose which type of track to insert and where (before or after a specified existing track)
Delete Track: Displays a dialog which lets you choose which track to delete
Switch Track Target Audio Stream
Fit all Tracks in View: When enabled, the tracks fits to the height of the timeline
Select All in Current Track: Selects all items in the current track
Select All: Selects all items in all tracks. Default shortcut: Ctrl+A
Deselect: Cancels the selection. Default shortcut: Ctrl+Shift+A
Toggle Track Disabled: Default shortcut: Shift+H
Toggle All Track Disabled: Default shortcut: Ctrl+Shift+H
Toggle Track Lock: Locks or unlocks the current track. A locked track cannot be edited and is marked with a red track number and the
 icon. Default shortcut: Shift+L
Toggle All Track Lock: Toggles the locked/unlocked status of all tracks. All locked tracks will be unlocked, all unlocked tracks will be locked. Default shortcut: Ctrl+Shift+L
Toggle Track Target: Default shortcut: Shift+T
Toggle Track Active: Makes the current track active or inactive. The track indicator is green when active, grey when inactive. Default shortcut: A
Toggle All Tracks Active: Toggles the active/inactive status of all tracks. All active tracks become inactive, all inactive tracks will become active. Default Shortcut: Shift+A
Switch All Tracks Active: Sets all track to active. Default shortcut: Alt+Shift+A
Restore Current Clip Target Tracks:
The sub-menu for inserting and deleting tracks can also be displayed by right-clicking anywhere in the track title.
Add Effect
This menu item will open a flyout with all the effect categories from which you can then select an effect to be added to the track effect stack. See also the Effects and Filters section of the documentation.
Disable Timeline Effects
Switches Timeline Effects on or off. Click on the Master button in the Timeline toolbar to see the master effect stack.
Show Video Thumbnails
Switches on or off the display of video thumbnails for the clips in the Timeline. Use the track right-click menu item Thumbnails to select which thumbnails will be displayed.
Show Audio Thumbnails
Switches on or off the display of the audio waveform in audio tracks.
Zoom Audio Waveforms
Toggles zooming audio waveforms from 1 (default) 2, 4, 8. It affects all displayed waveforms an all audio tracks.
Show Markers Comments
Switches on or off the display of the comment of Markers and Guides.
Snap
Switches on or off the snap function. With Snap turned on moving items along the Timeline will make them snap to other items including Markers and Guides even across different tracks. Default shortcut: Alt+M
Zoom In
Increases the zoom level of the Timeline. Default shortcut: Ctrl++, or Ctrl+MW[3] while the mouse is hovering anywhere over the Timeline.
Zoom Out
Decreases the zoom level of the Timeline. Default shortcut: Ctrl+-, or Ctrl+MW[3] while the mouse is hovering anywhere over the Timeline.
Fit Zoom to Project
Adjusts the zoom level of the Timeline to fit the entire project into the visible Timeline window.