Clip Menu
The functions in this menu affect the clip that is selected in the Timeline or in the Project Bin. Menu functions are available depending on whether a clip is selected in the Project Bin or in the Timeline.
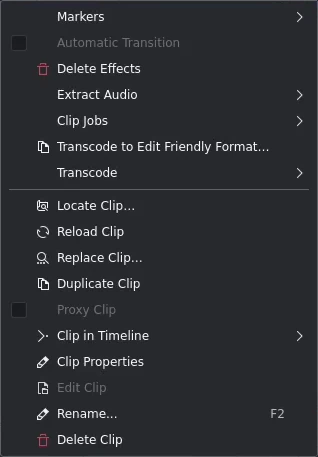
Clip Menu
Markers
The menu allows you to Add, Edit or Delete Markers or Guides. For more details see the section about Markers in this documentation.
Note
The Add Marker function behaves differently depending on whether a clip is selected in the Project Bin or in the Timeline and where the playhead is currently and whether the focus is on the Timeline or the Clip Monitor.
Add Marker
Adds a Marker to the clip at the current timepoint. Markers are properties of the clips in the Project Bin. So this action puts a marker in the clip in the Project Bin.
Note
In order for the Add Marker to work a clip must be selected in the Timeline. You can create multiple Markers in the Guides widget for the clip selected in the Project Bin independent of the Timeline.
Edit Marker…
For this to work the playhead needs to be right on top of a Marker. If it is not you get an error on the bottom left “No Marker found at Cursor time”. Use the Left and Right keys to move the playhead one frame at a time, or use them with ALT to jump to the next or previous edit point (for example cuts, clip edges, Markers and Guides).
As Markers are properties of the clips in the Project Bin, this action changes the Marker from the clip in the Project Bin and thus in any other instance of this clip in the Timeline.
Delete Marker
For this to work the playhead needs to be right on top of a Marker. If it is not you get an error on the bottom left “No Marker found at Cursor time”. Use the Left and Right keys to move the playhead one frame at a time, or use them with ALT to jump to the next or previous edit point (for example cuts, clip edges, Markers and Guides).
As Markers are properties of the clips in the Project Bin, this action removes the Marker from the clip in the Project Bin and thus from any other instance of this clip in the Timeline.
Delete All Markers
Deletes all Markers from the current clip.
As Markers are properties of the clips in the Project Bin, this action removes the Marker from the clip in the Project Bin and thus from any other instance of this clip in the Timeline.
Delete Effects
Deletes all effects from the selected clip.
Extract Audio
Only available if the selected clip is a video clip with an audio track. This function extracts the audio from the clip and adds it as a 48kHz wav file to the Project Bin. The process runs as a Clip Job in the Project Bin and may take some time. A small progress bar underneath the clip indicates the progress.
This function is also available via the right-click menu of the clip in the Project Bin.
Clip Jobs
Opens a flyout to select different options:
My Clip Job (this may look different in your environment)
This function is also available via the right-click menu of the clip in the Project Bin.
Select a clip which has running jobs, details of the jobs will appear in the clip monitor as overlay. Click on the X on the clip jobs overlay will cancel the clip job. To enable the clip job overlay see here.
Automatic Scene Split
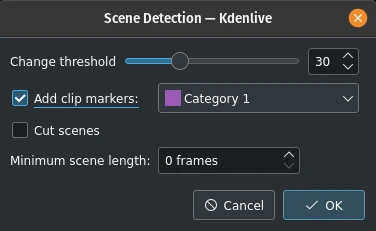
Scene Detection
This job detects scene changes in the clip and creates markers and/or cuts the clip into sub-clips. The Change threshold determines the difference in the video stream to be considered a scene change. You may need to experiment with this parameter to get satisfactory results for your specific situation and source material.
If you want Kdenlive to create sub-clips for each scene check the Cut scenes.
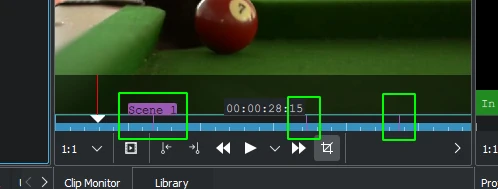
Automatic Scene Detection with markers
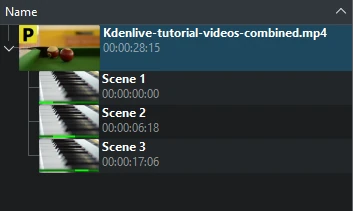
Automatic Scene Detection with cuts
Stabilize
This feature applies image stabilization algorithms to the clip which can reduce the shakiness of a bit of footage. It is also available via the right-click menu of the clip in the Project Bin.
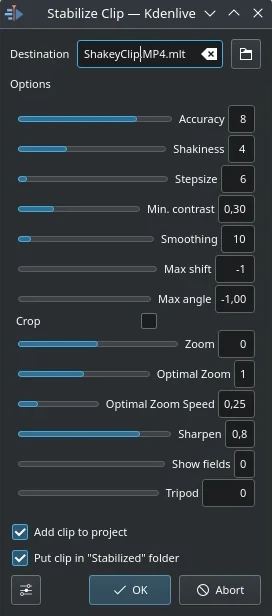
Stabilize Clip dialog in version 21.12
Based on the tooltips from this screen and the docs here this is what all the options mean:
- Accuracy
Accuracy of shakiness detection. Should be >= shakiness factor. 1: low (fast processing). 15: high (slow processing). Default: 4. Recommended: 8.
- Shakiness
How shaky is the video? And how quick is the camera? 1: little (fast processing). 10: very strong/quick (slow processing). Default = 4. Note: large values may also reduce the accuracy. This is due to the internals of the movement detection. Typically you do not need a value greater than 7.
- Stepsize
Step size of search process. Region around minimum is scanned with 1 pixel resolution. Default = 6.
- Min. contrast
Below this contrast the field is discarded. Range 0-1. Default = 0.3. You may want to use a smaller value for a really low contrast clip.
- Smoothing
Controls the amount of smoothing/stabilization. The larger the value for smoothing the more camera movements are compensated. The resulting clip has a lower change in camera speed. Technically it is the number of frames for lowpass filtering = (smoothing * 2) + 1.
For example, with a with 25 fps clip, a value of 12 for the smoothing factor means we would smooth over one second - 12 frames behind the current frame + the current frame (1) + 12 frames after the current frame. Default = 10.
Demo of the difference (top:3, bottom: 30).
- Max shift
Maximum number of pixels to translate image. Default = -1 (no limit)
- Max angle
Maximum angle to rotate in radians. Default = -1 (no limit).
- Crop
Unchecked means the border of the transformed frames contains the pixels from previous frames. Checked = black background. Default is unchecked.
- Zoom
Additional zoom during transform. Percentage to zoom > 0 = zoom in, < 0 = zoom out. The zoom specified here is in addition to the optimum zoom calculated by the program when optzoom is checked. Default = 0.
- Optimal Zoom
Use optimal zoom (calculated from transforms). Causes video to zoom until 90% of transformations are hidden. Default is checked. Hint: You can further zoom in with the zoom option.
- Optimal Zoom Speed
Zoom per frame (used when “Optimal Zoom” = 2)
- Sharpen
Sharpens transformed image. Amount of sharpening: 0 = no sharpening. Uses filter unsharp with 5x5 matrix. Default = 0.8.
- Show fields
0 = draw nothing, 1 or 2 = show fields and transforms. Use 1 or 2 to preview what the process is going to do. Check this example. Default = 0. Non-zero values of this parameter are not relevant in the Kdenlive implementation - use zero.
- Tripod
Virtual tripod mode (=relative=0, smoothing=0)
Here are examples of the effect of running stabilize - transcoded by the original author - Georg Martius.
Duplicate Clip with Speed Change
This function is only available for clips selected in the Project Bin, and can be selected from the right-click menu of a clip. [1]
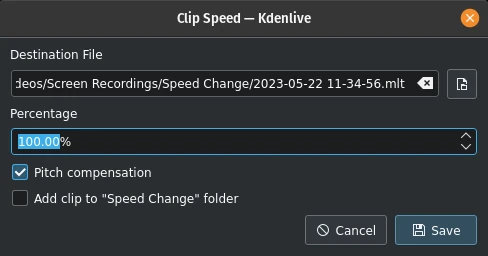
Duplicate Clip with Speed Change
Values above 100% speed the clip up, values below 100% slow it down. The sound in the clip is also reversed.
Select Pitch compensation to avoid the Mickey Mouse effect in speech when speeding up the clip. If you check Add clip to “Speed Change” folder a folder named “Speed Change” is created in the Project Bin and the clip added to it.
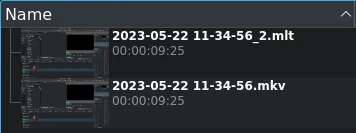
Duplicate Clip with speed change in Project Bin
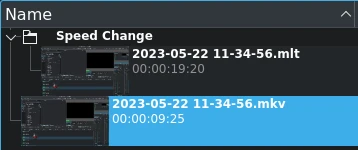
Same as above but with Speed Change folder
When you click on Save a new clip is created in the Project Bin. It has the filename you supplied in the dialog with the .mlt extension.
You can add this clip to the Timeline just like any other, and when you play it the video of the original source clip will be played but at the new speed (or in reverse if a negative % value was entered).
Configure Clip Jobs
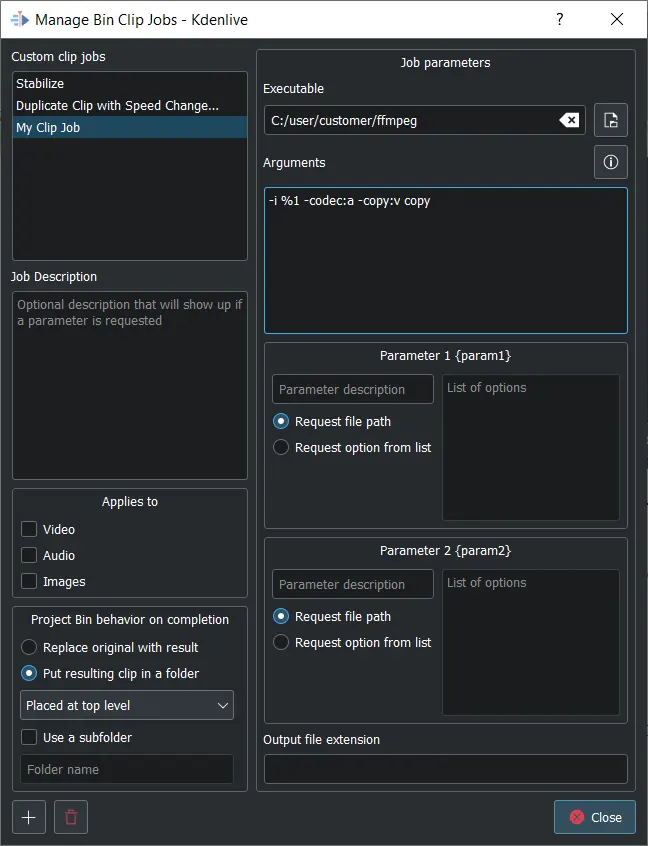
Manage Bin Clip Jobs dialog
This opens the Manage Bin Clip Jobs dialog. Here you can create and manage your own jobs that can then be applied to clips in the Project Bin. Select the executable you want to be called and enter the arguments to be passed to the executable. %1 will be replaced by the path of the source clip. If you do not specify an output file extension the extension of the source file will be used.
Unless you want the original clip to be replaced with the result, select whether the resulting clip is Placed in the original clip folder, Placed at the top level, or Kdenlive shall Use a subfolder to save it. In the latter case you need to enter a folder name.
You can have the source clip path {source} as well as 2 configurable parameters {param1} and {param2}. The output file will replace the {output}. The arguments should be: {source} {param1} {output}
Click on  to create a new custom clip job. In order to delete one, select it first then click on
  .
.
Transcode to Edit Friendly Format
Transcode clip to edit-friendly format
This opens a dialog window where you can select an edit-friendly format in case your source material is not suitable for non-linear video editing. This function is also available via the right-click menu for the clip(s) selected in the Project Bin.
You can select more than one clip in the Project Bin for this function.
There are several formats available, some are lossless (producing huge files), some produce a slight degradation in quality.
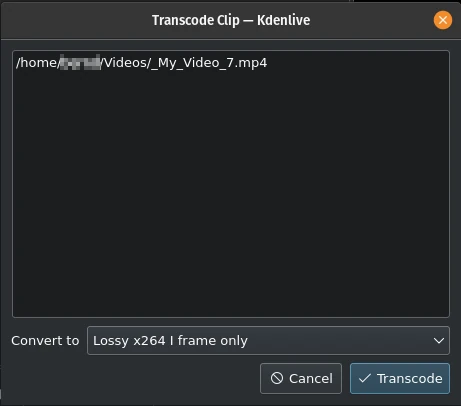
Transcode
Use this function to transcode your source material into a wide variety of other formats. This function is also available via the right-click menu for the clip(s) selected in the Project Bin.
Choose a transcode profile from the available list to transcode the selected clip into a different video format. The options are controlled by Transcode Settings. The transcoding is done by the ffmpeg program.
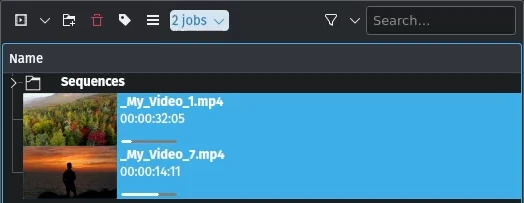
Transcoding job running
While the transcode job is running, the Project Bin will display a progress bar on the thumbnail of the clip(s), and a job list menu item will appear at the top of the Project Bin.
Locate Clip
Locate Clip opens up the system’s file browser at the location of the file system where the selected clip is stored. Useful for tracking down the sources of clips in the Project Bin.
This function is also available via the right-click menu of a clip selected in the Project Bin.
Please note that depending on the type of clip certain menu items are not shown.
Reload Clip
Reload Clip will re-import the clip from the file system into Kdenlive. This is useful when you edit a clip outside of Kdenlive and want Kdenlive to update it in the project.
This function is also available via the right-click menu of a clip selected in the Project Bin.
Replace Clip
Replace Clip will allow you to select a different file but keep all of the uses on the Timeline. This can be useful if you work with placeholder clips (e.g. low resolution or in project templates) and at the end, before rendering, you replace the clip with the final clip.
If you select an audio file only, Kdenlive ask you if you want to change the audio part of the clip only (or vice versa). This is helpful if you have optimized the audio with an external program and you will update the video clip.

Question if you only want to change the audio part of your clip
This function is also available via the right-click menu of a clip selected in the Project Bin.
Note
Make sure the clip replacement is at least of the same length/duration. Otherwise it may lead to unwanted gaps in the Timeline. If effects are used on these clips the replacement clips should have the same dimensions to avoid unwanted behaviour of effects.
Duplicate Clip
This function will create a copy of the clip in the Project Bin. This can be useful when applying effects to clips and allowing you to have the same source file with two different sets of applied effects, or one with the other without effects.
This function is also available via the right-click menu of a clip selected in the Project Bin.
Proxy Clip
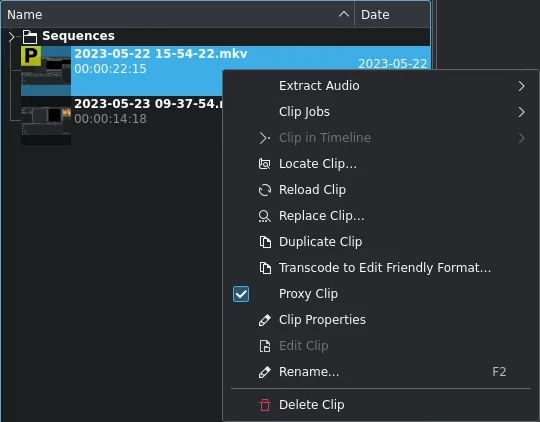
Proxy Clip
If Proxy Clips are enabled in the project settings this function will create a proxy clip for the selected clip(s). A yellow square with the letter P will indicate that the clip in the Project Bin is in fact a proxy clip (expect lower quality for playback in the Clip or Project Monitor). During the final render proxy clips will be replaced by the original source files.
This menu item is a toggle, meaning that if the selected clip is already a proxy clip Kdenlive will revert back to the original source clip.
This function is also available via the right-click menu of a clip selected in the Project Bin.
Clip in Timeline
This function is useful for quickly locating all the places where a clip is used in the Timeline. It is also available via the right-click menu for the clip selected in the Project Bin.
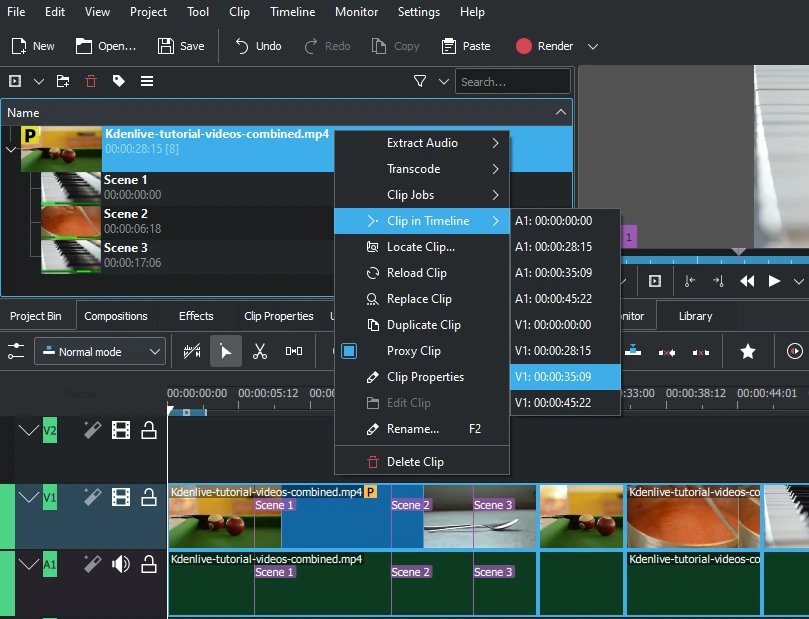
Locating all occurencies of a clip
Selecting the Clip In Timeline menu item brings up a flyout that lists all instances of the selected clip, identified by their track (A for audio, V for video) and position in the Timeline. Clicking on an entry in the list will reposition the playhead to the beginning of the indicated clip.
In the example we have clicked on the third video entry which is located on video track 1 at the 00:35;09 mark and the playhead is now located at the start of that clip.
This option will be greyed out if the clip is not being used in the Timeline.
See also Clip in Project Bin available in the right-click menu on a clip in the Timeline.
Clip Properties

Properties of the clip
This menu item opens the Clip Properties widget and displays the properties of the selected clip in the Project Bin. Depending on the type of clip it includes information about the audio stream, video stream, aspect ratio, dimensions or frame size, frame rate, etc.
This function is also available via the right-click menu of a clip selected in the Project Bin.
For more details see the chapter Clip Properties.
Edit Clip
This function is available for the following clip types:
audio
image
animation
It opens the clip in an external software specified in Default Apps ready for editing.
This function is also available via the right-click menu of a clip selected in the Project Bin.
If the path is not set a pop-up window appears to define the path to the external software on your computer:

Missing path for Glaxnimate
Once the path is set, the application starts and opens the clip you had selected. The entered path gets added automatically to the default apps in .
More details for installing the needed external software and how to set the path refer to the Default Apps chapter.
Hint
The option is greyed out for video clips because Kdenlive is the video editor - only audio, image and animation clips are edited by external software.
Rename
This function allows you to change the name of the clip in the Project Bin to an arbitrary name. It does not rename the file in the file system.
This function is also available via the right-click menu of a clip selected in the Project Bin.
Delete Clip
This function removes the clip from the Project Bin. It does not delete it from the file system. If the clip is being used in the Timeline a warning message will appear, and if you click on Continue any occurrence of that clip in the Timeline will be deleted.
This function is also available via the right-click menu of a clip selected in the Project Bin.