Clip Monitor

kdenlive2402_ui-monitors_cm_elements

Clip Monitor elements

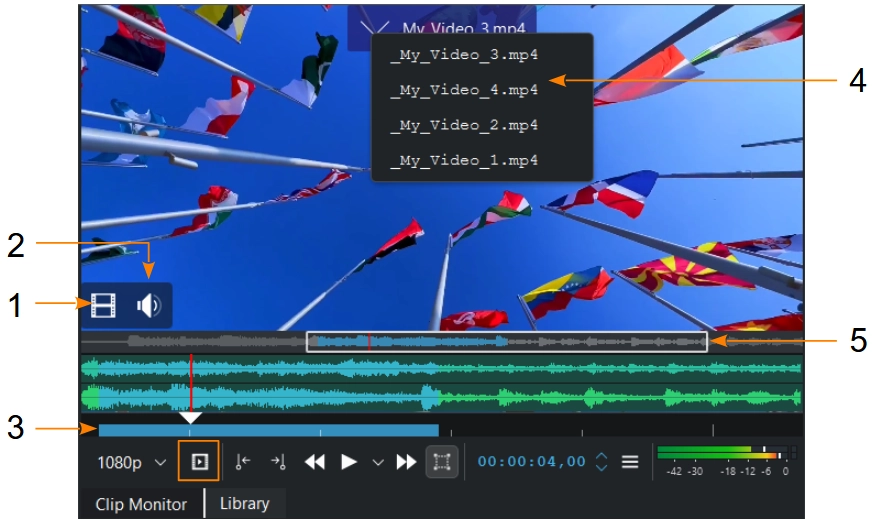
The Clip Monitor displays the unedited[1] clip that is currently selected in the Project Bin. It has the same functions and options as the Project Monitor except for the kdenlive-add-clip icon which adds the clip zone to the Project Bin where it will appear as child clip underneath the clip. See Creating Zones for more details.

1 Video Stream indicator
2 Audio Stream indicator
3 Clip Zone indicator
4 List of last opened clips

Number 4: Hover with the mouse to the top and a list of last opened clips appears. You can select a clip which then show up in the clip monitor.

For more details about the icons in the monitor toolbar refer to this section of the manual.

Hamburger Menu

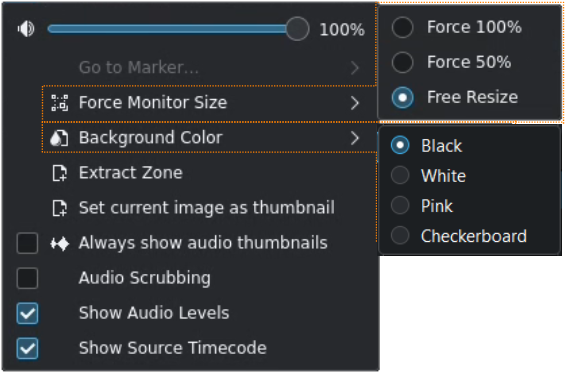
kdenlive2304_ui-monitor_cm_options

Clip Monitor options

  • Volume - Set the Clip Monitor playback volume. This does not affect the master volume setting.

  • Go to Marker - If markers are defined for the clip the list of markers is displayed and selecting one positions the playhead at the marker’s timecode.

  • Force Monitor Size - You can force the Clip Monitor to display the video at 100% (original size), 50% or adjust it to the Clip Monitor widget’s size (Free Resize).

  • Background Color - Set the background color for the Clip Monitor

  • Extract Zone - Saves the current zone as a .mlt file and adds it to the project bin if Add clip to project is selected. See also Extract Zone in the Right-Click Menu section below.

  • Set Current Image as Thumbnail - Takes the a snapshot of the current frame and uses that as the thumbnail for the clip.

  • Always show audio thumbnails -

  • Audio Scrubbing - If enabled plays the audio track while scrubbing through the timeline. You may want to turn this off to improve scrubbing performance or if the noise is distracting.

  • Show Audio Levels - If enabled shows the frequency curve of the master audio in the Project Monitor.

  • Show Source Timecode -

Creating Zones

Zones are defined regions of clips that are indicated by a colored section in the clip monitor’s timeline - see item 3 above. The beginning of a zone is set by clicking zone-in or pressing I. The end of a zone is set by clicking zone-out or pressing O.

Right-Click Menu

kdenlive2304_ui-monitor_cm_right-click

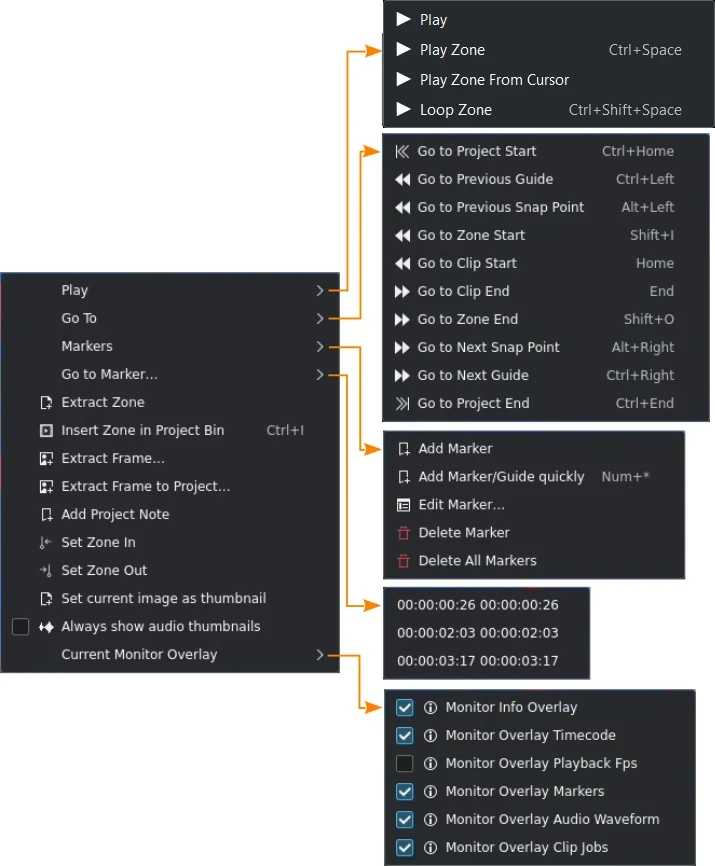
Clip Monitor right-click menu options

These are the menu items that are available when you right-click in the Clip Monitor. These actions affect the clip that is currently selected in the project bin. Similar menu items are available from a right-click menu in the Project Monitor. However, the project monitor menu items affect the currently selected clip on the Timeline.


Item

Shortcut

Description

Play

Space or click into the monitor

Plays the clip currently selected in the project bin. (Disable play on click in the settings)

Play Zone

Ctrl+Space

Plays the current zone and stops

Play Zone From Cursor

Plays the current zone from cursor to the end of the zone

Loop Zone

Ctrl+Shift+Space

Plays the current zone in a continuous loop

Go to Project Start

Ctrl+Home

Goes to the beginning of the clip

Go to Previous Guide

Ctrl+Left

Goes to the previous marker or guide

Go to Previous Snap Point

Alt+Left

Moves the playhead to the previous snap point

Go to Zone Start

Shift+I

Goes to the start of the zone

Go to Clip Start

Home

Moves the clip playhead to the beginning of the clip

Go to Clip End

End

Moves the clip playhead to the end of the clip

Go to Zone End

Shift+O

Goes to the end of the zone

Go to Next Snap Point

Alt+Right

Moves the playhead to the next snap point

Go to Next Guide

Ctrl+Right

Goes to the next marker or guide

Go to Project End

Ctrl+End

Goes the end of the clip

Add Marker

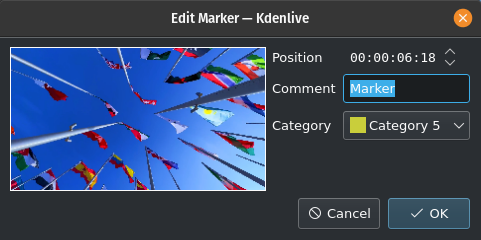
Opens the Edit Marker dialog window for adding a new marker into the clip at the current time point.

kdenlive2308_ui-monitors_edit_marker

Edit Marker dialog window to add or edit a marker

Add Marker/Guide quickly

Num+*

Adds a new marker at the current time point

Edit Marker

Brings up a dialog where you can edit the marker that is at the current time point. Use Go to marker to put the monitor at the marker you want to edit.

Delete Marker

Deletes the marker that is at the current time point. Use Go to marker to put the monitor at the marker you want to delete.

Delete All Markers

Deletes all the markers from the current clip.

Go to Marker…

The menu item pops out a list of existing marker to select from. When one is selected the playhead moves to that marker.

Extract Zone

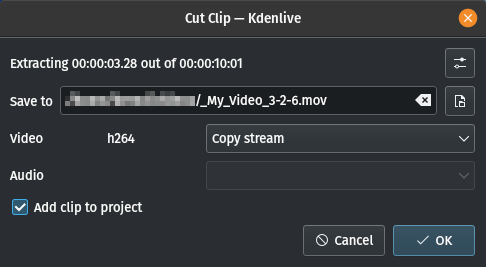
This brings up the Cut Clip dialog.

kdenlive2308_ui-monitors_cut_clip

Cut Clip dialog to extract zone

The current zone can be saved as a .mov file in your file system. If the Add clip to project is checked the zone will be added as a separate clip to the project bin.

Insert Zone in Project bin

Ctrl+I

Inserts the current zone into the project bin as a sub-clip of the original clip

Extract Frame

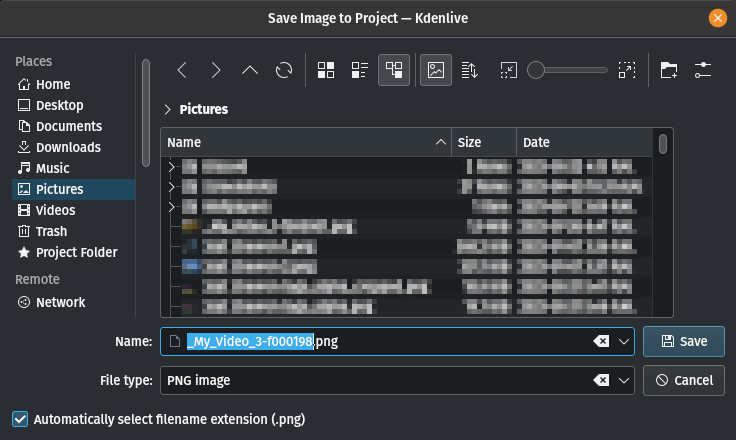
Opens the Save Image dialog window to save the current frame as an image file (default is .png) to your file system

Extract Frame to Project

Same as Extract Frame but in addition the image file is brought into the project bin

kdenlive2308_ui-monitors_save_image

Save Image dialog for extracting frames

Add Project Note

Opens the Project Notes widget and adds a hyperlink to the current frame in the clip. You can enter more text to describe the scene.

Set Zone In

I

Sets the in-point for the zone

Set Zone Out

O

Sets the out-point for the zone

Set current image as thumbnail

Uses the current frame as the thumbnail for the clip in the project bin

Always show audio thumbnails

Switches the permanent display of the audio waveform on or off. If unchecked (i.e. off) the audio graph is only displayed when the mouse is near the bottom of the monitor area and the Monitor Overlay Audio Waveform option is selected.

Current Monitor Overlay

Opens a fly-out for the various available monitor overlays

Monitor Info Overlay

Switches all monitor overlays on or off

Monitor Overlay Timecode

Switches the display of the timecode on or off

Monitor Overlay Playback FPS

Switches the display of the frame-per-seconds (fps) on or off

Monitor Overlay Markers

Switches the display of the marker lines and thumbnails on or off

Monitor Overlay Audio Waveform

Switches the display of the audio waveform on or off

Monitor Overlay Clip Jobs

Switches the display of running clip jobs on or off

Seeking

Inside the clip monitor: hold down Shift and move the mouse left/right.

Drag Audio or Video Only to Timeline

It is possible to drag only the video or audio stream of a clip from the project bin or clip monitor to the timeline

kdenlive2304_ui-monitors_cm_av_only

Move with the mouse to the lower left-hand corner of the clip monitor to access the video (1) and audio (2) icons. Left click on the respective icon to drag either the video or audio stream into the timeline.

This is very useful if you only need one of the streams as it avoids the un-grouping and subsequent deletion of one of the streams of the clip in the timeline.