Kdenlive viene rilasciato ogni circa 3 mesi. Vedi la news page di Kdenlive per avere le ultime informazioni sulle note di rilascio, e controlla Cosa c’è di nuovo per scoprire le ultime aggiunte di funzionalità.
Puoi installare Kdenlive in due modi diversi:
Usando un installatore
Come eseguibile integrato (Windows: standalone; Linux: appimage).
Su macOS puoi usare solo la versione con installatore.
Visita la download page nel sito web di Kdenlive per ottenere l’ultima versione per il tuo sistema operativo.
Troverai tutte le versioni precedenti di Kdenlive in attic.
Windows 10 a 64 bit (1809 o successivo)[2] o più recente
Apple macOS 13 (Ventura)[1] o più recente su Silicon serie M
Linux a 64 bit
Vedi i dettagli più sotto
CPU: Intel o AMD x86; almeno un core a 2 GHz per i video con definizione standard, 4 core per quelli ad alta definizione; 8 core invece per i video in 4K. Vedi i dettagli sotto.
GPU: OpenGL 2.0 che funzioni correttamente e che sia compatibile. In Windows puoi anche usare una scheda con dei buoni driver compatibili con DirectX 9 o 11.
RAM: almeno 4 GB per i video SD, 8 GB per quelli HD; 16 GB invece per i video in 4K.
Il montaggio video in genere è basato sulla potenza della CPU, invece Kdenlive ha profili di esportazione che supportano la GPU, ma la riproduzione nella linea temporale utilizza la CPU. Pertanto, più potente è la tua CPU, migliori saranno le prestazioni di riproduzione di Kdenlive. Un supporto alla GPU sempre migliore è nella tabella di marcia a breve termine.
Kdenlive può essere installato senza problemi in desktop diversi da KDE.
Pacchetti: AppImage o Flatpak sono i pacchetti ufficiali gestiti da Kdenlive.
Nota
A partire dalla versione 24.02 di Kdenlive, PPA non è più supportato. Solo le versioni AppImage e Flatpak sono supportate ufficialmente.
Se utilizzi la versione Flatpak, questa si installa correttamente nel tuo ambiente desktop. Non è richiesta nessun’altra azione.
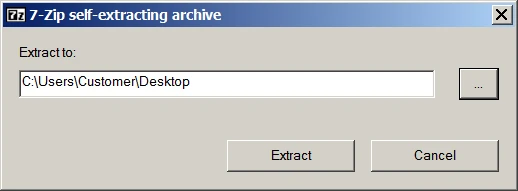
Se vuoi utilizzare AppImage, scarica l’AppImage, spostala in una cartella a tua scelta, e rendila eseguibile. Normalmente puoi farlo utilizzando il gestore dei file del tuo ambiente desktop (ad esempio Dolphin in KDE Plasma): fai clic con il pulsante destro del mouse sull’AppImage, seleziona Proprietà, poi Rendi eseguibile. In alternativa puoi utilizzare il comando della shell Linux chmod777<appimage_name> in un terminale: adesso basta fare doppio clic sul file AppImage per avviare Kdenlive, oppure digitare il nome dell’AppImage in un terminale.
Kdenlive funziona solo sulle versioni a 64 bit di Windows, da Windows 10 (1809 o successivo) o più recente. Non possiamo garantire che funzioni sui server o sulle versioni incorporate di Windows.
Puoi scaricare l’ultima versione per Windows 7 (Kdenlive 23.08.5) da attic.
Kdenlive è disponibile sia per l’installazione che come versione indipendente.
Versione per l’installazione: necessita dei diritti di amministratore e viene installata sulla macchina locale. Viene anche elencata tra i programmi.
È disponibile per tutti gli utenti del computer.
I file di Kdenlive si trovano sempre nella stessa cartella.
Versione indipendente: non necessita dei diritti di amministratore, e non viene installata. Non viene elencata tra i programmi, ed è accessibile solo dall’utente che ha scaricato il file.
Se lavori come utente normale del computer, puoi utilizzare Kdenlive.
Puoi copiare la cartella di Kdenlive su un’unità esterna ed eseguirla su un computer diverso senza installarlo, tuttavia le impostazioni personali e gli scaricamenti eseguiti dall’interno di Kdenlive sono salvati sul computer su cui stai lavorando.
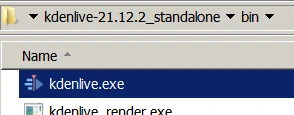
Per avviare Kdenlive, naviga fino alla cartella bin, poi fai doppio clic su kdenlive.exe. Per un accesso più facile puoi anche creare una scorciatoia sul desktop: tasto destro su kdenlive.exe, quindi seleziona Invia a …, e poi Desktop (crea scorciatoia).
Se vuoi utilizzare Kdenlive con gli utenti del dominio utilizzando Windows Active Directory oppure le politiche di gruppo (GPO), assicurati che tutti gli utenti abbiano diritti di lettura e scrittura sulle seguenti cartelle:
%AppData%\kdenlive
%LocalAppData%\kdenlive
%LocalAppData%\kdenliverc
%LocalAppData%\kdenlive-layoutsrc
%LocalAppData%\kxmlgui5\kdenlivekdenliveui.rc
%AppData%\kdenlive\.backup
%LocalAppData%\knewstuff3
Accertati anche che nessun GPO stia bloccando l’accesso a queste cartelle.
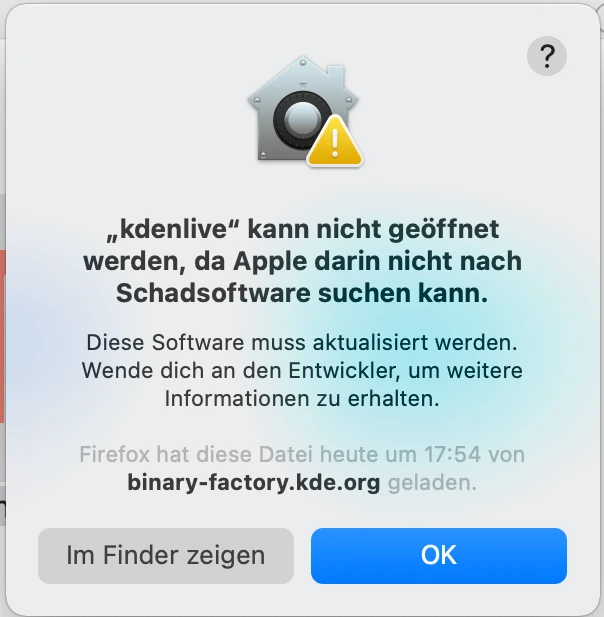
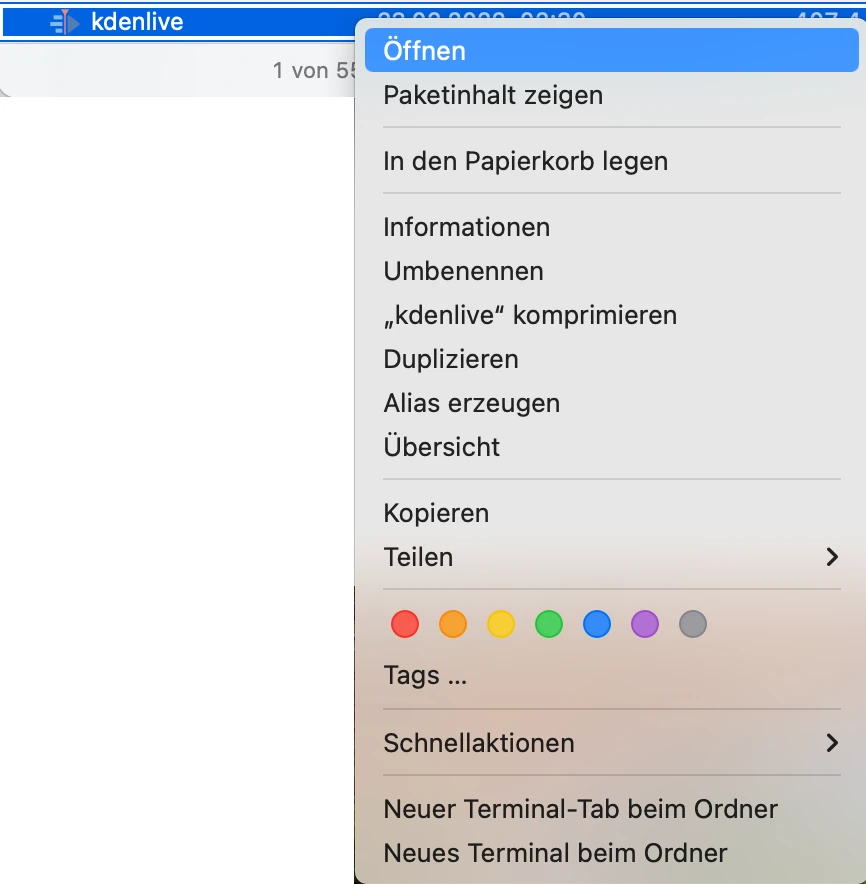
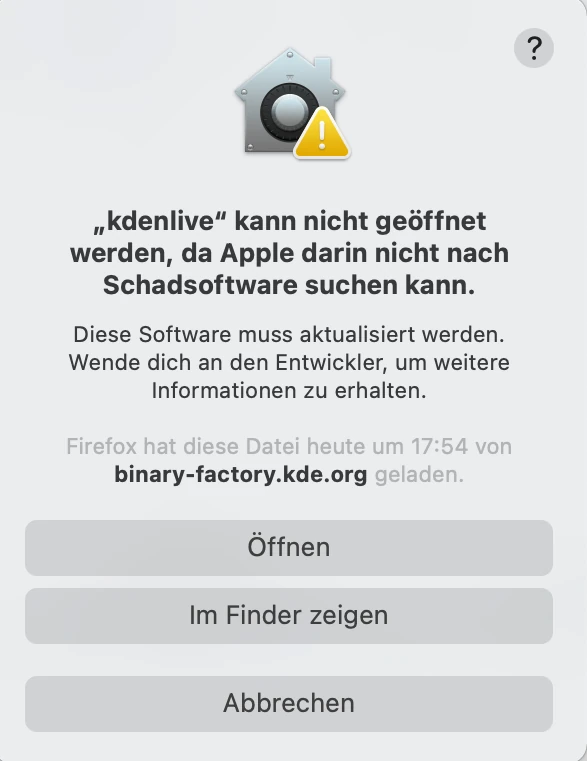
Quando apparirà il messaggio “kdenlive» non può essere aperto perché Apple non può controllarlo per software dannoso, devi fare clic su Mostra in Finder.