Using the Project Bin
The Project Bin[1] is where all your assets are. Depending on the size of your project, that list can quickly become confusing and difficult to work with. Kdenlive has several features to manage the bin’s content.
User Interface
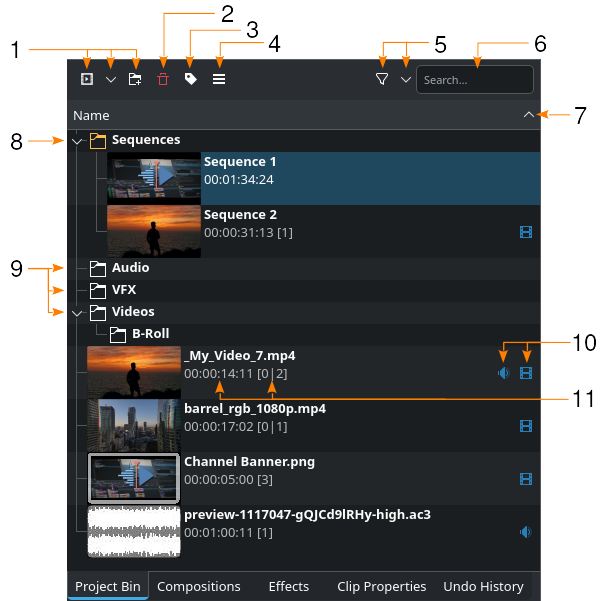
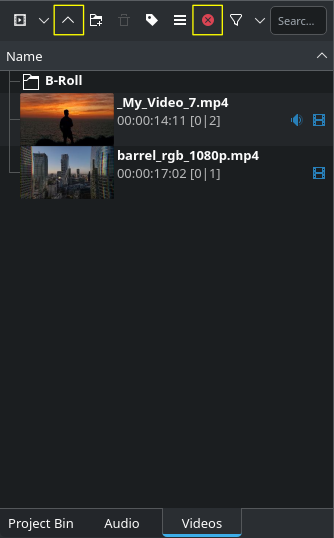
The Project Bin in Kdenlive
1 |
|
|
|
|
|
2 |
|
3 |
|
4 |
|
5 |
|
|
|
6 |
Search field to search for assets in the bin |
7 |
|
8 |
The folder with all the sequences. It is there even if you did not create a sequence. |
9 |
Folders created by the user (for illustration purposes only). You can turn folders into individual bins that can be added to your workspace and docked. |
10 |
|
|
|
11 |
Indicators for duration of the clip in the format hh:mm:ss:ff, and the number of instances in sequences (first number) and the timeline (second number). |

 opens a pop-up window from where you can select what kind of clip you want to add
 indicates a file with an audio stream
 indicates a file with a video stream
Scaling the View
You can zoom the project bin view in and out.
Scaling the project bin view
Click on the  Options icon and use the slider or the buttons to the left or right of it to increase or decrease the zoom level.
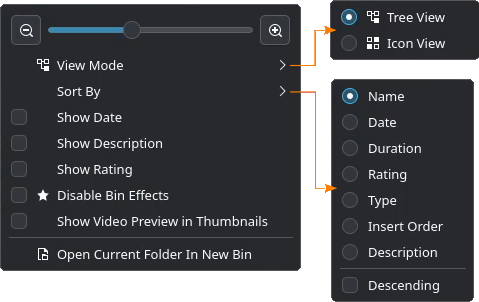
Changing the View
You can switch the project bin view from Tree View to Icon View, change the sort criterion, show additional columns for Date, Description, Rating, and have a preview in the thumbnails for video files.
Scaling the project bin view
Click on the Options icon and select the View Mode, Sort By criteria, and tick the boxes for additional columns.
Select  Disable Bin Effects to (temporarily) disable any effect applied to a clip in the Project Bin. See also the chapter about Efekty a filtry and Effects on Project Bin Clips.
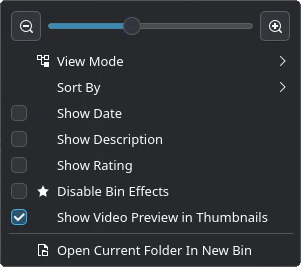
Thumbnail Video Preview
A neat feature is to have a preview in the thumbnails for video files. This allows scrubbing in the thumbnail to quickly check whether that particular clip has the scene or footage you are looking for.
Scaling the project bin view
Check the Show Video Preview in Thumbnails to enable the feature.
Výstraha
This will trigger several clip jobs to generate the video previews. Depending on the size of your project bin and video assets this may take a while. You can continue working with Kdenlive but expect some performance degradation.
Using Tags
Tags are a good way to stay organized as they give you a quick overview of the nature of your assets. You can create as many tags as you need, assign different colors, and change the default tags. After you assigned tags to your assets you can then quickly filter by tags making it much easier to assemble the clips in the timeline and building your story.
Výstraha
Kdenlive adjusts the width of the project bin widget to accommodate all tags and their description. It is recommended to keep the number of tags and the length of the description as small as possible to conserve valuable screen real estate for other widgets (in particular the timeline and monitors). If you have multiple monitors at your disposal consider undocking some of the widgets and moving them off the main screen used for editing.

Enabling the tags panel
Click on the  Tags Panel icon in the project bin toolbar to enable the panel.
Assigning Tags
Assigning tags is as simple as selecting a clip and then clicking the appropriate tag in the panel.
Assigning tags to clips
A clip can have more than one tag.
Click the tag again to remove it from the clip
Editing Tags
Editing tags
You can change the description and color of existing tags.
Click on  Delete to delete a tag.
Click on  Add tag to add a new tag.
Make sure to click  Save to save the changes.
Rada
You can change the order of the tags in the panel by simply grabbing a tag and dragging it to the desired place in the panel.
Filtering by Tags
You can filter the project bin list using tags.
Filtering using tags
Note how the background of the  icon changes as soon as filter criteria have been selected.
Filter criteria within the same category (like tag or rating) are applied in an OR fashion, meaning that all clips with any of the selected criteria will be listed (red OR green tag).
Filter criteria across different categories are applied in an AND fashion, meaning that clips with criteria from both categories will be listed (red OR green tag AND with four OR five stars)
For more details refer to the chapter about using filters.
Using Filters
Filters are an easy way to quickly narrow down assets by tag, rating, type, or whether or not they are being used in the timeline.
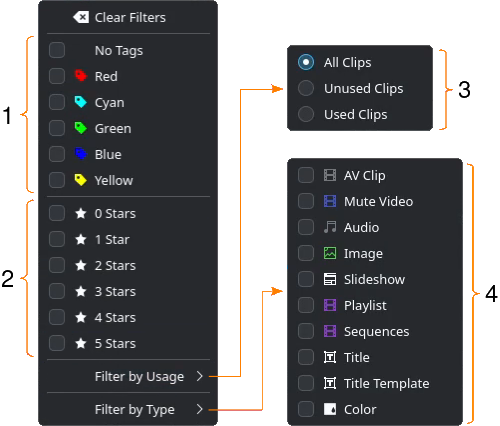
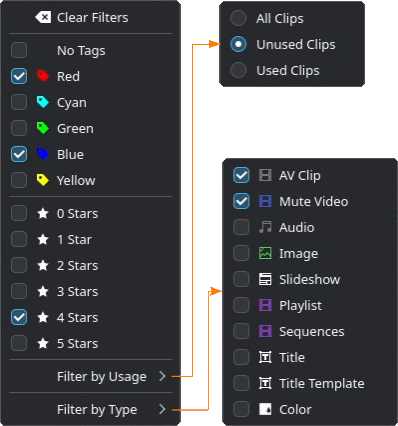
Filtering options
- 1:
Category Tags
- 2:
Category Rating
- 3:
Category Usage
- 4:
Category Type
Filters are applied in an OR way between objects of the same category, and in an AND way between different categories.
Example
Filtering options
This filter setting shows all assets that have a red OR blue tag, AND have a rating of 4 stars, AND are unused, AND are an AV Clip (file with video and audio streams) OR a Mute Video (file with only a video stream).
If filter criteria have been set, the filter icon in the project bin toolbar changes background color. Filter on:  - filter off:
Sorting the Project Bin
You can sort the project bin content by various criteria.
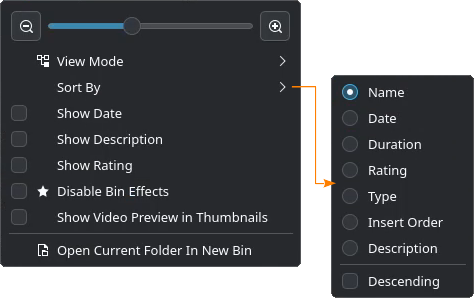
Sorting options
- Name:
Default sorting options
- Date:
Sort by file date
- Duration:
Sort by duration of the clip
- Rating:
Sort by the rating of the clip
- Type:
Sort by the file type
- Insert Order:
Sort by the sequence in which the files were added
- Description:
Sort by the description of the clip (this is an extra text field)
- Descending:
Sort in descending order (default is off which sorts ascending)
Searching the Project Bin
You can search by name for any asset in the Project Bin.
Searching the Project Bin
Enter the search term into the Search field. Kdenlive will start filtering the asset list immediately and continue adjusting the search results as you type.
Searching takes the entire filename including any suffixes (e.g. .ac3) into account.
Poznámka
Searching takes place only in the current view. If you want to search in folders you must open the folder first.
Multiple Bins
Folders are a good way to stay organized but they are tied to the Project Bin. If you need more flexibility you can create various bins from folders you have created. The advantage of multiple bins is that you can un-dock them, move them around your workspace, change the sequence in the dock area, and even move them to a second (or third) monitor.
Turning folders into bins
Right-click the folder name and choose Open Current Folder In New Bin.
A bin can be closed either by clicking the  Close Current Bin icon on the bin toolbar, opening the Options menu and selecting Close Current Bin (you must be in the bin), or by selecting the and un-ticking the respective bin in the list.
Additional icons in the toolbar
Note the additional icons in the toolbar of the bin.
 Go up (keyboard shortcut Alt+UP) goes up one level in the current bin.
Close Current Bin closes the current bin.
Folders
Folders help keeping the Project Bin organized, structured, and easy to navigate. Folders can be nested and turned into individual bins.
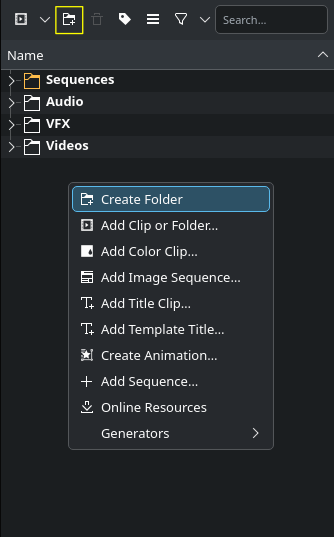
Creating folders in the project bin
You create a folder by clicking the  Create Folder icon in the project bin toolbar.
Alternatively, right-click on empty space in the project bin and select Create Folder.
If you want to create a folder below an existing one, select that folder first.
You can delete a folder by selecting the folder and clicking on the Delete Folder icon, or by right-click on the folder and selecting Delete Folder.
Folder Right-Click Menu
Right-click on a folder opens this context menu:
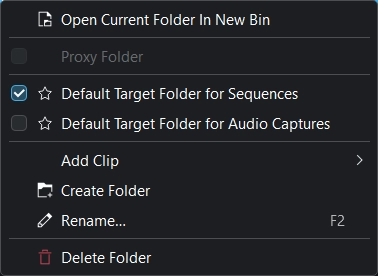
 Open Current Folder in New Bin:
Creates a new bin from the folder
- Default Target Folder for Sequences:
Check this if you want this folder to be target for new sequences
- Default Target Folder for Audio Captures:
Select this if you want this folder to receive all audio captures
- Add Clip
- Create Folder:
Creates a new folder. If nothing has been selected in the bin, a new folder is created at the bin level. If a folder has been selected, a new folder underneath the selected one is created.
 Rename:
Renames the folder. Keyboard shortcut is F2. You can also just double-click the folder name in the bin
- Delete Folder:
Deletes the selected folder.
Poznámka
Deleting an empty folder happens immediately without any are-you-sure? dialog. Only if there is content will there be a warning dialog window that you need to confirm or cancel.
Context Menu
Right-click on any asset or item in the Project Bin to get a context menu with several and different options depending on the asset or item you used it on. The menu is also available via .
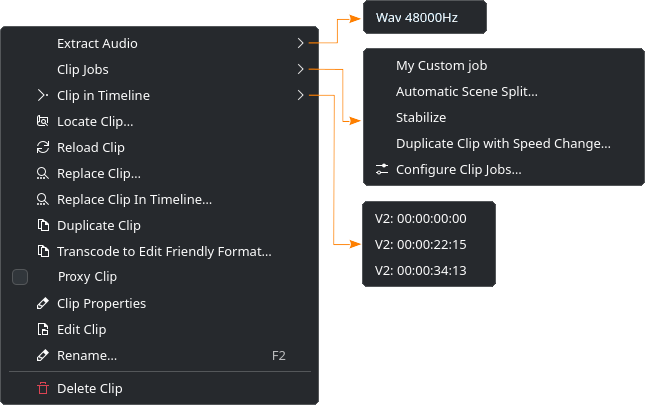
The context menu for bin items
- Extract Audio:
Extracts the audio stream of the clip and adds a
.wavfile with a sample rate of 48kHz to the project bin. Is only available if the clip is of typeaudioor a video file with an audio stream. For further details see the chapter Extrahovat audio.- Media Jobs:
Opens a flyout with additional options
My Custom Job runs the clip job My Custom Job
Automatic Scene Split runs a clip job that detects scene changes and creates individual clips for each detected scene. For further details see the chapter Automatické rozdělení scény.
Stabilize runs a stabilizer. See also the chapter Stabilizovat.
Duplicate Clip with Speed Change creates a copy of the selected clip and applies a speed change you can specify in a dialog window. For further details see the chapter Duplikovat klip se změnou rychlosti.
 Configure Clip Jobs opens a window to manage clip jobs. See also the chapter Configure Clip Jobs
 Clip in Timeline:
Opens a flyout with a list of all the instances of the selected clip in the timeline. For example V2: 00:00:22:15 indicates that this clip is in video track V2 at position (timecode) 00:00:22:15 (format is hh:mm:ss:ff)
 Locate Clip:
Opens the folder in your file system where the selected clip is located in your OS default file manager. See also the chapter Najít klip.
 Reload Clip:
Reloads the selected clip from the file system. See also the chapter Znovu načíst klip.
 Replace Clip:
Opens your OS file manager. Select the file you want to replace the selected clip with. See also the chapter Nahradit klip.
- Replace Clip in Timeline:
You need to select two clips in the bin for this action. The clip you right-clicked on will be replace by the other. See also the chapter Nahradit klip.
 Duplicate Clip:
Creates a copy of the selected clip. See also the chapter Duplikovat klip.
- Transcode to Edit Friendly Format:
Opens a window with the selected clips where you can select the format to transcode the clips to. See also the chapter Transcode to Edit Friendly Format.
- Proxy Clip:
If checked indicates that the selected clip is a proxy clip* Zástupný klip. If the option is greyed out, proxy clips are not enabled for the project. Go to the Nastavení proxy tab in the Project Settings () and enable proxy clips.
- Clip Properties:
Opens the widget for the Clip Properties. For more details refer to the chapter Vlastnosti klipu.
- Edit Clip:
Opens the application associated with the type of the selected clip. See also the chapter Upravit klip.
- Rename (default keyboard shortcut F2):
Opens the clip name field in the bin for editing. This does not change the filename in the file system.
- Delete Clip:
Deletes the selected clips. If the clips are being used in the timeline or in sequences, a warning windows is opened where you need to confirm that the clips‘ instances in the timeline will also be deleted. See also the chapter Smazat klip.