Obecná nastavení
The first tab in the Project Settings dialog is for general project settings. It contains the important information about the project.
Layout and Controls
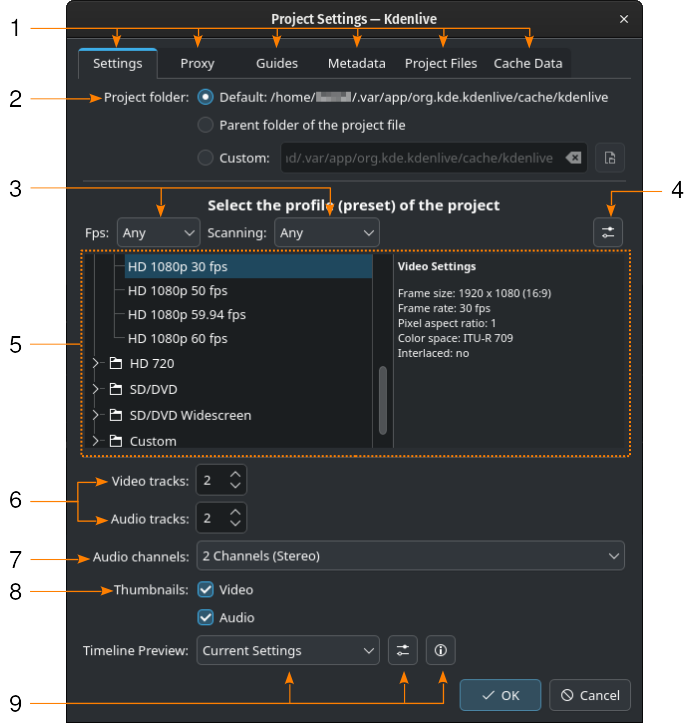
The Project Settings dialog window
- 1:
The available tabs for the different settings: Settings, Proxy, Markers, Metadata, Project Files, and Cache Data. The two latter ones are only available via .
- 2:
Defines how to set up the project folder
- 3:
Filters the list of available project profiles by fps or scanning method
- 4:
Opens the dialog for creating new project profiles
- 5:
List of all available project profiles (left) and their details (right)
- 6:
Defines how many initial video and audio tracks the project will have. You can add and delete tracks later from within the timeline.
- 7:
Defines the number of audio channels
- 8:
Defines whether or not you want Náhledy of the clips in the timeline
- 9:
Select which profile you want to use for the preview render feature
Složka projektu
As recommended in the Rychlý start section, you should create a new folder for your project. This folder will hold all temporary files that are used during the editing of your project (thumbnails, proxy clips, etc).
Viz také
Default |
Lets Kdenlive determine the best location for the project folder |
Parent folder of the project file |
Uses the parent folder of the folder the |
Custom |
Enter the path to the folder, or click on the |

Project Profile / Preset
The project profile (or preset) will define the format of your project, like the dimensions (or frame size) and the aspect ratio, the frame rate (or fps), the color space, and whether or not the frames are interlaced.
You can use the pull-down menus to filter the list of profiles by Fps (frames per second) or Scanning (Interlaced or Progressive).
You should carefully choose your project profile and select the one which best fits your desired output. All video operations on the project (like compositing, transformations, use of keyframes, etc.) will then use this profile and the inherent properties.
For example, if your desired output is a 4K video, select one of the 4K profiles; if you want to create a video suitable for social media on smartphones or YouTube Shorts, select a profile for vertical output (found in the Custom category).
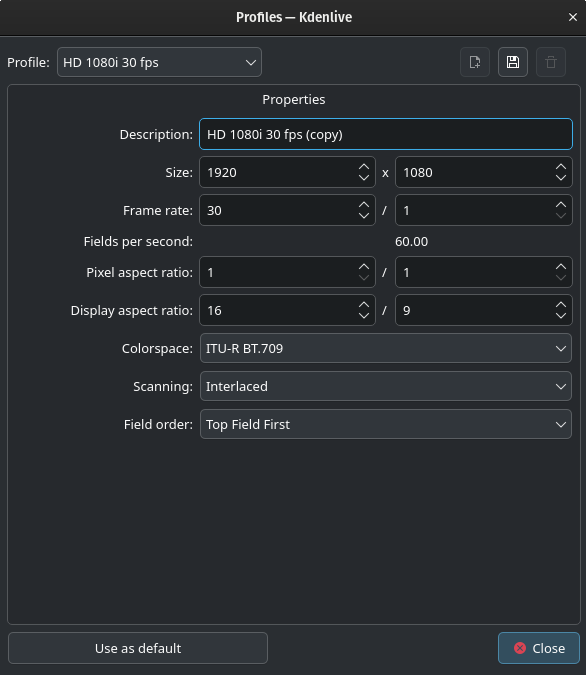
Creating a new project profile
You can manage the list of project profiles from here. Click on the  Manage project profiles icon. By default, the profile currently highlighted in the list will be opened for editing. In case this is the profile used in the current project, an error message will be displayed saying that it cannot be edited while the project is open.
Further details can be found in the Configure Project Defaults section of this documentation.
Varování
Make sure you click on the  Save profile icon before you Close this window. Kdenlive does not issue a warning if the changed or newly created project profile was not saved.
Stopy
You can select the default number of audio and video tracks that your project will have. You can always add or remove tracks later in the timeline of an existing project.
Zvukové kanály
You can select the number of audio channels per audio track. The following settings are supported:
2 Channels (Stereo) |
The default and most common setup |
4 Channels |
|
6 Channels |
Náhledy
If ticked, audio and video thumbnails are shown in the Časová osa. They can also be enabled/disabled through buttons in the Stavový řádek.
Náhled časové osy
This setting determines what codec to use for the preview render feature. Select the codec that works best for your HW environment and the sources you are using in the project.
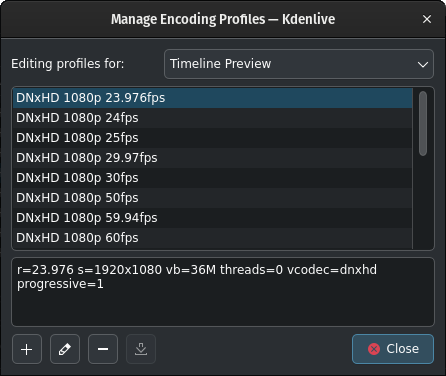
The list of available preview profiles
You can also change the settings for the various preview profiles or create new ones. Click on the Display Profile Parameters icon to open this dialog window.
If you are just interested in the parameters used in the selected preview profile click on the  Information icon.