Editing is done in the Timeline. Add a clip by dragging it from the project bin or the Monitors. Once a clip is dropped on a track, it can be moved (drag and drop it) to another place on the same track or onto another track.
Editing with keyboard shortcuts can speed up the editing work, and you can do editing steps that are not possible or not as quick and easy with the mouse. Working with keyboard shortcuts from version 19.08 onwards is different as in previous Kdenlive versions. Mouse operations have not changed and work as before. See 3 Point Editing
The timeline cursor shows your current position in the project. The positions of the cursors on the timeline ruler and Project Monitor are always in sync. Position can be moved in the following ways:
Keyboard shortcut: right / left arrows for one frame, Shift+ right / left for 1 second
Clicking/dragging in the Timeline or in an empty area of the timeline.
To cut a clip, the easiest way is to place the timeline cursor where you want to cut the clip, then select the clip (left click in it) and use the menu Timeline ‣ Current Clip ‣ Cut Clip (default shortcut: Shift+R).
A clip can be resized from its start or end by dragging its left or right edge. If you want a more precise resize, you can place the timeline cursor wherever you want the resize to end and use the menu Timeline ‣ Resize Item Start (default shortcut: ( or Timeline ‣ Resize Item End (default shortcut: ))
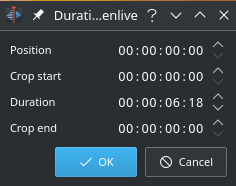
To even more precisely control the length of a clip, double click it in the timeline and adjust its duration using the Clip duration dialog. You can have frame-level accuracy with this method.
You can also resize a clip by cutting it with the Razor Tool and then deleting the bit you do not want.
Adjust AV clips independently with Shift+resize to resize only audio or video part of a clip.
alt+Move in timeline allows to move the audio or video part to another track independently.
Select a clip in the project bin. When resizing this clip in the timeline the clip monitor shows a yellow indicator relative to the original clip length.
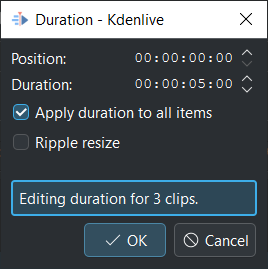
Select several clips in the timeline. Double click on one of the clips. The Duration dialog window pops up. Enable Apply duration to all items, otherwise nothing happens.
The duration/resize is linked to the start position of each clip. Meaning if you select three clips and reduce the duration you get gaps between each clip as the start position of each clip is fixed.
Position show the start position of the most left selected clip
Duration shows the length of the first selected clip done by Shift+LMB. When selected by Shift+drag it show the length of the most left clip.
Selection with Shift+drag shows the length of the most left clip
Shorten and lengthen duration: The clips get shortened/lengthened but keep their starting position
Clips attached to each other: You cannot lengthen the clips
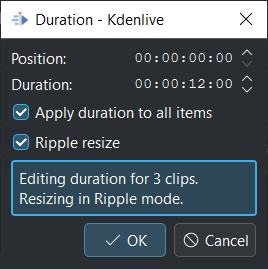
Change duration with Ripple resize enabled
Selection with Shift+click shows the length of the first selected clip
Shorten and lengthen duration: The starting position of the left most selected clip on each track is fixed. Any gaps between clips are kept.
Clips attached to each other: All clips attached to the right will lengthen or shorten according to the left most clip, keeping their attachment.
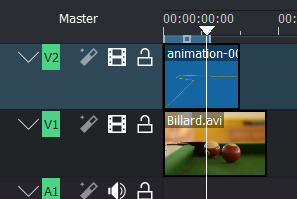
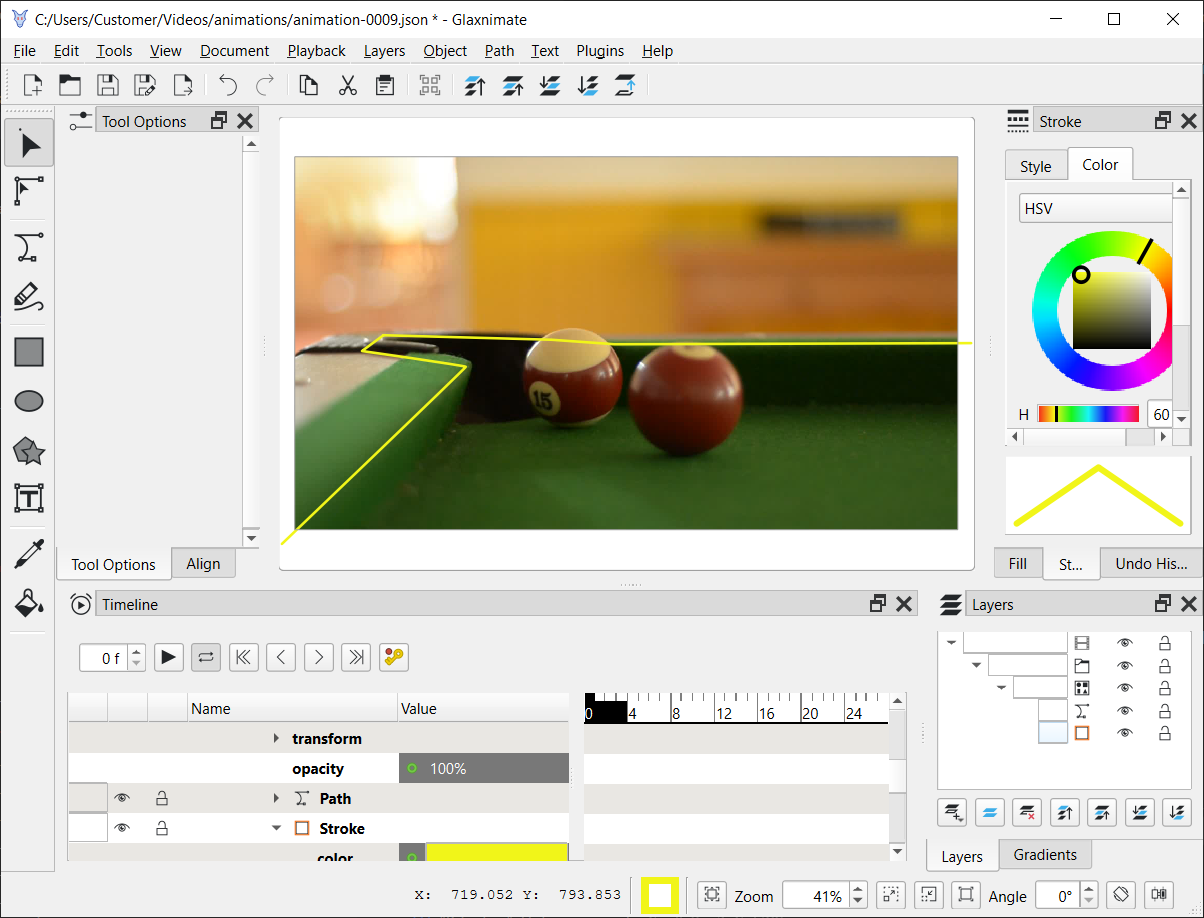
Double click on an animation clip in the timeline and this will open Glaxnimate.
The background of the animation in Kdenlive will also be shown in Glaxnimate.
It is possible to have several Glaxnimate instances open, but the background will only be send to the one opened first in Glaxnimate. If you like to see the Kdenlive background of another animation clip, save the animation and close Glaxnimate before you double click another animation clip.
In the timeline select the clip or multiple clips for which you want to change the speed.
Adjust the speed by pressing CTRL and dragging with the LMB on one of the selected clips. The clip on which you change the speed determines the change for all selected clips. Once the mouse is released the speed change is shown on all selected clips.
Doing with right click on one of the selected clips see Change speed. If enabled, pitch compensation is preserved for all selected clips.
If there is not enough space on a track to expand the clips, an error message is shown in the status bar.
Right click in the space between the clips and choose Remove Space. Be aware however that if you have clips on multiple tracks in the timeline and they are not grouped, then removing space may disturb the alignment of the clips between the different tracks – the space is only removed from the timeline where you clicked. Under this situation it may be safer to use the Spacer Tool.
Timeline ‣ Current track ‣ Remove All Spaces After Cursor
It handles AV clips as 1 element, doesn’t matter on which track they are. This function is only in the Timeline menu available this to avoid clutter.
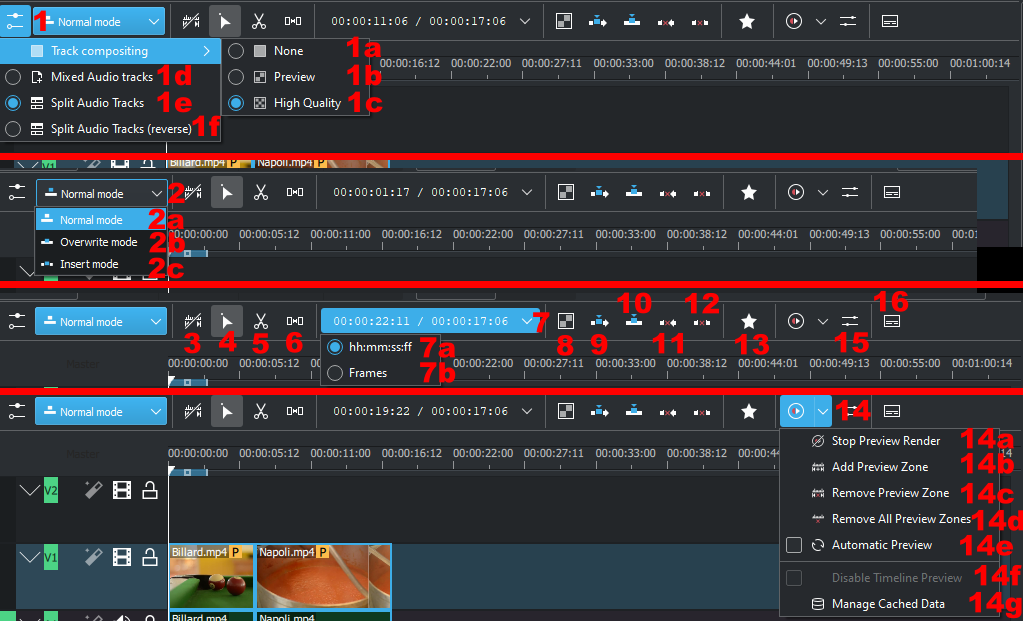
Deprecated since version 22.08: 1a, 1b and 1c cannot be selected anymore.
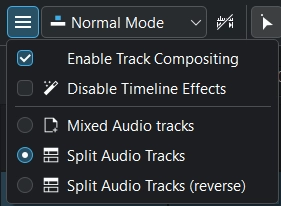
Disable timeline Effects
When enabled it Disables all Timeline effects
1d. Mixed Audio tracks
Changes the order in which tracks are displayed to mixed audio and video tracks. For example, from the bottom of the timeline to the top of the timeline: A1, V1, A2, V2, A3, V3
1e. Split Audio tracks
Changes the order in which tracks are displayed to separate audio and video tracks. For example, from the bottom of the timeline to the top of the timeline: A3, A2, A1, V1, V2, V3
1f. Split Audio tracks (reverse)
Changes the order in which tracks are displayed to separate audio and video tracks with the audio tracks in reverse order. For example, from the bottom of the timeline to the top of the timeline: A1, A2, A3, V1, V2, V3
Timeline Edit Mode drop down
These same settings can be found under the Tool menu.
2a. Timeline Normal Mode
2b. Timeline Overwrite Mode
2c. Timeline Insert Mode
Toggles for insert Use timeline zone, Do not use timeline zone .
The track compositing applies uniformly to all tracks in your timeline.
Tip
Under certain compositing conditions, if you see the outcome of a transition not to be what you would expect, try to switch track compositing off for a quick check. If the oddity is gone, then this is an interference between the automatic timeline track compositing and your user transitions.
Track compositing is now a simple checkbox instead of the none/high resolution choice.
When track compositing is set to High-Quality tracks with alpha channel information will be automatically composited with the other tracks using an algorithm that is somewhat slower than the algorithm used with Preview but which retains higher fidelity color information.
When Track Compositing is set to None you will not get tracks with alpha channel information to composite with the other tracks unless an explicit composite or affine transition is added between the clips. This is basically kind of an expert mode when you need full control over any compositing in your timeline.
Final rendering always uses either High Quality or None. So Preview quality is, well, for preview only.
When track compositing is set to Preview tracks with alpha channel information will be automatically composited with the other tracks using an algorithm that is somewhat faster than the algorithm used with High Quality but which slightly degrades the colors.
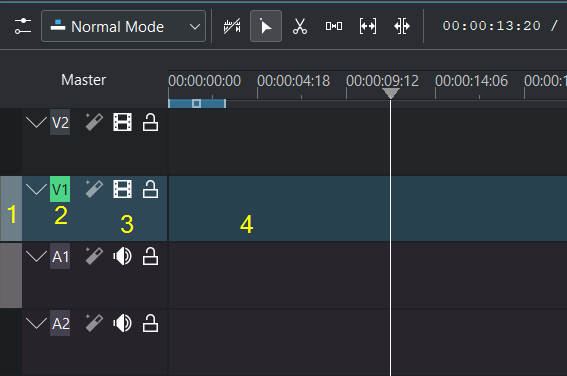
1 Target track (3-point editing). The highlighted target strip indicates that in the project bin an A/V clip is selected (the selected clip has an audio and video part).
2 Active track (3-point editing)
3 Track header
4 Empty part of the track
Only active tracks can accept clips or react to an edit function. An active track is indicated by a:
highlighted track number (2) (for 3-point editing)
blueish or brownish track (3 4) (depends on the color scheme), working with the mouse or insert clip by paste
When you work with the mouse Kdenlive make a track active as you drop a clip to the timeline or you select a clip.
Make a track active by:
click into the track header (3)
double click into an empty part of the track (4) (the playhead moves to this point too). This is useful when you copy & paste clips.
In this edit mode, you can not drag clips on top of other clips in the same track in the timeline. You can drag them to another track in the timeline but not into the same track at the same time point as an existing clip. Contrast this to overwrite mode.
In this edit mode, you can drag a clip onto a track where there is an existing clip and the incoming clip will overwrite that portion of the existing clip (or clips) covered by the incoming clip.
In the “After” screenshot above, you can see that the clip which was dragged from the upper track has replaced a portion of the clip on the lower track.
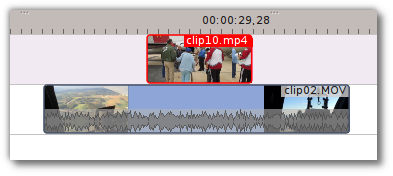
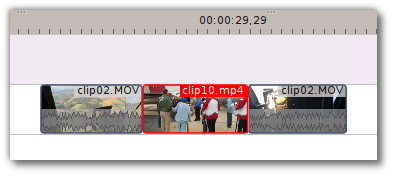
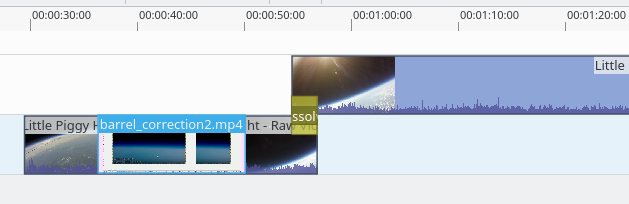
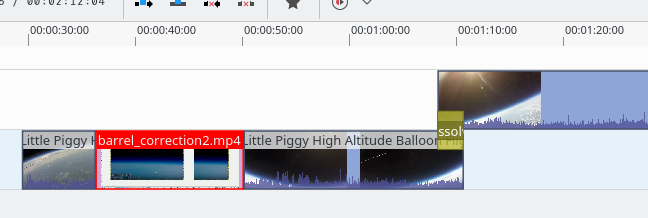
Rearrange clips in the timeline
Performing a rearrange edit. This technique lets you quickly change the order of clips in the timeline.
Drag a clip, as you drop it to a new location performs an overwrite edit that overwrites the existing clip.
With this mode selected and you drop a selection into the timeline the selection will be inserted into the timeline at the point where the mouse is released. The clip that the selection is dropped on is cut and clips are moved to the right to accommodate the incoming clip.
After. Incoming Clip inserted. Clips after the insert point are shifted Right
Rearrange edit in the timeline
Performing a rearrange edit. Only clips in the destination track are shifted; clips in other tracks are not affected. This technique lets you quickly change the order of clips in the timeline.
It always closes all space in the track.
Drag a clip, as you drop it to a new location. Releasing the clip performs an insert edit that shifts clips in the destination track only.
Use this tool () to temporarily group separate clips and then drag them around the timeline to create or remove space between clips. Very useful. Experiment with this tool to see how it works.
In the above example, these clips are not grouped. However, the spacer tool groups them temporarily for you so you can move them all as a group.
ESC: Return from any tools back to Selection tool.
Slip keeps the original duration of the clip. Like working with old film material: beneath the given “window” of the clip length it slips the film strip back and forth.
Use Slip () to trim, in a single operation, the IN and OUT points of a clip forward or backward by the same number of frames, while keeping the original duration and without affecting adjacent clips.
You can slip multiple clips at once now: select all clips you want to slip with the selection tool using Shift then enable the slip tool and go ahead…
Slip can be done with the mouse, with the arrow keys and with the buttons on the monitor toolbar.
ESC: Return from any tools back to Selection tool.
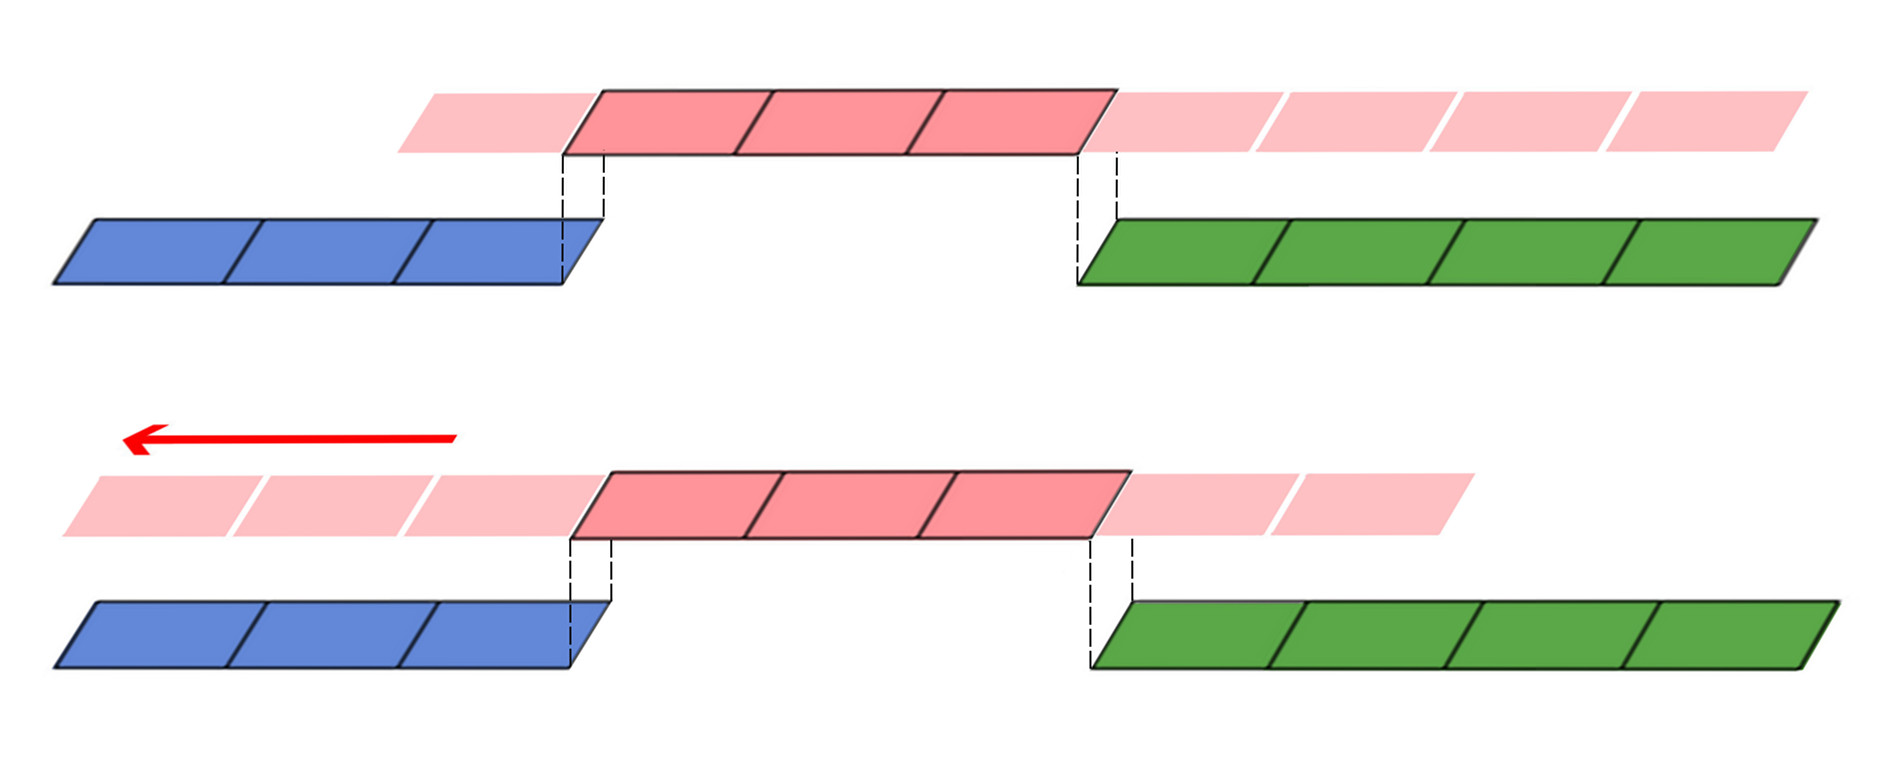
Ripple changes the original duration of the clip. Like working with old film material: You lengthen or shorten the film strip and move the adjacent clips back and forth as you do that.
Use Ripple () to trim a clip and shift following clips in the track by the number of frames you trim. When you shorten a clip by this action all clips that follow the cut shift back in time, contrariwise, when you extend a clip the clips after the cut shift forward in time. If an empty space is on the track it behaves as a clip and it shifts in time as a standard clip would be.
You can Ripple only a single clip at once.
Ripple can be done with the mouse only.
ESC: Return from any tools back to Selection tool.
The multicam tool allows to cut between several cameras while playback is running. Add your clips in different tracks, but at the same position in the timeline and activate the multicam tool by going to menu Tool -> Multicam tool. You may trim the clips in the desired track while the timeline is playing by pressing their corresponding numbers (for track V1, press key 1; for track V2 press key 2, etc…) or simply select the desired track in the project monitor by clicking on it with the mouse.
Select multicam tool will switch on the Multitrack View in the project monitor and set a marker at the current timeline position. You can then seek/play to the wanted position, click on a track view in the project monitor and it will lift all tracks except for the previously active track. You can then repeat seek and click in another track to continue lifting tracks.
It doesn’t stop playing when you perform the operation to avoid to lose the rhythm and to work as you are working during a live broadcasting. If you need to correct the editing you can manually stop and trim the cut as you do when you video editing as normal.
The audio tracks is not involved in the process as you generally use only one audio track (the one which come from the main mixer to which the other ones are synced to)
ESC: Return from any tools back to Selection tool.
Switch for Audio Thumbnails. Toggles zooming audio waveforms from 1 (default) 2, 4, 8. It affects all displayed waveforms and all audio tracks. See Show Audio Thumbnails
When this is on and you drag a clip to the timeline, the audio in the clip will end up on an audio track and the video on a video track. You can achieve the same result if you select the clip, Right-Click Menus, Split Audio. When this is off and you drag a clip onto the timeline, both the audio and video tracks are combined into one video track.
When on, the video clips in the timeline will contain thumbnails as well as a filename. Otherwise, they just have the clip filename.
When the timeline is zoomed in to the maximum, the video track will show a thumbnail for every frame in the clip. When the timeline is not on maximum zoom, the video track will show a thumbnail for the first and last frame in the clip.
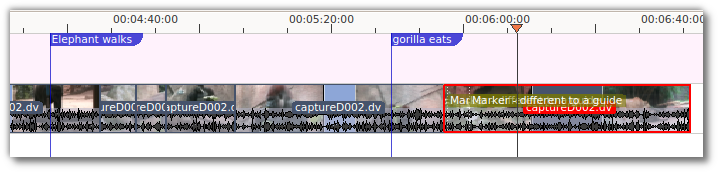
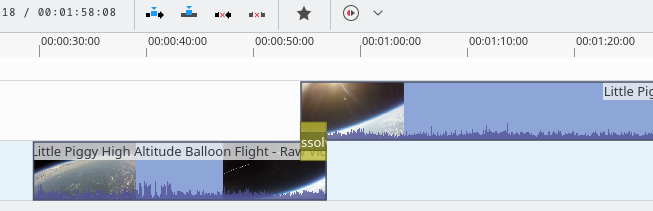
This toggles on and off the display of Markers saved within clips (the text with the gold background in the example below) and within Timeline Markers (the text with the purple background).
When this feature is on, dragging the beginning of one clip near to the end of another will result at the end of the first clip snapping into place to be perfectly aligned with the beginning of the second clip. As you move the two ends near to each other, as soon as they get within a certain small distance, they snap together so there is no space and no overlap. Note that this occurs even if the clips are on different tracks in the timeline.
Clips will also snap to the cursor position, markers and Timeline Markers.
This will zoom the project out so that it all fits in the timeline window. This is the same function that is triggered by Sequence Menu Menu item, Fit Zoom to Project.
The magnifying glasses zoom in or out on the timeline. The slider adjusts the zoom by large increments. These same settings are controlled by the Timeline menu items, Zoom In and Zoom Out.
Cutting Footage from multiple aligned tracks - Ripple Delete
There are 4 possibilities for ripple delete (point 1 and 2 are the classical Ripple Delete):
On the active track: Cut out the piece on the clip which you do not want with Shift+R. Right click on that piece and choose Extract Clip or press Shift+Del. This removes the clip and slides everything else to the left to fill the gap. The playhead stays where you made the last cut.
On the active track: Empty spaces between clips can only be removed by right click on empty space and choose Remove Space.
On all tracks together: Mark In and Out points in the Project Monitor or on the Timeline, then choose Timeline ‣ Removal ‣ Extract Timeline Zone (or Shift+X). Kdenlive deletes all footage between the In and Out points in unlocked tracks, slides everything else back to fill the gap, and puts the playhead on the In point.
On the active track with Insert Mode: Cut out the piece on the clip which you don’t want with Shift+R. Hit Delete. This removes the clip and slides everything else to the left to fill the gap. The playhead stays where you made the last cut.
On the left of the track head the green vertical lines (V1 or A2). The green line is connected to the source clip in the project bin. Only when a clip is selected in the project bin, the green line shows up depending on the type of the clip (A/V clip, picture/title/color clip, audio clip).
In the track head the target V1 or A1 is active when it’s yellow. An active target track reacts to edit operations like insert a clip even if the source is not active.
The concept is like thinking of connectors
Connect the source (the clip in the project bin) to a target (a track in the timeline). Only when both connectors on the same track are switched on the clip “flow” from the project bin to the timeline.
Important
Active target tracks without connected source react on edit operations.
Here is a brief introduction to the 3 point editing system.
Select a clip in the project bin with an up/down arrow
Navigate the clip by the JKL keys or by the left/right arrows and set the IN and the OUT point by the I and O keys.
Hit T to change to the timeline
Select a video or audio track in the timeline (up/down arrow key) and set it as source with Shift+T.
Activate the track as a target with shortcut A (this connects the track to the source)
Hit V (insert) or B (overwrite) to add the clip at the play-head position or to fill the selected area in the timeline if it is active. If you need to activate it use the G key.
In the following example, we want only to insert the audio part of a clip in A2 and we want to create a gap in all the other video and audio tracks:
Activate all the target tracks which contain clips (yellow buttons).
Disable timeline Effects
Mixed Audio tracks
Split Audio tracks
 , Do not use timeline zone
  .
.
 ) to temporarily group separate clips and then drag them around the timeline to create or remove space between clips. Very useful. Experiment with this tool to see how it works.
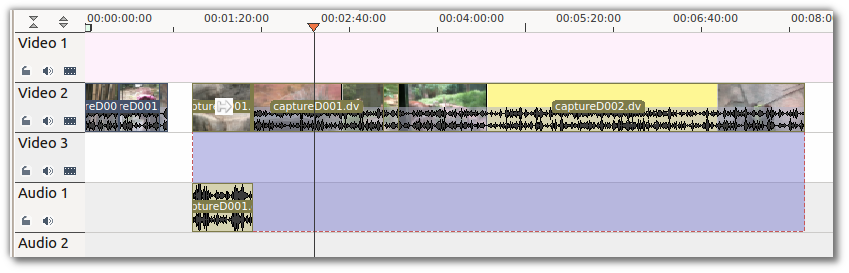
 ) to trim, in a single operation, the IN and OUT points of a clip forward or backward by the same number of frames, while keeping the original duration and without affecting adjacent clips.
 ) to trim a clip and shift following clips in the track by the number of frames you trim. When you shorten a clip by this action all clips that follow the cut shift back in time, contrariwise, when you extend a clip the clips after the cut shift forward in time. If an empty space is on the track it behaves as a clip and it shifts in time as a standard clip would be.