Estrazione di fotogrammi con una risoluzione maggiore rispetto al profilo del progetto
Sometimes you may need to work in your Kdenlive projects with image stills extracted from your source footage. Now that is easy, thanks to the “extract frame…” and “extract frame to project…” items in the context menu of the clip monitor. See also the chapter Estrai fotogramma nel progetto.
Attenzione
Kdenlive currently extracts frames according to your project settings. That means: if your source footage happens to be of higher resolution than your project settings and even different orientation, then the extracted frame will be in project frame format. In consequence, extracted frame quality might noticeably differ from the same video footage when used side-by-side in your project.
Project Profile and Profile-Differing Footage
In some projects you may face source footage that does not match the project profile at all. For instance, when working with certain screen recordings, especially when recorded on tablets and smartphones. The recordings might be even in a different orientation[1].
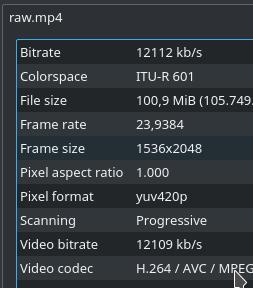
To give a concrete example: Recording the screen of an Android Tablet, say, a Samsung Galaxy Tab S3 gives raw footage with a frame size of 1536x2048 pixels with 2:3 aspect ratio (because the portrait orientation). Even when recording in landscape orientation, the 3:2 display aspect ratio isn’t ideal. And you may very well want to record in original resolution in order to not loose later downstream during post production when you may need the reverse in the raw footage.
Nota
The frame rate displayed by Kdenlive for this footage (see screenshot) is not even in the right ballpark. In fact, this footage has a widely varying frame rate (not to be confused with a variable bitrate), and Kdenlive/MLT/ffmpeg seem to offer wild guesses here, maybe based on the TV color range indicated for the video stream. But a 23500/1001 framerate is used by NTSC, yet this has been recorded with PAL cromaciticies on a PAL device.
Unfortunately, if you need to work with still images extracted from such source footage, then you might have already met a nasty surprise: Kdenlive’s media engine MLT extracts still frames always according to the project settings. Consider you have a FullHD 1920x1080 pixels 19:6 project. And the screencast footage is 1536x2048 pixels with 2:3 portrait aspect ratio. Then you end up with extracted frames of 1920x1080 pixels size with a landscape 16:9 aspect ratio and a lot of transparent space, but not the expected 1536x2048. So not only the resolution changed, but also the aspect ratio.
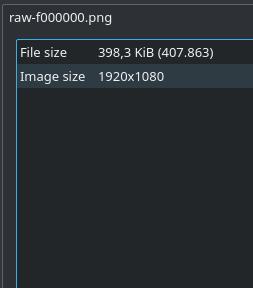
Hardly what you want here, as our detail screenshot shows. When comparing this clip monitor screenshot with the clip monitor screenshot taken from the raw footage, you’ll notice their different qualities. It does not matter which one you prefer, the issue is that they noticeably differ.
This is a no-no when we need to use both the raw footage as well as the extracted frames in the same project, especially adjacent to each other in the timeline. The differences are clearly visible, unless you compress the resulting video to the extreme of looking rather like a fake Barbapapa episode.
Estrazione frame risoluzione originale
Of course, after all timeline cuts have been mostly settled with the required extracted frames for stills, we could then manually (re-) extract the frames in their original resolution. Naturally, this is not only a daunting but also error-prone task.
Fortunately, there’s the easy route using the extract-frames bash shell script (courtesy of the original blog post author TheDiveO). Download the bash script (ZIP file), extract it and make it executable ($ chmod u+x extract-frames).
Avvertimento
A word of caution: before you let loose anything on your Kdenlive project directory that makes changes, make sure to have backed up your project first. You have been warned. We take no responsibility for any data losses or other losses you may experience.
Now run the script inside your project directory, where your frame image PNGs are located together with the corresponding video files from which the frames have been extracted. You always need to specify the Kdenlive project filename in order to run the script:
$ extract-frames myproject.kdenlive
That is all there is to it! You should now see also Kdenlive’s project bin noticing that the image files have been updated. Thus, you can run the script while your Kdenlive project is opened.
What does this script actually do? It first scans for frame image PNGs with filenames in the form xxx-f000000.png. Here, xxx is the filename (without extension) of the corresponding video file from which the frame has been extracted. At this time, the script only looks for corresponding video files ending in .mp4 and .MP4.
The f000000 part identifies the frame number from which the still frame has been extracted. Now this is posing an interesting question: in which reference system were these frames counted?
Remember that we wrote above that Kdenlive extracts frames from bin clips using the project properties? So, the reference system for counting extracted frame numbers is your project. And that is the reason why you need to tell extract-frames of your project: the script learns the project’s frame rate in order to correctly handle frame numbers. Without it, we would later extract the wrong frames in case the raw footage has a different frame rate and thus frame counting from your project.
Nota
The frame image files can be located not only in the project directory, but also in sub directories. The script will not find any extracted frame PNG files outside your project directory sub-tree, because it does not scan your Kdenlive project for extracted frames.
Attenzione
Do not change the project frame rate afterwards, or the frame extraction will get messed up. That is because the frame numbers from the filenames do not match the project settings anymore.
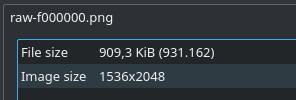
After you have run the extract-frames script, you should notice in Kdenlive’s clip properties pane that the extracted frame PNGs are now having the correct original frame size and aspect ratio. Just for completeness: the clip preview monitor now shows the same image quality as the original raw footage does. So you are all set to finalize and tape-out, erm, render your project.
If you happen to see color changes at this stage, then please check out our other How-to chapter about Color Hell: Ffmpeg Transcoding and Preserving BT.601.
Flusso di lavoro in poche parole
Your overall workflow does not change much, just throw running the extract-frames script inside your Kdenlive project directory whenever you need to update the frame image files with full-resolution images from your raw footage. You can run and rerun the script at any time while you work on your project.
But remember to not change the project frame rate while working on your project, as this will put the frame numbers encoded in the filenames out of sync.
Note
- Fonti
The original text was submitted by user TheDiveO to the now defunct kdenlive.org blog. For this documentation it has been lifted from kdenlive.org, updated and adapted to match the overall style.