语音转文本
警告
由于 Vosk API 的问题,21.04.2 版本无法使用语音转文本。请使用 21.04.1 或 21.04.3 及更高版本。
Before you can use Speech to Text, it must be properly configured and speech models installed. Please refer to the chapter Configure Speech to Text.
提示
While you can configure and set up both, VOSK and Whisper, for speech recognition, the engine that is selected in the Speech to Text configuration section is being used for speech recognition the next time you use this feature. You can switch back and forth during editing, of course, and use different engines for different purposes. The Speech Editor widget has a menu entry to quickly access the configuration section bypassing the Speech to Text route.
Speech Recognition
There are two use cases for speech recognition:
Creating subtitles automatically
Creating transcripts and the ability to add clips to the timeline based on the transcript
Creating Subtitles using VOSK Speech Recognition
If not yet created, add a subtitle track by clicking on the Edit Subtitle Tool icon in the Timeline tool bar (6).
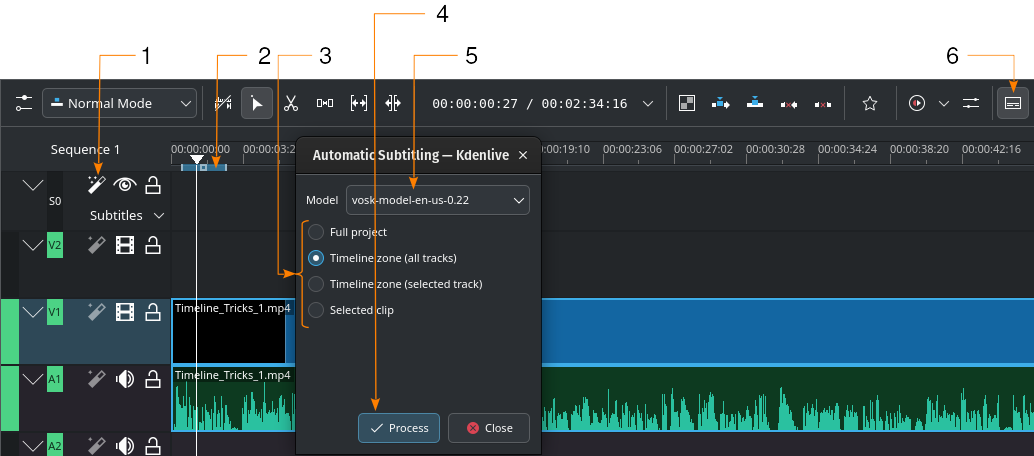
Automatic subtitle generation using the VOSK engine
- 1:
Speech recognition. Click here to open the Automatic Subtitling dialog window.
- 2:
Timeline Zone. More details about Timeline Zones can be found in the chapter 时间轴标尺.
- 3:
Choose which part of the timeline should be used for speech recognition
- 4:
Process. Click to start the recognition
- 5:
Model. Select the model for the language of the subtitles. You can install more models in the Configuration section Speech to Text.
- 6:
Edit Subtitle Tool. Click to open or close the subtitle track.
Steps to create subtitles using VOSK speech recognition
(numbers in brackets point to the GUI element in the screenshot above):
Speech recognition (1). Click here to open the Automatic Subtitling dialog window.
If needed, define a timeline zone (2) for which you want to use speech recognition. More details about Timeline Zones can be found in the chapter 时间轴标尺.
Model (5). Select the model for the language of the subtitles. You can install more models in the Configuration section Speech to Text.
Choose which part of the timeline should be used for speech recognition (3)
Process (4). Click to start the subtitle creation.
The subtitle is created and inserted automatically.
Remark to step 4: The default is to analyze only the Timeline zone (all tracks) (2 in the screenshot above). Set the timeline zone to what you want to analyze (use I and O to set in and out points). Selected clips option analyses the selected clip only.
Creating Subtitles using WHISPER Speech Recognition
If not yet created, add a subtitle track by clicking on the Edit Subtitle Tool icon in the Timeline tool bar (11).
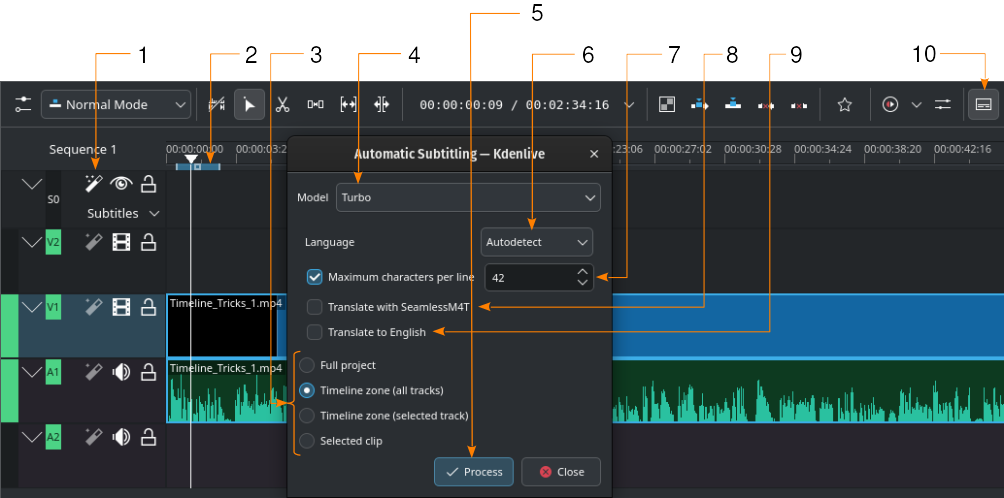
Automatic subtitle generation using the Whisper engine
- 1:
Speech recognition. Click here to open the Automatic Subtitling dialog window.
- 2:
Timeline Zone. More details about Timeline Zones can be found in the chapter 时间轴标尺.
- 3:
Choose which part of the timeline should be used for speech recognition
- 4:
Model. Select the model for the language of the subtitles. You can install more models in the Configuration section Speech to Text.
- 5:
Process. Click to start the recognition
- 6:
Language. Default is Autodetect. Change to the correct language if not detected properly.
- 7:
Maximum character per line. Define how many characters per line are allowed before a line break is inserted.
- 8:
Translate with SeamlessM4T. Checking this opens adds two more selection fields: One for the Input language, and one for the Output language. This requires that translation with SeamlessM4T is enabled in the settings (). Please refer to the chapter about Speech to Text.
- 9:
Translate to English. Select this to use Whisper for the translation to English.
- 10:
Edit Subtitle Tool. Click to open or close the subtitle track.
Steps to create subtitles using VOSK speech recognition
(numbers in brackets point to the GUI element in the screenshot above):
Speech recognition (1). Click here to open the Automatic Subtitling dialog window.
If needed, define a timeline zone (2) for which you want to use speech recognition. More details about Timeline Zones can be found in the chapter 时间轴标尺.
Model (5). Select the model for the language of the subtitles. You can install more models in the Configuration section Speech to Text.
Choose which part of the timeline should be used for speech recognition (3)
Process (4). Click to start the subtitle creation.
The subtitle is created and inserted automatically.
Remark to step 4: The default is to analyze only the Timeline zone (all tracks) (2 in the screenshot above). Set the timeline zone to what you want to analyze (use I and O to set in and out points). Selected clips option analyses the selected clip only.
Translate with SeamlessM4T
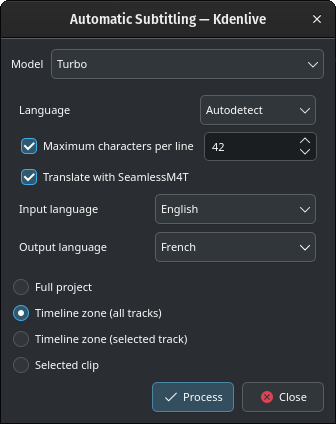
Translating with SeamlessM4T
Select Input Language and Output Language and click Process.
This will first process the audio using Whisper, then start the SeamlessM4T translation. Translation can occupy 100% RAM, 100% CPU and 100% disk access.
注意
如果9GB模型尚未下载,现在将下载。使用100MB/s的下载速度,这将大约需要12分钟!
During download Kdenlive will react as normal. Do not click on Close, otherwise the download is stopped.
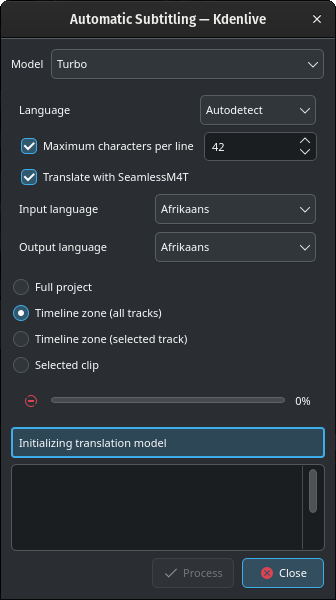
Don’t worry if you see such a message on the box below Initializing translation model while the download is running.
Depending on your internet connection and bandwidth, downloading the model can take quite some time (about 12 minutes with 100MB/s download speed).
Once the translation model is downloaded, translation will start.
Creating Clips using Speech Recognition
This is useful for interviews and other speech-related footage. Go to the Speech Editor widget. If not yet enabled, do so via .
备注
Using speech recognition to create transcripts and create clips from that, is only possible with clips in the Project Bin.
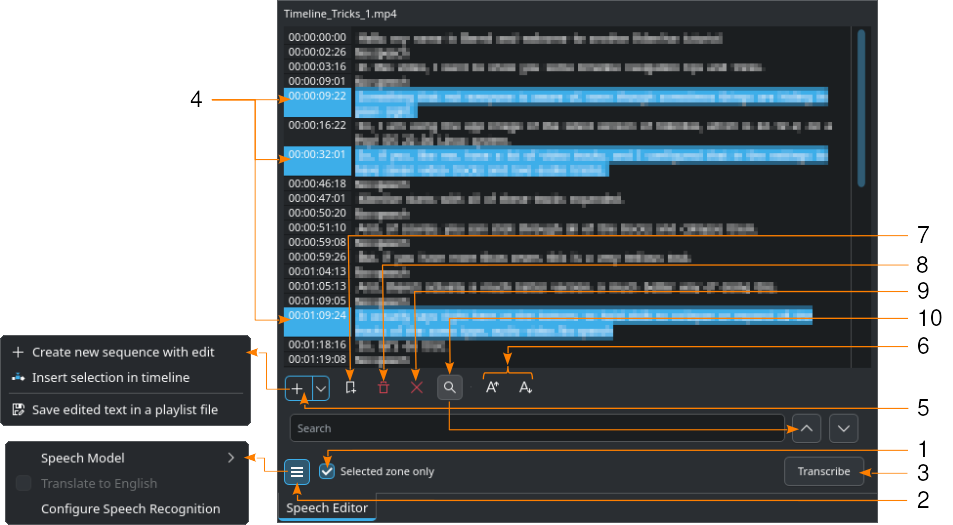
Shown with the VOSK engine and Search (10) enabled
在 项目素材箱 中选择一个片段。
- 1:
If needed, set in and out points in the Clip Monitor and check Selected zone only. This will only transcribe text inside that zone.
- 2:
Click on
Hamburger Menu and choose the model for the correct language when the VOSK engine is set for speech recognition. If the Whisper engine is selected, you can select Translate to English if needed. You select the speech recognition engine in . Click on Configure Speech Recognition to open the configuration section for Speech to Text. For more details about the configuration refer to the chapter Configure Speech to Text.
- 3:
Press the Transcribe button.
- 4:
选择你想要的文本。按住 CTRL 或 Shift 选择多个文本。
- 5:
Create new sequence with edit creates a new sequence with each timecode-text as a single clip. Insert selection in timeline creates clips for each selected timecode-text starting at the playhead’s position. Save edited text in a playlist file creates an asset in the project bin with the entire transcribed text.
- 6:
Increase font size and
Decrease font size decrease, respectively, increase the font size.
- 7:
Add marker adds a marker for the timecode of the selected text. More details about Timeline Markers and Markers are available in the chapter about Timeline Markers.
- 8:
Delete selection deletes the selected text.
- 9:
Remove non speech zones deletes all “No speech” entries at once.
- 10:
Search in text toggles the search field. Enter text you want to find in the transcribed text. Search is not case sensitive and finds all occurrences of the string even within words.
and
navigate to the next occurrence of the search term. If the search field turns reddish you have reached the last occurrence of the search term in the text.
Silence Detection
备注
这仅适用于VOSK引擎。
Select the clip in the Project Bin and open the speech editor window () .
Click on Hamburger Menu and choose the model for your language. If the right model is not listed, click on Configure Speech Recognition. For details about how to add models for the VOSK engine refer to the chapter about Plugins.
然后点击 开始识别 按钮。
完成后,选择上面的第6点中的 一次删除非语音区域。或者点击“无语音”指示的时间码(按 Ctrl 选择多个项目),然后按 Delete 键。
重复操作,删除所有你想要删除的部分,包括那些你说你不想包含在最终编辑中的部分。
完成后,确保禁用 仅选择区域,点击 将编辑后的文本保存到播放列表文件 按钮(在上面的第5点),然后几秒钟后,一个新的播放列表将添加到项目素材箱中,没有静音,也没有你不想包含的文本。