用户界面
本章节将介绍 Kdenlive 用户界面 (UI),解释各种 元素,图标,按钮,菜单选项,可加快编辑工作的默认 键盘快捷键,以及如何 自定义布局 以适应特定的后期制作流程。
Welcome and Splash Screen
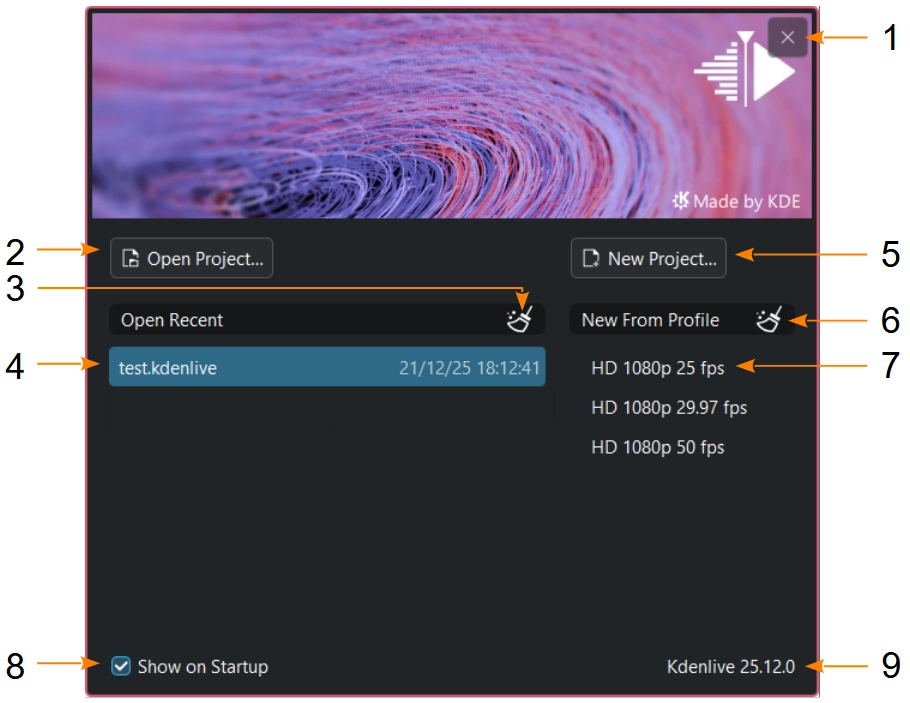
When starting Kdenlive a welcome screen appears on which you can:

Kdenlive’s default welcome screen
- 1:
Cancel the start of Kdenlive
- 2:
Opens the Open dialog after start
- 3:
Clears the history list of recent projects
- 4:
Opens a recent project directly. The same list as in open recent.
- 5:
Opens the New dialog after start
- 6:
Clears the history list of recent profiles
- 7:
Opens a new project with the setup of a recent profile
- 8:
If un-checked, Kdenlive will show the splash screen on startup instead. You can enable the Welcome Screen in the environment settings
- 9:
Shows the Kdenlive version
If a project is opened from command line or file browser, instead of the welcome screen the splash screen is showing up.

Kdenlive’s splash screen when the welcome screen is disabled or a project is opened from command line or file browser
User Interface after Kdenlive has Started
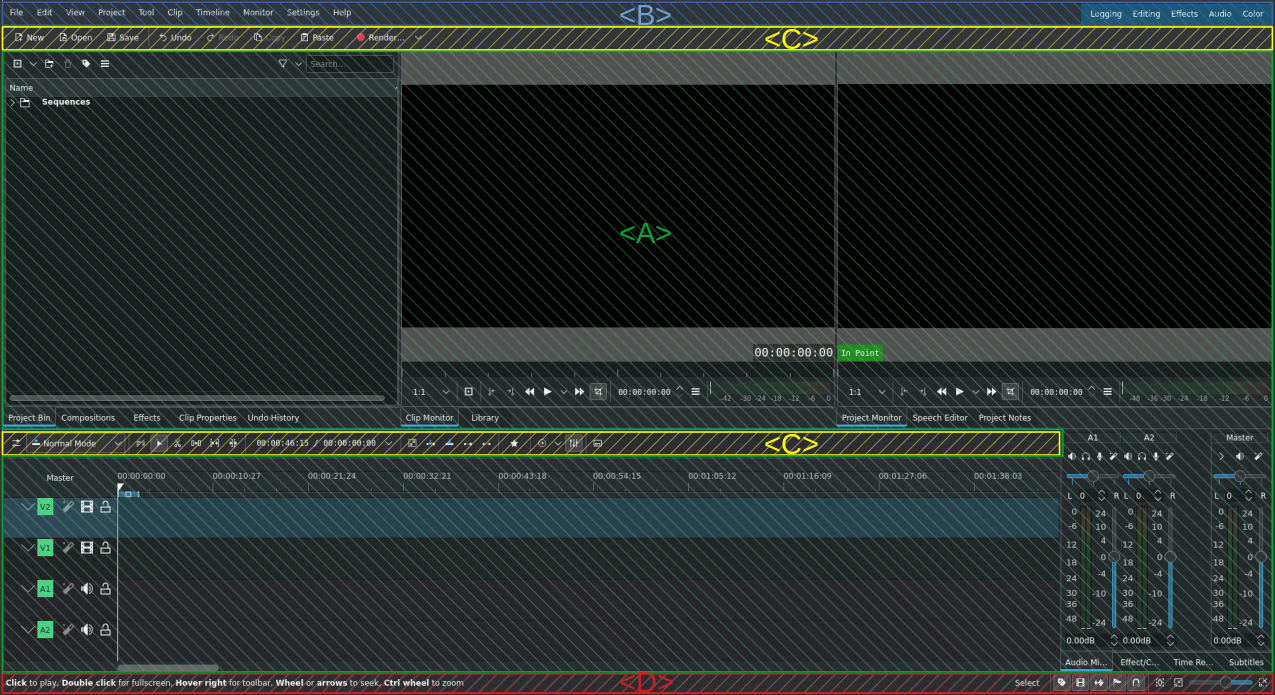
启动 Kdenlive 后,窗口应与下图类似。Kdenlive 的用户界面 (UI) 在所有平台上都是一致的,因此无论您的操作系统是 Linux,Windows 还是 MacOS 都没有关系。当然,图标和文本看起来会有所不同。
用户界面分为四个主要部分:
[A] 有各种可以根据需要进行排列的 窗口部件 的工作区。详见 视图菜单 和 工作区布局。
[D] 屏幕底部的 状态栏。

Kdenlive 的默认屏幕布局 (以编辑视图为例):菜单栏 (蓝色),工具栏 (黄色),工作区 (绿色) 和状态栏 (红色)。
工作区
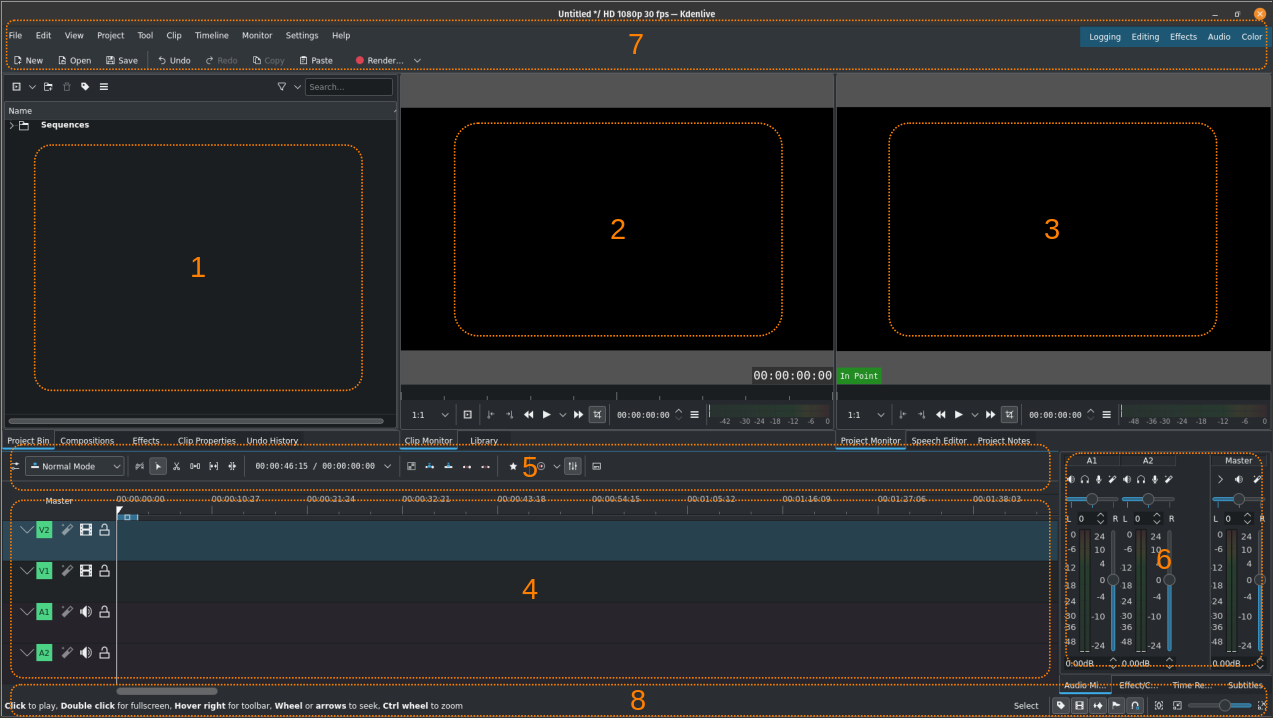
工作区模式遵循视频编辑流程,可根据个人风格和偏好进行调整。默认情况下,Kdenlive 以编辑工作区模式启动,如下所示:

Kdenlive 的默认工作区 (以编辑视图为例)
- [1] 项目素材箱,素材库:
This is where you keep your source files (video clips, images and image sequences, title and color clips, animations, audio files). In this screenshot the widgets for Undo History, Compositions, and Effects have been added to this section.
- [2] 剪辑监视器:
- [3] 项目监视器:
This is where the content of the timeline is being displayed with all effects and compositions applied. In this screenshot the widgets for Speech Editor and Project Notes have been added to this section. See the chapter 项目监视器 for more details.
- [4] 时间轴:
Most of the action is taking place in the timeline. Here you put your sources in the order in which they will appear in the final video, make your edits (cuts and trimmings), apply effects, add compositions and transitions, and add audio and sound tracks. See the chapter 时间轴 for more details.
- [5] 时间轴工具栏:
在这里您可以找到编辑视频项目所需的所有工具。详情请参阅 时间轴工具栏 一章。
- [6] 混音器:
这部分是 音频混音器面板,您可以在此控制各音轨和主音轨的音量和左右声道平衡。
- [7] 菜单栏,工具栏:
在屏幕顶部,您可以访问菜单 (详见 菜单栏 和 菜单),工作区布局 和 主工具栏。可以使用 Ctrl+M 打开或关闭菜单栏。
- [8] 状态栏:
根据鼠标指针悬停的位置,Kdenlive 会在状态栏左侧显示特定上下文信息或提示。在中间位置,您会看到时间轴上悬停的片段名称。在时间轴中处理剪辑时的错误信息也会出现在这里。在右侧,Kdenlive 会显示当前选择的时间轴 编辑工具,以及各种启用/关闭时间轴功能的图标。更多详情,请参阅 状态栏图标 和 状态栏 章节。