Inicio rápido
Creación de un nuevo proyecto
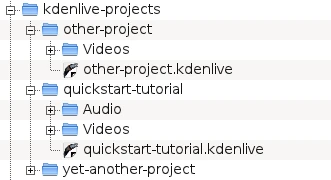
Estructura de directorios de Kdenlive
El primer paso es la creación de una carpeta para el nuevo proyecto. La llamaremos tutorial-iniciorapido/ en este tutorial. Luego obtener algunos medios de video de muestra o descargarlos de aquí Kdenlive-tutorial-videos-2011-avi.zip (7 MB)[1] y extraerlos a una subcarpeta llamada tutorial-iniciorapido/Videos/ dentro de la carpeta del nuevo proyecto.
La imagen a la izquierda muestra la estructura sugerida de carpetas: Cada proyecto tendrá su propia carpeta, conteniendo los archivos de video en la subcarpeta Videos, los de audio en la subcarpeta Audio, etc. (ver también Estructura de carpetas)
Nota
A partir de ahora el tutorial asumirá que se están usando los archivos de video provistos, aunque funcionará con cualquier otro también.
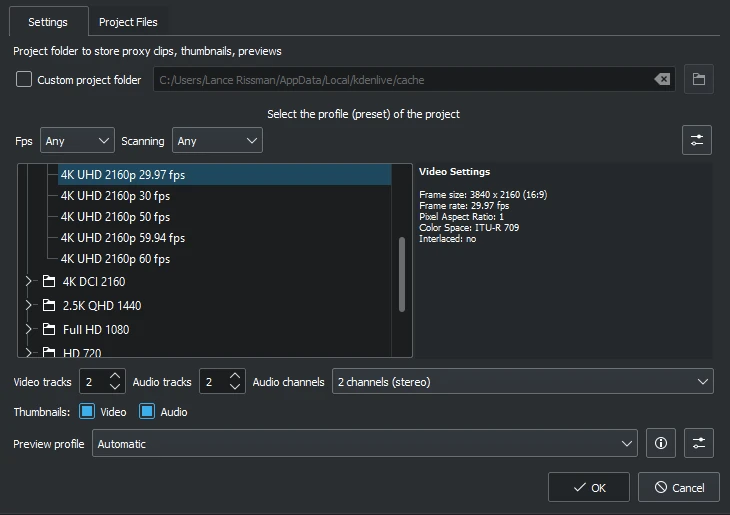
Diálogo de nuevo proyecto
Abrir Kdenlive y crear un nuevo proyecto .
Elegir la carpeta de proyecto creada previamente (tutorial-iniciorapido/) y seleccionar un perfil de proyecto apropiado. Los archivos de video provistos arriba son de 720p a 23,97 fps. [2] Si se estuvieran utilizando otros archivos y no se conocieran sus características, Kdenlive sugerirá un perfil apropiado al cargar el primer medio [3] , de manera que será posible dejar estas opciones tal como estén.
Si se deseara, sería posible utilizar el tema oscuro de la interfaz desde el menú .
Carga de medios
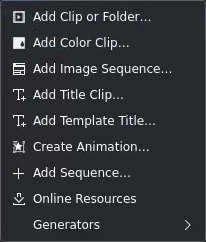
Panel Medios: Carga de medios de video
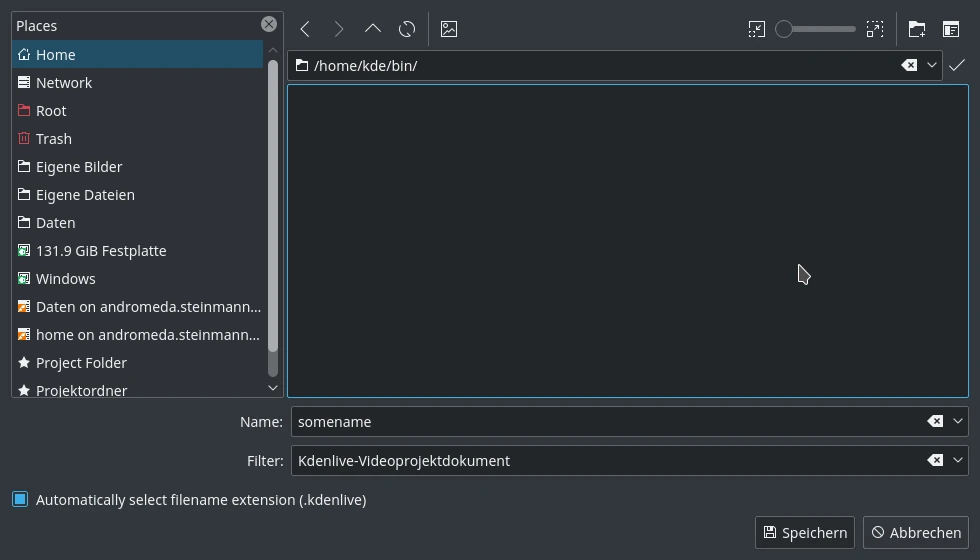
Ahora que el proyecto se encuentra listo, comencemos a cargar algunos medios (p.ej: los descargados previamente). Esto se hará desde el panel Medios; un clic sobre el botón  abrirá directamente un explorador de archivos, mientras que un clic sobre la pequeña flecha descendente mostrará una lista con tipos adicionales de medios que será posible cargar, crear o generar. Desde el explorador de archivos de será posible cargar medios de video, audio, imágenes, así como otros proyectos de Kdenlive al proyecto activo.

Interfaz de Kdenlive con los archivos del tutorial cargados
Luego de haber cargado los medios, Kdenlive lucirá similar a esto. Sobre la esquina superior izquierda se encuentra el ya conocido panel Medios. A su derecha se encuentran los monitores, en donde es posible visualizar el material: El Monitor de medios muestra el video de los medios originales, el Monitor de secuencias muestra cómo lucirá el video final, con todos los efectos, transiciones, etc. aplicados. El tercer elemento, también muy importante, es la Línea de tiempo (debajo de los monitores): Allí es donde los clips serán editados. Existen dos tipos distintos de pistas: de video y de audio. Las de video podrán contener cualquier tipo de clip, sin embargo cuando se arrastre un medio a una pista de audio, solo se utilizará el audio del mismo.
Guardar un proyecto de Kdenlive
Guardemos el trabajo usando el menú . Esto guardará nuestro proyecto, esto es, la edición de los clips en la línea de tiempo, los efectos que fueron aplicados, así como otros detalles. Este no podrá ser reproducido.[4] Al proceso de creación del video final se le llama Procesamiento.
Línea de tiempo
Nota
En esta sección de Inicio rápido no nos adentraremos en los detalles de la Línea de tiempo y sus componentes. Información más detallada se encuentra disponible en la sección Línea de tiempo de este manual.
Ahora viene la edición en sí misma. Los medios serán combinados en la Línea de tiempo para alcanzar un resultado final. Llegarán hasta allí al ser arrastrados y soltados[5]: Arrastrar el medio Napoli (asumiendo que se estén usando los archivos provistos más arriba, como se hará en el resto de este tutorial; si no fuera así, por favor asegurarse de que la pantalla sea a prueba de agua y, quizás, de tomates) desde el panel Medios hasta la primera pista de la Línea de tiempo. En este caso la pista V2.
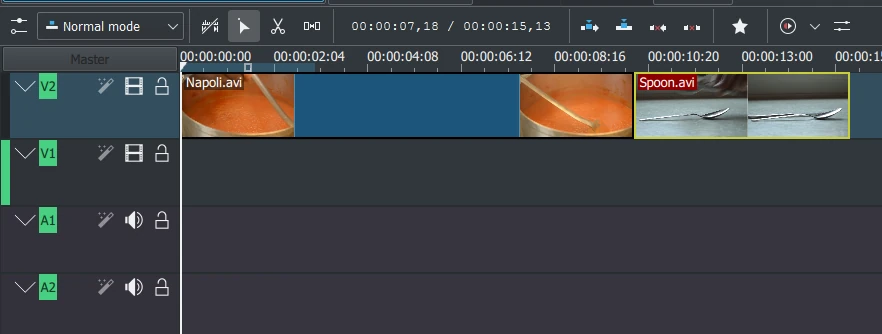
Primeros clips en la Línea de tiempo
Dado que también se necesitarán algunos cubiertos, vamos a arrastrar el medio Spoon y soltarlo también en la primera pista (V2). Luego arrastraremos el clip Napoli hasta el inicio de la Línea de tiempo (de otro modo el video final comenzará con algunos segundos de color negro) y el clip Spoon justo a continuación, de manera que quede como en la imagen de la izquierda. (En donde se ha hecho un acercamiento de la vista mediante Ctrl+Rueda.)

Cursor de tiempo
El resultado ya puede ser visto presionando Espacio (o el botón Reproducir en el Monitor de secuencias). Se podrá ver el clip Napoli, seguido directamente por el clip Spoon. Si el cursor de tiempo no se encontrara en el comienzo, el Monitor de secuencias comenzará a reproducir desde alguna parte en medio; será posible moverlo arrastrándolo desde la regla de la Línea de tiempo o desde el Monitor de secuencias. Si se prefirieran accesos rápidos de teclado, Ctrl+Inicio hará lo mismo para el monitor activo. (Seleccionar el si no lo estuviera ya, antes de usar este acceso rápido).
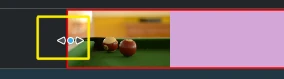
Marcador de redimensionamiento
Ya que luego de comer viene el juego, existe un medio llamado Billiards. Agregarlo también a la Línea de tiempo (en la pista V1). Durante los primeros 1,5 segundos nada sucede en el clip, por lo que se podría cortar para evitar que el video se torne aburrido. Una manera sencilla[6] de hacerlo es mover el cursor de tiempo hasta la posición deseada (donde queramos cortar el video), y luego arrastrar el extremo izquierdo del clip, una vez que aparezca el marcador de redimensionamiento. Cuando se lo mueva suficientemente cerca del cursor de tiempo, este se adherirá al mismo.
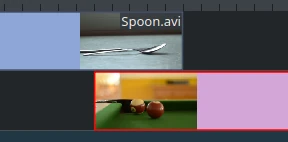
Superposición de clips
Para agregar una transición entre la comida (Spoon) y el juego (Billiard), ambos clips necesitarán estar superpuestos. Para ser precisos: deberá colocarse el segundo clip por encima o debajo del primero. El primer clip deberá finalizar algunos fotogramas después de que el segundo hubiera comenzado. Un acercamiento hasta que aparezcan las marcas de los fotogramas individuales podrá ser de ayuda aquí; también lo facilitará tener siempre transiciones de una misma duración, de cinco fotogramas en este caso.
Es posible hacer un acercamiento tanto usando el en la esquina inferior derecha del la ventana de Kdenlive, como usando Ctrl+Rueda del ratón. El el primer caso, Kdenlive efectuará el acercamiento centrándose en el cursor de tiempo, en el segundo caso lo hará centrándose en el puntero del ratón; por lo tanto primero se deberá colocar el cursor de tiempo o el puntero del ratón en la posición que se quiera ver de cerca, para luego recién accionar el zoom.
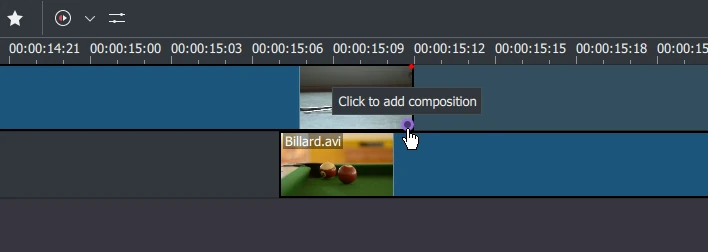
Marcador de transición
Ahora que los clips se encuentran superpuestos, la transición podrá ser agregada. Esto se hará haciendo clic derecho sobre el clip superior y escogiendo y luego o, más fácil, posando el puntero del ratón sobre la esquina inferior derecha del clip Spoon hasta que aparezca el puntero con forma de dedo índice y se lea el mensaje «Clic para agregar un método de composición» en la barra de estado. Esto último, de forma predeterminada, agregará una transición de tipo fundido, lo que en este caso será la mejor idea de todas formas, dado que la cuchara no es necesaria para el juego de billar.
La transición fundirá el primer clip con el segundo. Ver también Transición.
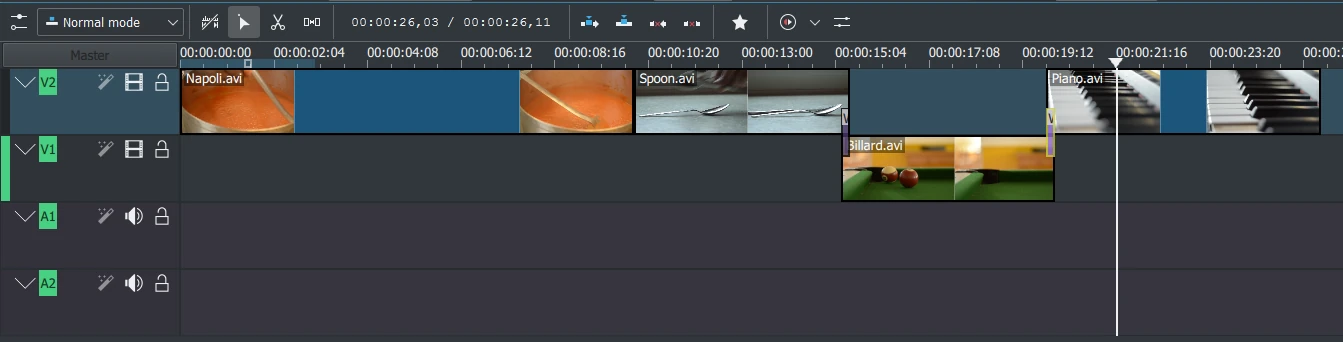
Agreguemos ahora el último medio, Piano, y otra vez aplicaremos una transición. Al agregarlo en la primera pista de la Línea de tiempo (V2), será necesario hacer clic en la esquina inferior izquierda del nuevo clip para agregar la transición con el clip anterior.
Efectos
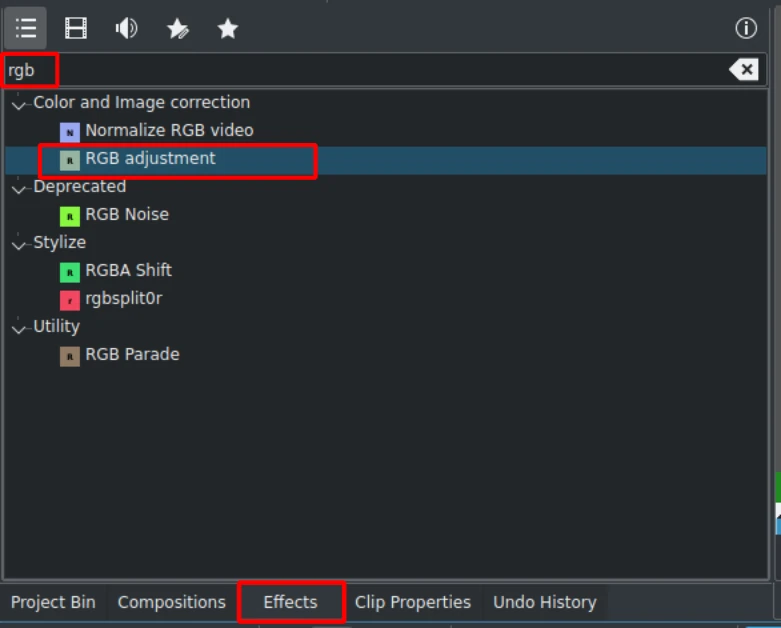
Panel Efectos
Es posible colorear el clip Piano agregándole un efecto. Seleccionar dicho clip en la Línea de tiempo. Hacer clic sobre el panel Efectos (si el panel no se encontrara visible, habilitarlo mediante: ). En el campo de búsqueda ingresar ajustar y luego hacer doble clic sobre el efecto .
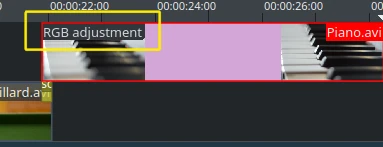
Una vez que el efecto haya sido agregado, hacer clic sobre un área vacía de la Línea de tiempo y se mostrará su nombre sobre el clip en la Línea de tiempo. También se mostrará en el panel .
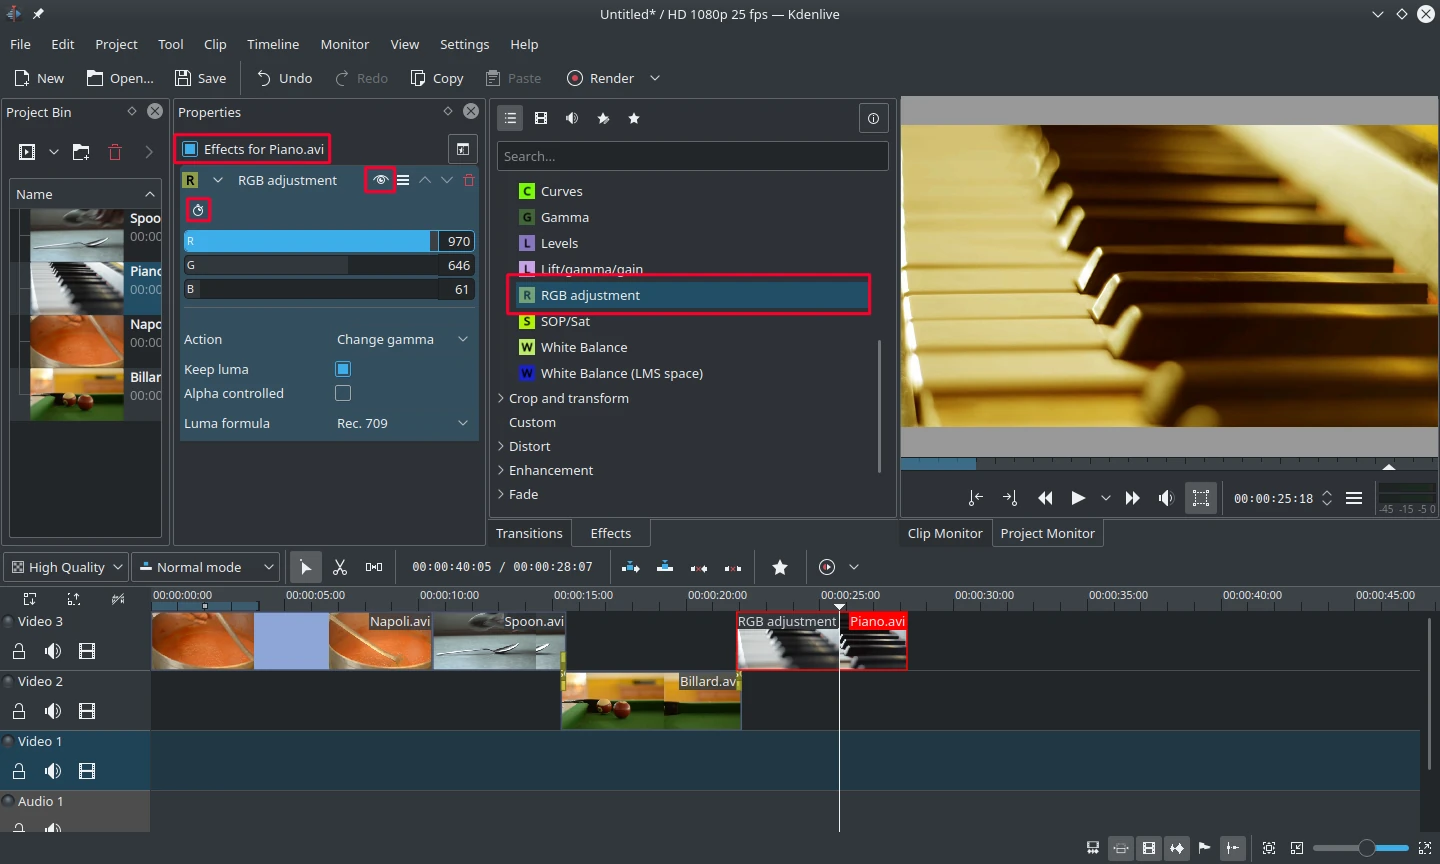
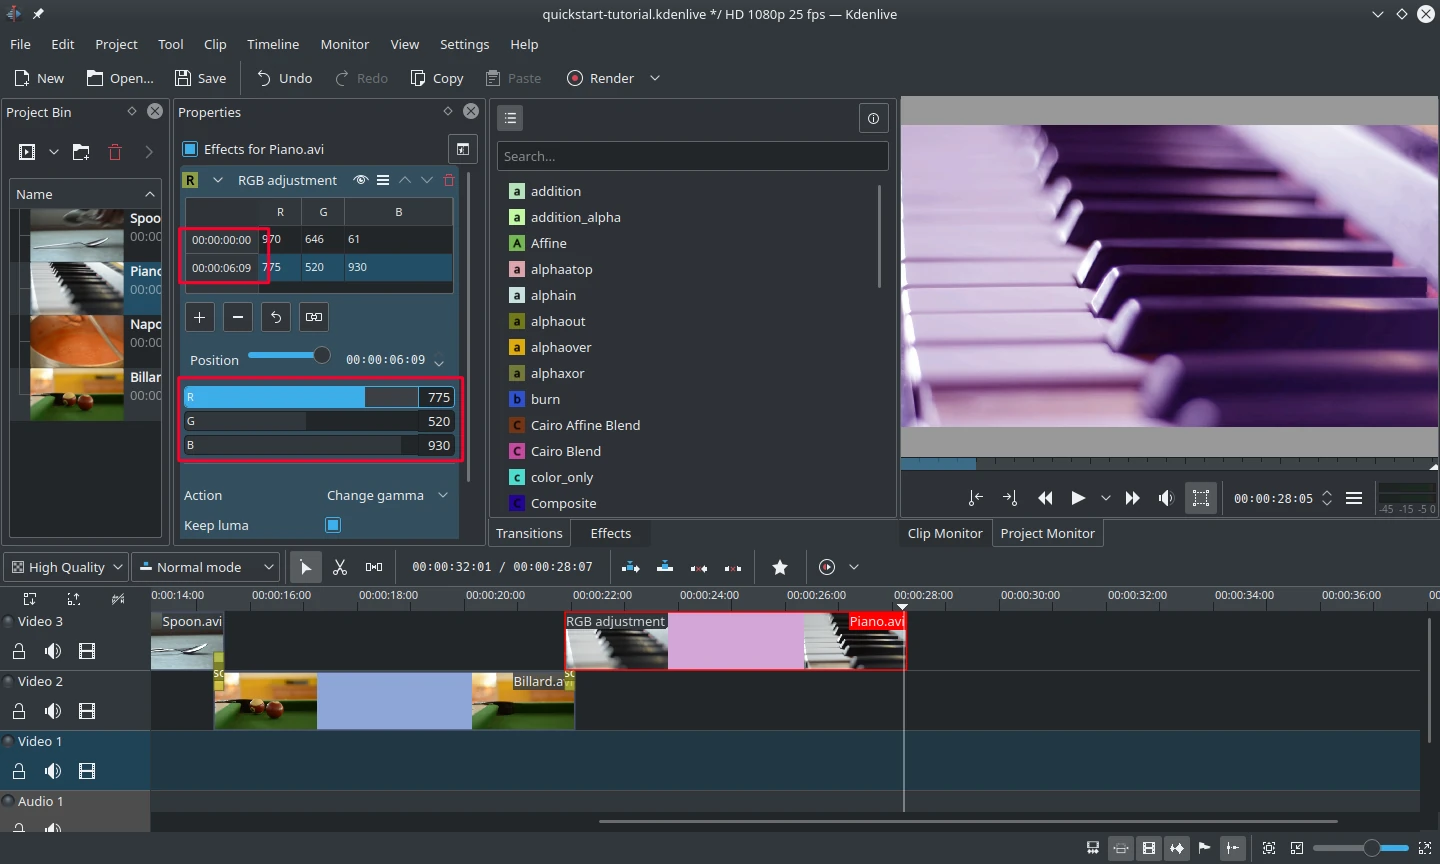
Opciones de efectos/composición con el efecto Ajustar RVA
Para obtener un tono cálido amarillo-anaranjado sobre la imagen, coincidente con una tarde confortable, será necesario reducir el azul y aumentar el rojo y el verde.
Los valores en el panel Opciones de efectos/composición podrán ser cambiados usando los deslizadores (el botón central del ratón restablecerá su valor) o ingresando valores de forma directa haciendo clic en el extremo derecho de los deslizadores.
El panel Opciones de efectos/composición siempre mostrará las opciones de los efectos aplicados al medio/clip o pista seleccionados. Cada efecto podrá ser deshabilitado temporalmente haciendo clic en el ícono del ojo, también se podrán deshabilitar temporalmente todos los efectos del medio/clip/pista usando el ícono del ojo en la parte superior derecha de este panel (sus opciones serán igualmente almacenadas). Esto puede resultar útil para, por ejemplo, efectos que requieran mucha potencia de cómputo y que podrán ser temporalmente deshabilitados durante la edición, para ser posteriormente habilitados antes del procesamiento final.
Para algunos efectos, como el aquí utilizado, será posible agregar fotogramas clave. El ícono del cronómetro permitirá esto. Los fotogramas clave (o simplemente claves) son usados para cambiar los valores de las opciones de los efectos a lo largo del tiempo. En nuestro clip, esto permitirá fundir el color del piano, desde un color cálido correspondiente a un atardecer, a uno frío en la noche.
Fotogramas clave de efectos
En el panel Opciones de efectos/composición llevar el cursor de tiempo del efecto hasta el final del mismo (extremo derecho). Luego hacer clic sobre el ícono de (el cronómetro). Ahora existirán dos claves, uno al inicio del clip, con los valores ingresados previamente, y otro al final, inicialmente también con los mismos valores.
Asegurándose de que el último clave se encuentre seleccionado, es tiempo de inundar ese piano con un azul profundo.
Regresar el cursor de tiempo hasta el inicio del proyecto y reproducirlo (mediante Espacio o el botón Reproducir en el ), ahora el piano debería cambiar de tono como se deseaba.
Introducir fotogramas clave ha sido la parte más difícil de este tutorial. Una vez hecho esto, dominar Kdenlive será fácil!
Nota
En esta sección de inicio rápido sobrevolamos los efectos de forma muy veloz. Se encuentran disponibles más detalles acerca de los efectos, así como una explicación sobre cada uno de ellos en la sección Efectos de este manual.
Música
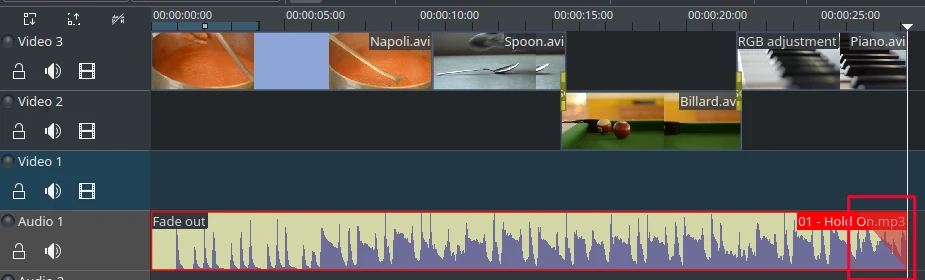
Fundido saliente de audio
Dado que los clips con los que estamos trabajando no contienen audio, buscaremos música en nuestra colección privada o en páginas web tales como Jamendo. Luego de cargar el audio en el panel Medios, deberá ser arrastrado hasta una pista de audio de la Línea de tiempo.
El clip de audio podrá ser redimensionado en la Línea de tiempo de la misma manera en que se hace con los clips de video. El cursor se adherirá automáticamente al final del proyecto. Para agregar un efecto de fundido saliente al final del clip de audio (excepto que justo se hubiera encontrado un archivo con la extensión exacta) se podrá posar el puntero del ratón sobre el extremo superior derecho (o izquierdo) del clip y arrastrar el triángulo rojo hasta la posición en donde el fundido debería comenzar.[7]
Procesamiento
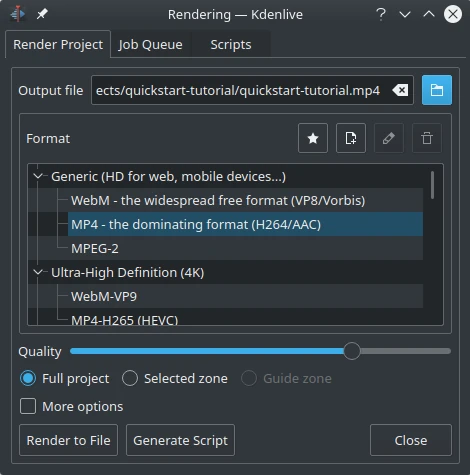
Diálogo de procesamiento
¡Unos pocos minutos más y el proyecto estará concluido! Hacer clic sobre el botón Procesar (o ir a l menú o pulsar Ctrl+Intro) para que se muestre el diálogo de Procesamiento (izquierda). Seleccionar el nombre del archivo para el nuevo video a ser generado, con todos los efectos y transiciones, elegir MP4 (funciona casi en todos lados), seleccionar la ubicación del archivo de salida y presionar el botón Procesar a archivo.
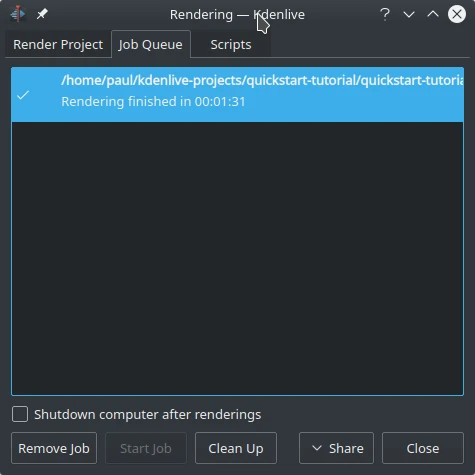
Progreso del procesamiento
Luego de algunos segundos el procesamiento habrá finalizado y nuestro primer proyecto con Kdenlive estará pronto. ¡Felicitaciones!