Riconoscimento vocale
Avvertimento
Il riconoscimento vocale non funziona nella versione 21.04.2 a causa di alcuni problemi con l”API Vosk. Usa la versione 21.04.1, oppure la 21.04.3 o le successive.
Prima di usarlo, il riconoscimento vocale deve essere configurato correttamente, e devono essere installati i modelli per riconoscimento vocale. Fa riferimento al capitolo Configura il riconoscimento vocale.
Suggerimento
Sebbene sia possibile configurare e impostare sia VOSK che Whisper per il riconoscimento vocale, il motore selezionato nella sezione di configurazione Riconoscimento vocale verrà utilizzato per il riconoscimento vocale la prossima volta che verrà utilizzata questa funzione. Ovviamente è possibile passare da uno all’altro durante la modifica, oltre a poter utilizzare motori diversi per scopi diversi. L’oggetto Editor vocale dispone di una voce di menu che consente di accedere rapidamente alla sezione di configurazione, evitando il percorso Riconoscimento vocale.
Riconoscimento vocale
Ci sono due casi d’uso per il riconoscimento vocale:
La creazione automatica dei sottotitoli
La creazione di trascrizioni e la possibilità di aggiungere le clip nella linea temporale in base alla trascrizione
Creazione di sottotitoli usando il riconoscimento vocale VOSK
Se non era ancora stata creata, aggiungi una traccia dei sottotitoli facendo clic sull’icona  Strumento di modifica dei sottotitoli nella barra degli strumenti della linea temporale (6).
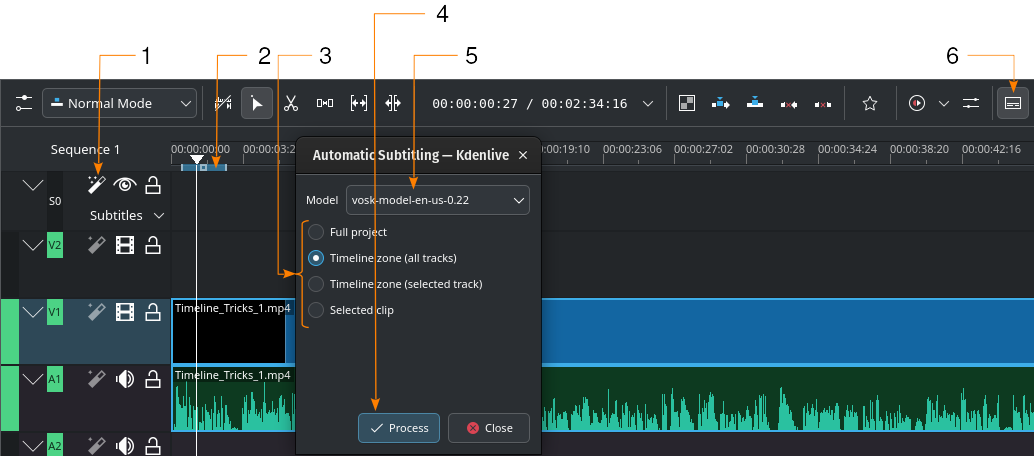
Generazione automatica dei sottotitoli usando il motore VOSK
- 1:
 Riconoscimento vocale. Fai clic qui per aprire la finestra Sottotitolazione automatica.
- 2:
Zona dalla linea temporale. Maggiori dettagli sulle zone dalla linea temporale possono essere trovati nel capitolo Righello della linea temporale.
- 3:
Scegli quale parte della linea temporale dovrebbe essere usata per il riconoscimento vocale
- 4:
Elabora. Fai clic per iniziare il riconoscimento
- 5:
Modello. Seleziona il modello per la lingua dei sottotitoli. Puoi installarne di altri nella sezione Configurazione del Riconoscimento vocale.
- 6:
- Strumento di modifica dei sottotitoli. Fai clic per aprire o per chiudere la traccia dei sottotitoli.
I passi per creare i sottotitoli usando il riconoscimento vocale VOSK
(i numeri tra parentesi indicano l’elemento dell’interfaccia utente nella schermata precedente):
- Riconoscimento vocale (1). Fai clic qui per aprire la finestra per la Sottotitolazione automatica.
Se necessario, definisci una zona dalla linea temporale (2) nella quale vuoi utilizzare il riconoscimento vocale. Puoi trovare maggiori dettagli sulle zone dalla linea temporale nel capitolo Righello della linea temporale.
Modello (5). Seleziona il modello per la lingua dei sottotitoli. Puoi installarne di altri nella sezione Configurazione del Riconoscimento vocale.
Scegli quale parte della linea temporale dovrebbe essere usata per il riconoscimento vocale (3)
Elabora (4). Fai clic per iniziare la creazione dei sottotitoli.
Il sottotitolo viene creato e inserito automaticamente.
Nota sul passaggio 4: il comportamento predefinito è analizzare solamente la Zona dalla linea temporale (tutte le tracce), cioè il passaggio 2 nella schermata qui sopra. Imposta la zona della linea temporale a quella che vuoi analizzare (usa I e O per impostare i punti di attacco e di stacco). L’opzione Clip selezionate analizza solamente le clip selezionate.
Creazione di sottotitoli con il riconoscimento vocale WHISPER
Se non era ancora stata creata, aggiungi una traccia dei sottotitoli facendo clic sull’icona Strumento di modifica dei sottotitoli nella barra degli strumenti della linea temporale (11).
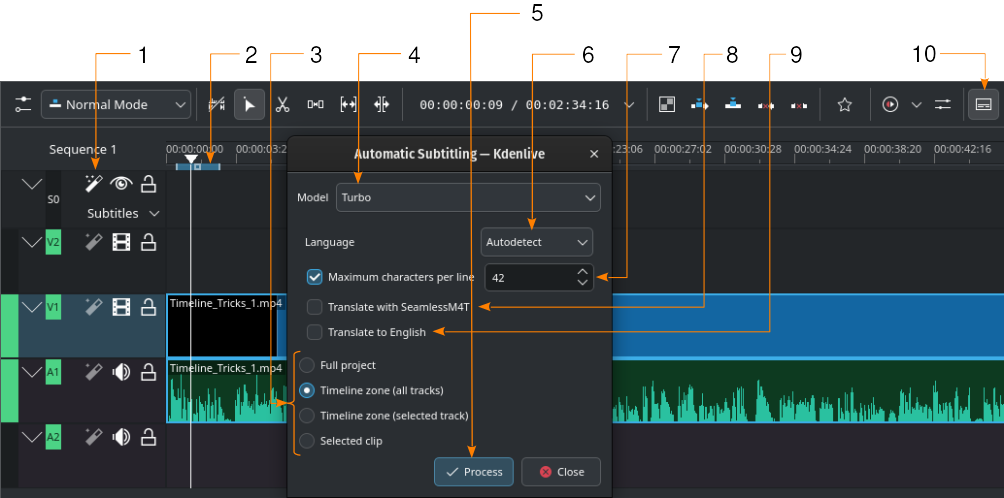
Generazione automatica dei sottotitoli usando il motore Whisper
- 1:
- Riconoscimento vocale. Fai clic qui per aprire la finestra Sottotitolazione automatica.
- 2:
Zona dalla linea temporale. Maggiori dettagli sulle zone dalla linea temporale possono essere trovati nel capitolo Righello della linea temporale.
- 3:
Scegli quale parte della linea temporale dovrebbe essere usata per il riconoscimento vocale
- 4:
Modello. Seleziona il modello per la lingua dei sottotitoli. Puoi installarne di altri nella sezione Configurazione del Riconoscimento vocale.
- 5:
Elabora. Fai clic per iniziare il riconoscimento
- 6:
Lingua. Il valore predefinito è Rileva automaticamente. Modificalo se la lingua non viene riconosciuta correttamente.
- 7:
Numero massimo di caratteri per riga. Definisce quanti caratteri per riga sono consentiti prima che venga inserita un’interruzione.
- 8:
Traduci con SeamlessM4T. Spuntando questa opzione vengono aggiunti altri due campi di selezione: uno per Lingua in ingresso, e l’altro per Lingua in uscita. Ciò richiede che la traduzione con SeamlessM4T sia abilitata nelle impostazioni (). Fai riferimento al capitolo sul Riconoscimento vocale.
- 9:
Traduci in inglese. Selezionalo per usare Whisper per la traduzione in inglese.
- 10:
- Strumento di modifica dei sottotitoli. Fai clic per aprire o per chiudere la traccia dei sottotitoli.
I passi per creare i sottotitoli usando il riconoscimento vocale VOSK
(i numeri tra parentesi indicano l’elemento dell’interfaccia utente nella schermata precedente):
- Riconoscimento vocale (1). Fai clic qui per aprire la finestra per la Sottotitolazione automatica.
Se necessario, definisci una zona dalla linea temporale (2) nella quale vuoi utilizzare il riconoscimento vocale. Puoi trovare maggiori dettagli sulle zone dalla linea temporale nel capitolo Righello della linea temporale.
Modello (5). Seleziona il modello per la lingua dei sottotitoli. Puoi installarne di altri nella sezione Configurazione del Riconoscimento vocale.
Scegli quale parte della linea temporale dovrebbe essere usata per il riconoscimento vocale (3)
Elabora (4). Fai clic per iniziare la creazione dei sottotitoli.
Il sottotitolo viene creato e inserito automaticamente.
Nota sul passaggio 4: il comportamento predefinito è analizzare solamente la Zona dalla linea temporale (tutte le tracce), cioè il passaggio 2 nella schermata qui sopra. Imposta la zona della linea temporale a quella che vuoi analizzare (usa I e O per impostare i punti di attacco e di stacco). L’opzione Clip selezionate analizza solamente le clip selezionate.
Traduci con SeamlessM4T
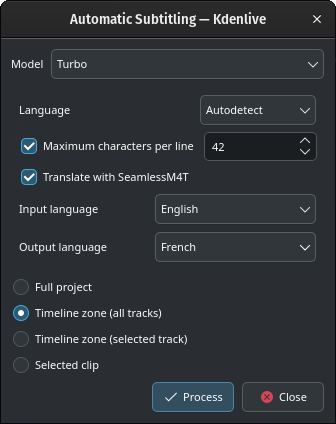
Tradurre con SeamlessM4T
Seleziona la Lingua in ingresso e la Lingua di uscita, poi fai clic su Elabora.
Questo prima elaborerà l’audio usando Whisper, poi inizierà la traduzione di SeamlessM4T. La traduzione può occupare il 100% della RAM, il 100% della CPU, e il 100% dell’accesso al disco.
Attenzione
Se il modello di circa 9GB non è statoi ancora scaricato, lo sarà adesso. Con una velocità di scaricamento di 100MB/s ci vorranno circa 12 minuti.
Durante lo scaricamento, Kdenlive reagirà normalmente. Non fare clic su Chiudi, altrimenti lo scaricamento verrà interrotto.
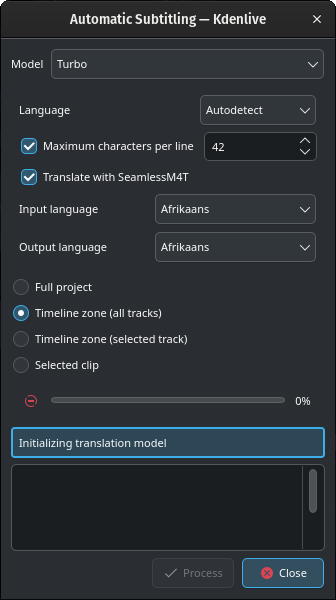
Non preoccuparti se compare un messaggio sul rettangolo Inizializzazione del modello di traduzione mentre avviene lo scaricamento.
A seconda della connessione Internet e della larghezza di banda, lo scaricamento del modello potrebbe richiedere un po” di tempo (circa 12 minuti con una velocità di scaricamento di 100 MB/s).
La traduzione inizierà una volta scaricato il modello per la traduzione.
Creazione di clip usando il riconoscimento vocale
È utile per interviste e per altri filmati relativi al parlato. Vai nell’oggetto Editor vocale. Se non è già abilitato, fallo da .
Nota
L’uso del riconoscimento vocale per creare delle trascrizioni, creando clip da queste, è possibile solo con le clip presenti nel Contenitore del progetto.
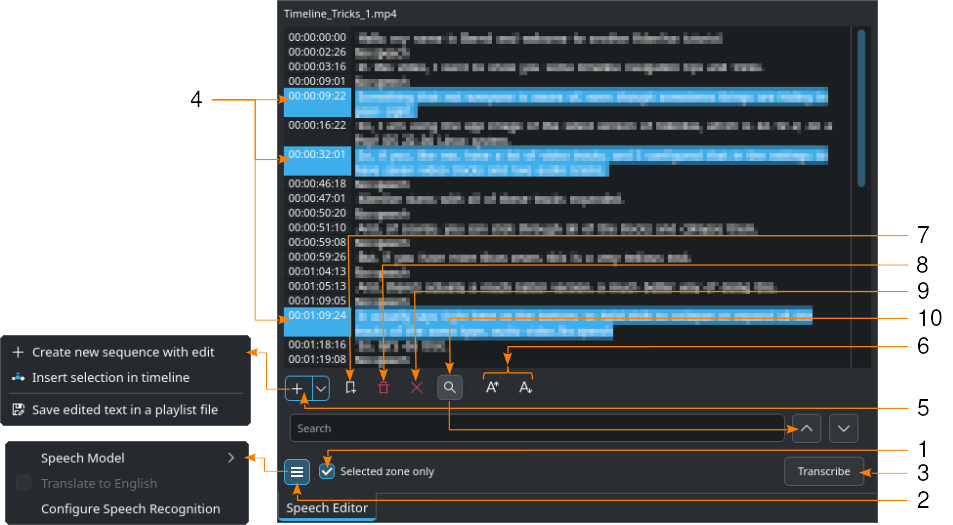
Mostrato con il motore VOSK e la ricerca (10) abilitata
Seleziona una clip nel contenitore del progetto.
- 1:
Se necessario, imposta i punti di attacco e di stacco nel Controllo della clip, poi spunta Solo la zona selezionata: in questo modo verrà trascritto solamente il testo all’interno di quella zona.
- 2:
Fai clic sul
 Menu hamburger, e scegli il modello per la lingua corretta se per il riconoscimento vocale selezioni il motore VOSK. Se opti invece per Whisper, puoi selezionare Traduci in inglese. Seleziona il motore per riconoscimento vocale in , poi fai clic su Configura il riconoscimento vocale per aprire la sezione di configurazione del riconoscimento vocale. Per ulteriori dettagli sulla configurazione, fai riferimento al capitolo Configura il riconoscimento vocale.
- 3:
Premi il pulsante Trascrivi.
- 4:
Seleziona il testo che vuoi. Tieni premuto CTRL o Maiusc per selezionarne più di uno.
- 5:
Crea una nuova sequenza con modifica crea una nuova sequenza con ogni testo di codice temporale come singola clip, Inserisci la selezione nella linea temporale crea invece delle clip per ogni testo di codice temporale selezionato a partire dalla posizione dell’indicatore di riproduzione. Salva il testo modificato in un file di scaletta crea invece una risorsa nel contenitore del progetto con tutto il testo trascritto.
- 6:
 Aumenta dimensione caratteri e
  Diminuisci dimensione caratteri aumentano e diminuiscono la dimensione dei caratteri.
- 7:
 Aggiungi marcatore aggiunge un marcatore al codice temporale del testo selezionato. Puoi trovare maggiori dettagli sui Marcatori della Linea temporale e sui Marcatori nel capitolo sulle Marcatori della linea temporale.
- 8:
 Elimina selezione elimina il testo selezionato.
- 9:
Rimuovi le zone senza parlato elimina contemporaneamente tutte le voci «Nessuna voce».
- 10:
 Cerca nel testo attiva il campo di ricerca: inserisci il testo che vuoi cercare nel testo trascritto. La ricerca non è sensibile alle maiuscole, e trova tutte le occorrenze della stringa anche all’interno delle parole. Utilizza
  e
e  per spostarti sulle occorrenze del testo dei termini di ricerca. Quando questi diventano rossicci hai raggiunto l’ultima occorrenza dei termini di ricerca nel testo.
Rilevamento del silenzio
Nota
Funziona solo col motore VOSK.
Seleziona la clip nel contenitore della clip, e apri la finestra dell’editor () .
Fai clic sul Menu hamburger, e scegli il modello per la tua lingua. Se quello giusto non è elencato, fai clic su Configura il riconoscimento vocale. Per i dettagli su come aggiungere i modelli per il motore VOSK fai riferimento al capitolo sulle Estensioni.
Fai quindi clic sul pulsante Inizia il riconoscimento.
Una volta che è terminato vai al punto 6 qui sopra e scegli Rimuovi le zone senza parlato, che le rimuove tutte in un colpo solo. Diversamente fai clic sul codice temporale dove è indicato «Nessuna voce» (tieni premuto Ctrl per selezionarne più di una per volta), quindi premi semplicemente il tasto Canc.
Ripeti l’operazione con tutte le parti che vuoi rimuovere, incluse quelle in cui qualcuno dice qualcosa che non vuoi includere nel montaggio finale.
Quando hai terminato, assicurati che Seleziona solo la zona sia disabilitato, poi fai clic sul pulsante Salva il testo modificato in un file di scaletta (alla fine del punto 5) e dopo pochi secondi verrà aggiunta nel contenitore del progetto una nuova scaletta: questa sarà senza silenzi e senza il testo nei punti in cui non lo vuoi.