Marcatori della linea temporale
Nell’immagine sottostante, i marcatori della linea temporale sono le bandierine rosse. Non vanno confusi con i Marcatori di una clip (gialli nell’immagine sottostante). I marcatori della linea temporale possono essere sia fissati che spostati insieme alle clip. I marcatori, invece, si trovano all’interno delle clip, e si spostano insieme a queste ultime.
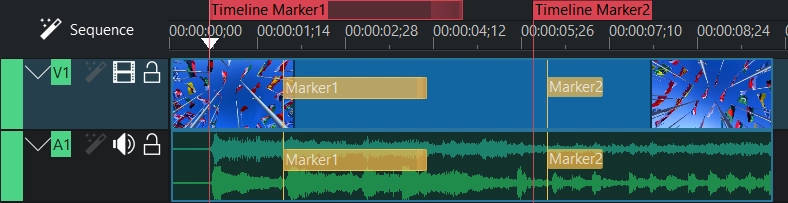
I marcatori della linea temporale possono essere utilizzati per certi punti (Timeline Marker2), oppure per certi intervalli (Timeline Marker1).
Puoi usare i marcatori della linea temporale per definire delle regioni per l’esportazione. Vedi Esportazione usando i marcatori della linea temporale.
Puoi usare i marcatori della linea temporale anche come capitoli per i DVD video. Vedi Esportazione usando i marcatori della linea temporale.
Tre modalità per aggiungere i marcatori della linea temporale
Le procedure seguenti aggiungono un marcatore della linea temporale nella posizione dell’indicatore di riproduzione della linea temporale:
Menu
Clic col tasto destro sul righello della linea temporale, poi scegli Aggiungi/rimuovi marcatore della linea temporale dal menu
Clic col tasto destro nella linea temporale, poi scegli Aggiungi/rimuovi marcatore della linea temporale dal menu
Tastiera
G aggiunge un marcatore della linea temporale.
1 - 0 (numeri da 1 a o sul tastierino numerico)
Mouse
Doppio clic sul righello della linea temporale e il marcatore della linea temporale viene aggiunto dove avevi fatto clic
Menu contestuale del righello della linea temporale
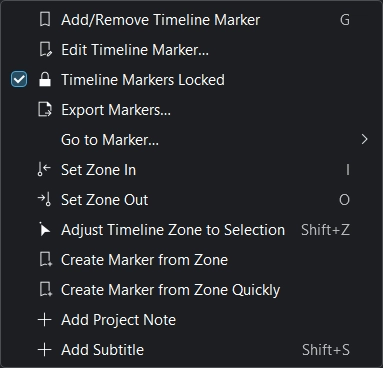
Aggiungi/rimuovi marcatore della linea temporale
Modifica marcatore della linea temporale: vedi Spostare e modificare i marcatori della linea temporale
Marcatori della linea temporale bloccati: vedi Spostare e modificare i marcatori della linea temporale
Esporta marcatori: apre la finestra Esporta marcatori.
Vai al marcatore…. Seleziona un marcatore al quale dovrebbe saltare l’indicatore di riproduzione.
Imposta il punto di attacco / di stacco della zona: vedi anche Esportazione dell’anteprima della linea temporale.
Regola zona della linea temporale in base alla selezione
Crea marcatore dalla zona
Crea velocemente un marcatore dalla zona
Aggiungi note sul progetto: vedi Note sul progetto
Aggiungi sottotitolo: vedi Sottotitoli
Marcatore della linea temporale con intervallo
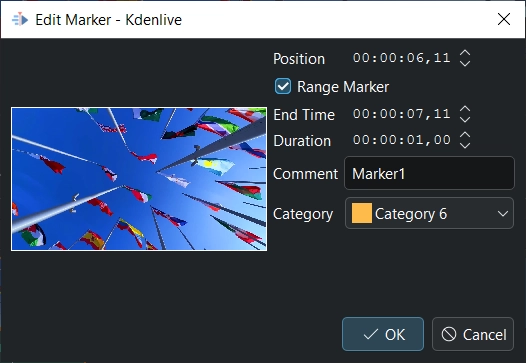
Nella finestra Modifica marcatore puoi abilitare Marcatore di intervallo. che ti permette di determinare una Durata del marcatore. La Durata predefinita è di un secondo.
Gestione delle categorie e dei marcatori
Categorie
Quando si inizia un nuovo progetto, le categorie per esso vengono prese da Categorie dei marcatori nell’impostazione Configura colori e marcatori. Queste categorie sono per i marcatori e per i marcatori della linea temporale.
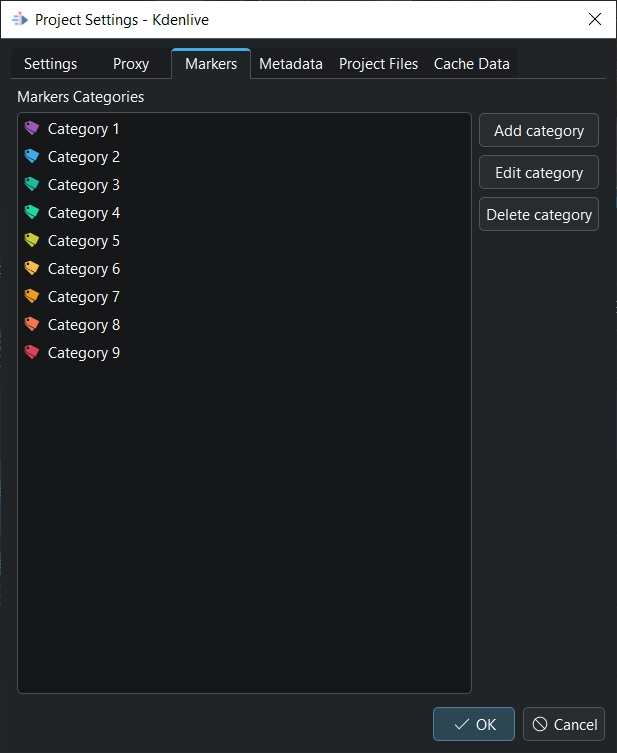
Le categorie specifiche del progetto possono essere aggiunte, modificate o eliminate da
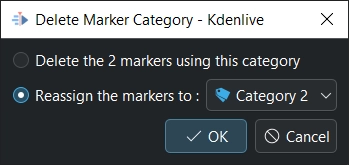
Elimina categoria Quando elimini una categoria alla quale erano state assegnati dei marcatori, Kdenlive ti chiede se vuoi davvero farlo, oppure se vuoi riassegnare i marcatori ad un’altra categoria.
Vista dei marcatori
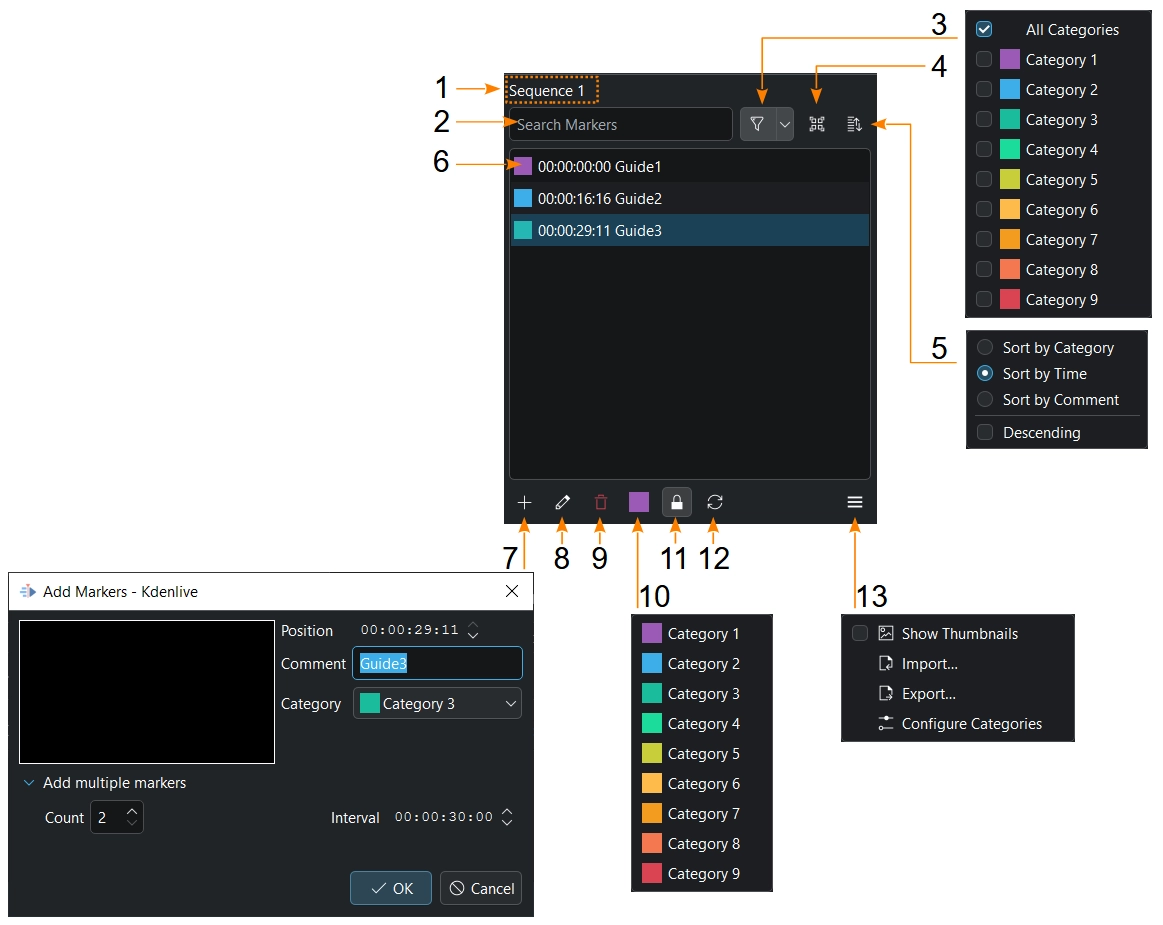
apre la finestra dei marcatori, dalla quale puoi gestire i marcatori.
- 1:
Mostra l’oggetto selezionato: nome della clip, nome della sequenza
- 2:
Cerca marcatori della linea temporale o della clip. Se in questo esempio inserisci 2, nell’elenco e nella linea temporale, oltre che nel controllo della clip, verranno mostrati solo guide2 e marker2.
- 3:
Mostra solo le categorie scelte nell’elenco e nei controlli della clip e del progetto.
- 4:
Mostra i marcatori di tutte le clip nel progetto
- 5:
Ordina per categorie, ora, commento, e modifica l’ordinamento (in ordine crescente o discendente).
- 6:
Facendo clic su un marcatore, oppure su freccia su, freccia giù lo selezionerà, e l’indicatore di riproduzione salterà ad esso nella linea temporale o nel controllo della clip. Selezione multipla: tieni premuto Maiusc per selezionare un intervallo di marcatori, oppure Ctrl per aggiungere alla selezione singoli marcatori, mentre con Ctrl + A selezionerai tutti i marcatori. Fai doppio clic o premi F2 su un marcatore per aprire la finestra di modifica dei marcatori/finestra di modifica dei marcatori.
- 7:
Aggiungi un marcatore. Solo qui puoi aggiungere più marcatori con un intervallo.
- 8:
Modifica un marcatore selezionato. Lo stesso di quando fai doppio clic su un marcatore al punto 4, o con le guide nel righello della linea temporale.
- 9:
Elimina i marcatori selezionati.
- 10:
Imposta la categoria predefinita per i nuovi marcatori.
- 11:
Solo per i marcatori della linea temporale: Blocca i marcatori della linea temporale. Sono bloccati quando lo sfondo è grigio chiaro (come mostrato nella schermata).
- 12:
Aggiorna tutte le miniature, se sono abilitate
- 13:
Abilita/Disabilita le miniature. Importa o esporta marcatori, oppure configura le categorie del progetto.
Puoi mettere un commento nella guida o nel marcatore e fare in modo che venga visualizzato scegliendo Montaggio nel menu , oppure facendo clic sul pulsante di Montaggio.
Esporta i marcatori della linea temporale come descrizione del capitolo
I marcatori della linea temporale possono marcare i capitoli, oppure le diverse sezioni di un video durante il montaggio. Nel caricamento dei video montati in piattaforme come YouTube, possono essere esportati come marcatori dei capitoli, che sono supportati da YouTube. Questo può essere fatto da Copia negli appunti, e poi incollandoli in YouTube.
Tasto destro sul righello della linea temporale, poi scegli Esporta marcatori o . Appare quindi la finestra Esporta i marcatori come descrizione del capitolo.
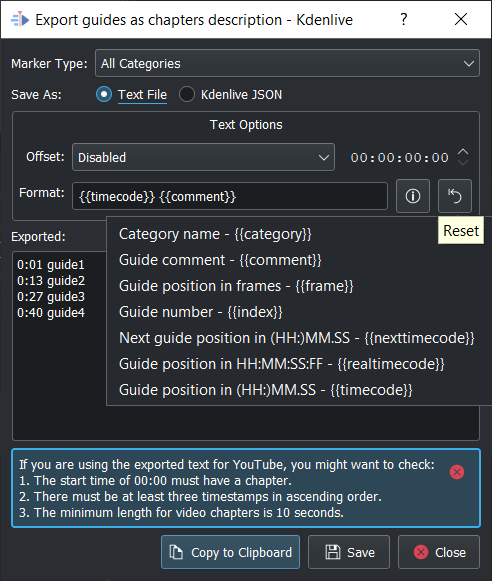
Tipo di marcatore: scegli uno dei tipi di marcatore della linea temporale per marcare i capitoli, e usa i rimanenti per fare altro.
Salva come: testo (per Youtube) o come file dati JSON, che può essere reimportato.
Scostamento: aggiunge la possibilità di impostare uno scostamento generale (hh:mm:ss:ff) per ciascun marcatore della linea temporale.
Formato: definisce come vengono esportati i marcatori dei capitoli. Quando si usano i due formati predefiniti di stringhe, come mostrato nella figura, Kdenlive controlla se il marcatore del capitolo corrisponde alle linee guida di YouTube; in caso contrario visualizza un avviso.
i: mostra tutte le possibili stringhe da esportare. Seleziona la stringa che vuoi, e Kdenlive la aggiunge al Formato per l’esportazione. Se necessario, aggiungi degli spazi tra le stringhe.
{{timecode}} aggiunge la posizione del marcatore della linea temporale in HH:MM.SS (predefinito)
{{comment}} aggiunge il testo del marcatore della linea temporale (predefinito)
{{frame}} aggiunge il numero del fotogramma per ciascun marcatore della linea temporale
{{index}} aggiunge il numero del marcatore della linea temporale
{{nexttimecode}} aggiunge la posizione del marcatore della linea temporale successiva in HH:MM.SS
{{realtimecode}} aggiunge la posizione del marcatore della linea temporale HH:MM:SS:FF
Reimposta: reimposta le impostazioni ai valori predefiniti: {{timecode}} {{comment}}
Esportato: mostra quello che verrà impostato. Per modificare il testo del marcatore della linea temporale, modifica il marcatore della linea temporale nella linea temporale.
Copia negli appunti: copia negli appunti i dati visualizzati in Esportato per poterli poi usare in altre applicazioni (Youtube).
L’avvertimento nel rettangolo blu si presenta solo se uno dei 3 punti non è soddisfatto.
Spostare e modificare i marcatori della linea temporale
I marcatori della linea temporale possono essere spostati facendo clic sul testo di una di essi nella linea temporale, e trascinandoli nella posizione desiderata.
I marcatori della linea temporale possono essere spostati modificando la Posizione nella finestra di modifica.
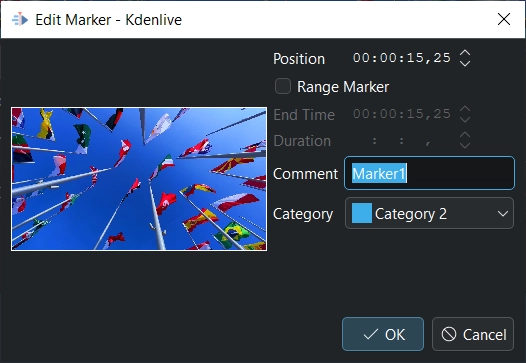
Un doppio clic sul testo di un marcatore della linea temporale nel righello della linea temporale apre la finestra di modifica (è possibile anche dalla Vista dei marcatori).
Commento text and Categoria possono essere modificati nella finestra di modifica.
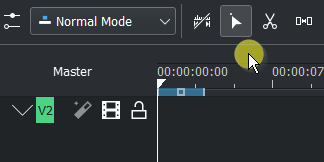
Sposta i marcatori della linea temporale con lo strumento spaziatore
Sposta facilmente i marcatori della linea temporale insieme alle clip usando la nuova opzione . Quando sono bloccati, i marcatori della linea temporale rimangono sul posto, mentre, quando non lo sono, si spostano con la clip.
