Estensioni
Questa sezione definisce le impostazioni per il riconoscimento vocale e per il rilevamento degli oggetti.
Prima di poter configurare e utilizzare il riconoscimento vocale e il rilevamento degli oggetti, è necessario installare Python3. Una volta installato, è consigliabile utilizzare un ambiente virtuale (venv) per mantenerlo separato da Kdenlive e dagli altri utilizzi presenti sul sistema.
If you have installed Python3 already jump right to the configuration page of Speech To Text or Object Detection.
Installazione di Python
Installazione su Linux
Nella maggior parte delle distribuzioni Linux, Python è installato per impostazione predefinita. Puoi verificarlo eseguendo python3 –version in un terminale. Di seguito sono riportati i passaggi fondamentali per installare Python3 su Ubuntu. Se la tua distribuzione non è basata su Ubuntu fai riferimento alla documentazione specifica, oppure cerca le istruzioni per l’installazione su Internet.
$ sudo apt updates
$ sudo apt install python3
Il pacchetto Python di terze parti fondamentale di cui potresti aver bisogno è pip. Python 3.4 e le versioni successive includono pip per impostazione predefinita, ma puoi comunque verificarlo eseguendo command -v pip in un terminale (alcune distribuzioni utilizzano pip per Python2, e pip3 per Python 3). Se pip non è presente, puoi installarlo con
$ python3 -m ensurepip --upgrade
In caso di problemi, fai riferimento a pip installation guide.
Nota
Nei paragrafi seguenti, pip è il termine generico per tutte le versioni di pip, inclusa pip3. Usa il comando pip corretto per il tuo sistema operativo.
Installazione su Windows
Scarica Python dalla pagina ufficiale Python download.
Seleziona «Aggiungi python.exe al PATH»
Seleziona «Installa adesso»
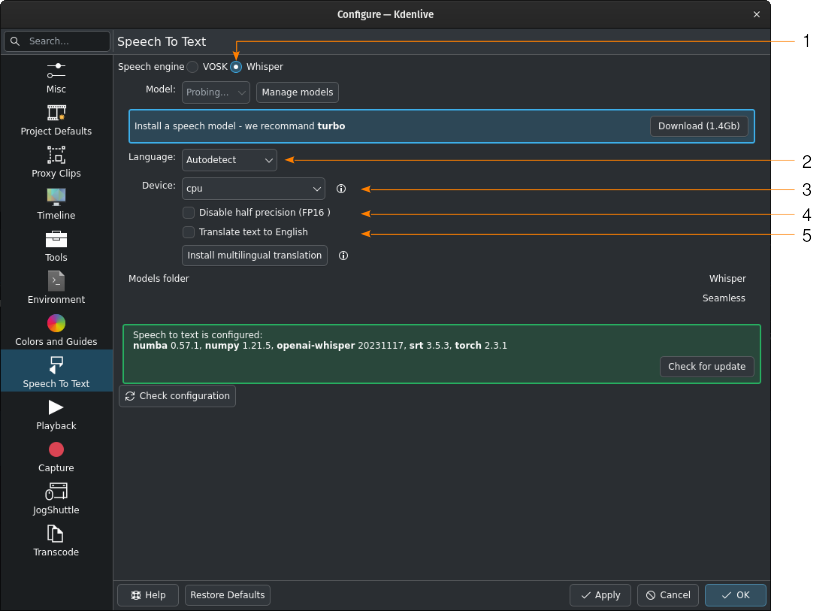
Riconoscimento vocale
Questa sezione viene utilizzata per configurare la funzionalità di riconoscimento vocale di Kdenlive, e per la gestione dei vari modelli per i due motori, VOSK e Whisper.
Avvertimento
Speech To Text does not work with version 21.04.2 due to Vosk API issues. Use version 21.04.1 or 21.04.3 and later versions.
Motori vocali
Ci sono due motori per la sintesi vocale: VOSK e Whisper. Whisper di OpenAI è un modulo di riconoscimento vocale per uso generico addestrato su un ampio insieme di dati audio diversificati, ed è in grado di eseguire la traduzione vocale e l’identificazione della lingua.
Whisper è più lento di VOSK nella CPU, ma è un po” più preciso. Whisper crea frasi con i segni di punteggiatura, anche nella modalità base.
Devi installare i modelli da usare con questi due motori.
Suggerimento
If you are using the flatpak version of Kdenlive, you may experience problems with installing the speech models. The sandbox approach of flatpak prevents kdenlive from running pip. There is a possible workaround using $ flatpak run --command=/bin/bash org.kde.kdenlive and then $ python -m ensurepip followed by $ python -m pip install -U openai-whisper torch (courtesy of Veronica Explains). Your mileage may vary.
The other option is to select Whisper and then click on Install multilingual translation. This will download and install the necessary dependencies and make Kdenlive aware of the location of your installation of Python and pip. After that you can follow the instructions for setting up VOSK and Whisper here.
VOSK
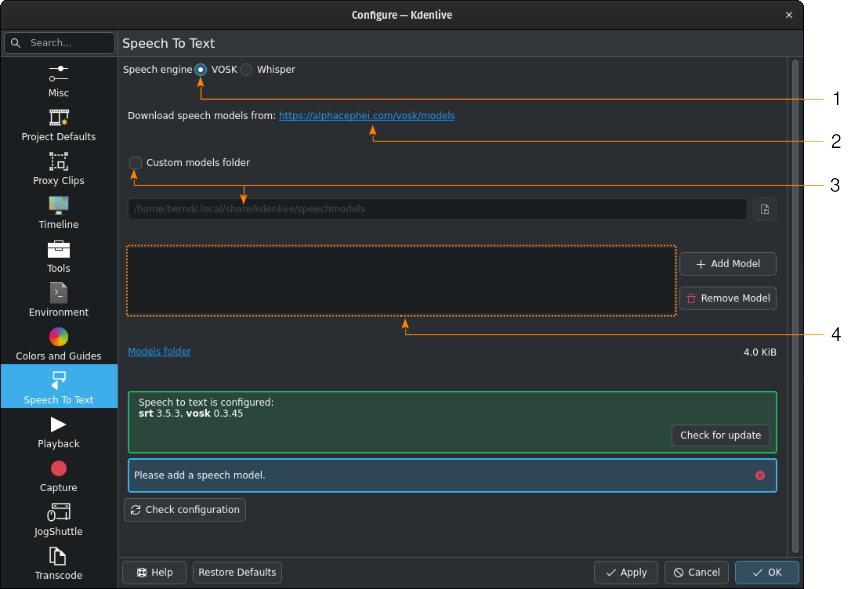
Python funziona, ma VOSK non è ancora utilizzabile a causa della mancanza dei modelli vocali.
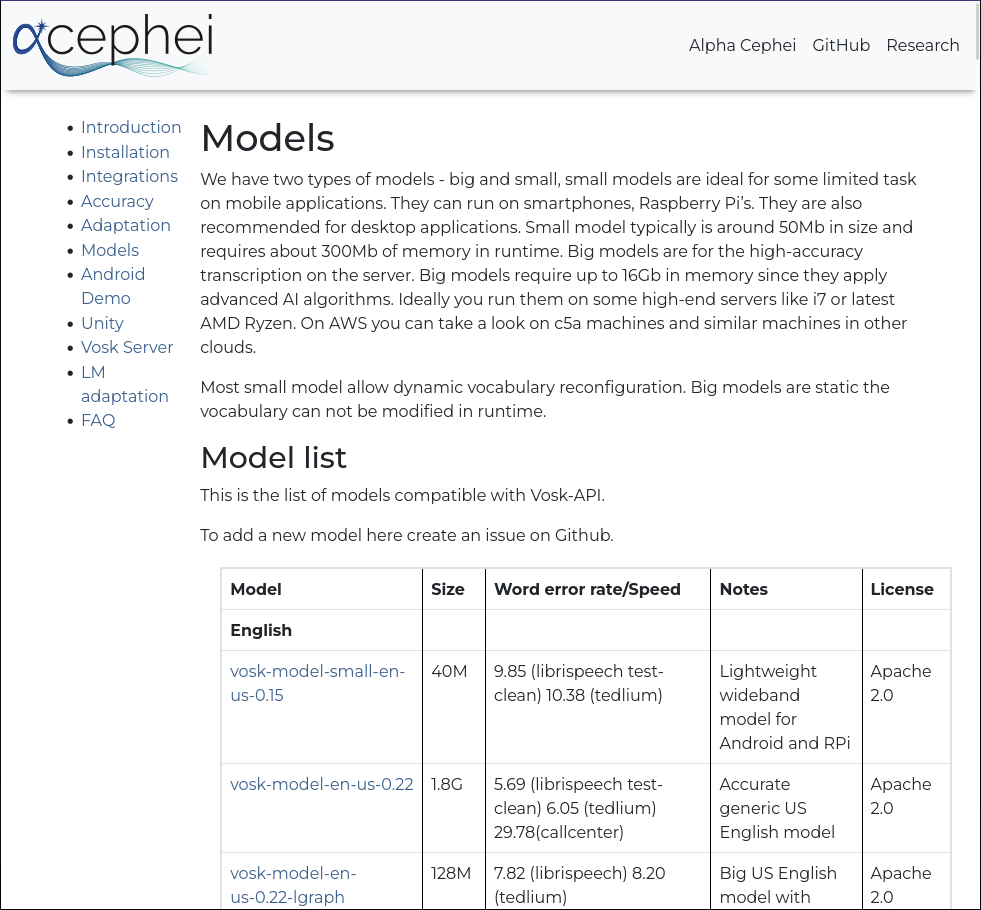
Devi scaricare prima un modello vocale dalla pagina degli scaricamenti di alphacephei[1]. Segui il collegamento (2), e scarica i modelli necessari.
Per impostazione predefinita, i modelli delle lingue sono installati nelle seguenti cartelle:
- Linux:
~/.local/share/kdenlive/venv/Lib- Windows:
%LocalAppData%\kdenlive\venv\Lib
If you want to use a specific folder, check Custom models folder (3) and specify it in the text field below or click on  Open file dialog to navigate to the target folder. If you use the default folder, it will be displayed for informational purposes in the models folder text field.
If you have installed VOSK in an earlier Kdenlive version, and now you have chosen the venv folder for Python, you can delete the previously installed VOSK libraries by using the following command in a terminal:
$ pip uninstall vosk srt
Fai clic su Aggiungi modello e inserisci il percorso dei file che hai scaricato.
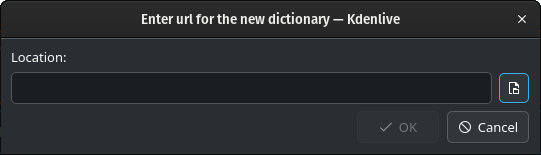
Fai clic su Finestra apri per aprire il gestore di file del sistema operativo, in modo da spostarti dove hai scaricato i file, poi seleziona il file del modello che vuoi aggiungere.
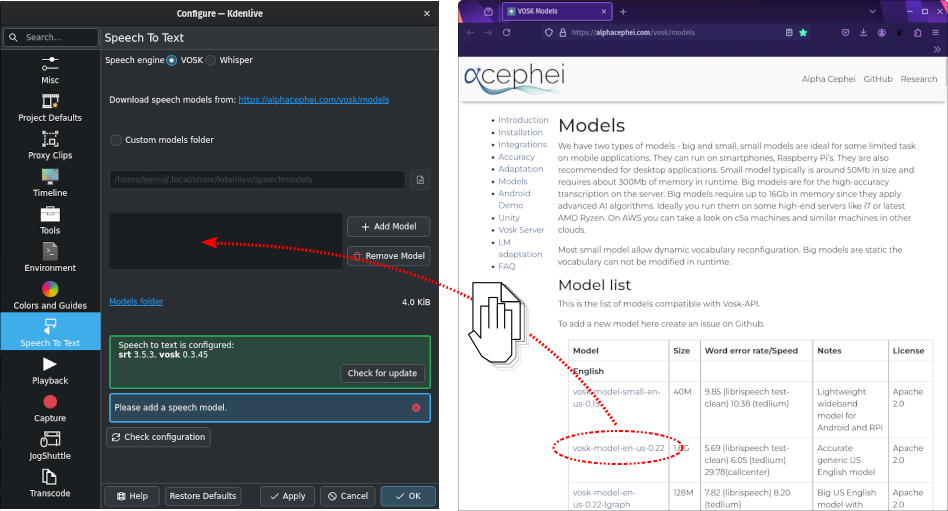
Alternatively, drag & drop the language model you want from the alphacephei[1] download page to the model window (4), and Kdenlive will download and extract it for you into the default folder or the custom folder you specified.
Nota
The models are compressed files (.zip) and can be several GB big. Depending on your internet connection, download times could be long. After the download, the files need to be extracted which depending on your system configuration can also take a long time. Kdenlive will appear unresponsive but is working in the background. Please be patient.
Once models have been installed, Kdenlive displays the size of the model folder. Click on Models folder to open the models folder with the file manager of your OS.
Whisper

Installa le dipendenze mancanti
Quando passi a Whisper per la prima volta devi installare le dipendenze mancanti (circa 2 GB da scaricare).
Poi devi scaricare uno o più modelli vocali.
Whisper è installato, ma non è stato ancora scaricato nessun modello vocale
- 1:
Whisper è selezionato per il riconoscimento vocale
- 2:
When left at Autodetect, Kdenlive will try to figure out which language to use for speech recognition. If this gives the wrong results, select the correct language here.
- 3:
Per il riconoscimento vocale puoi passare da CPU a GPU; in quest’ultimo caso ne serve però una che supporta CUDA.
- 4:
Solo per la GPU: quando viene rilevata una scheda video NVIDIA GTX 16xx, Kdenlive disabilita automaticamente la mezza precisione (FP16). Se usando la GPU hai problemi, puoi disabilitare la mezza precisione.
- 5:
You can have Whisper translate the text to English. If you need translation to other languages, you need to click on Install multilingual translation. This will enable SeamlessM4T[2] and download and install its models (around 10GB of data). Processing will happen offline from then on.
Click on Manage models or go with the recommendation of using the turbo model by clicking on Download (1.4GB). More information about the available models is on the Whisper source code page.
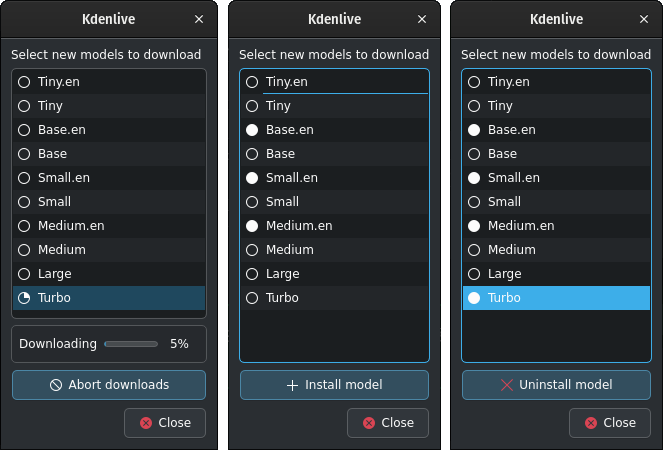
Whisper download and manage models
Kdenlive mostra il processo di scaricamento.
Installed speech models have a solid circle. You can delete them by clicking on Uninstall model
Available models have a hollow circle. You can install them by clicking on Install model.
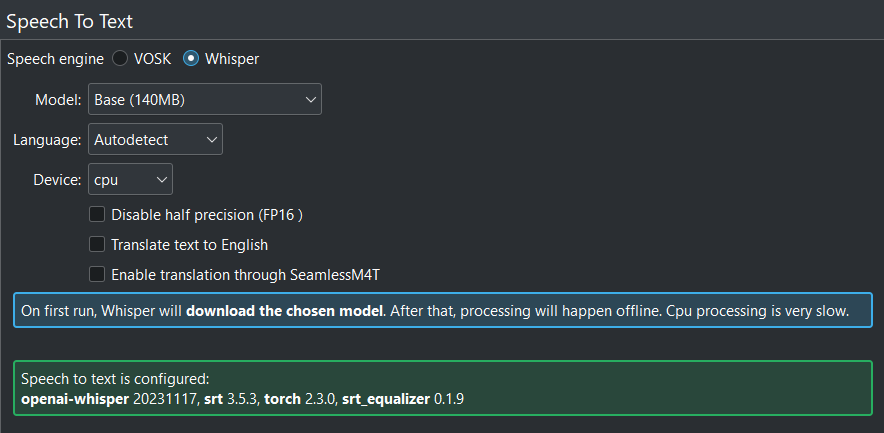
Quando tutto è configurato correttamente, viene visualizzata questa schermata: tutto verde!
Percorso nel quale Whisper è installato:
- Linux:
~/.local/share/kdenlive/venv/Lib- Windows:
%LocalAppData%\kdenlive\venv\Lib
The Whisper speech models are stored here:
- Linux:
~/.local/share/kdenlive/opencvmodels- Windows:
%AppData%\kdenlive\opencvmodels
Per scaricare e iniziare la traduzione dei sottotitoli, segui questi passaggi.
Puoi controllare gli aggiornamenti facendo clic su Controlla la configurazione
If you have installed Whisper in an earlier Kdenlive version, and now you have chosen the venv folder for Python, you can delete the previously installed Whisper libraries by using the following command in a terminal:
$ pip uninstall openai-whisper
Nota
If you get consistent messages during speech recognition about missing model files, check where clicking on the link next to Models folder takes you. If it is ~/.cache where there is a folder Whisper containing all the models you downloaded, simply copy this folder to where the error message says they are missing (most likely: ~/.var/app/org.kde.kdenlive/cache)
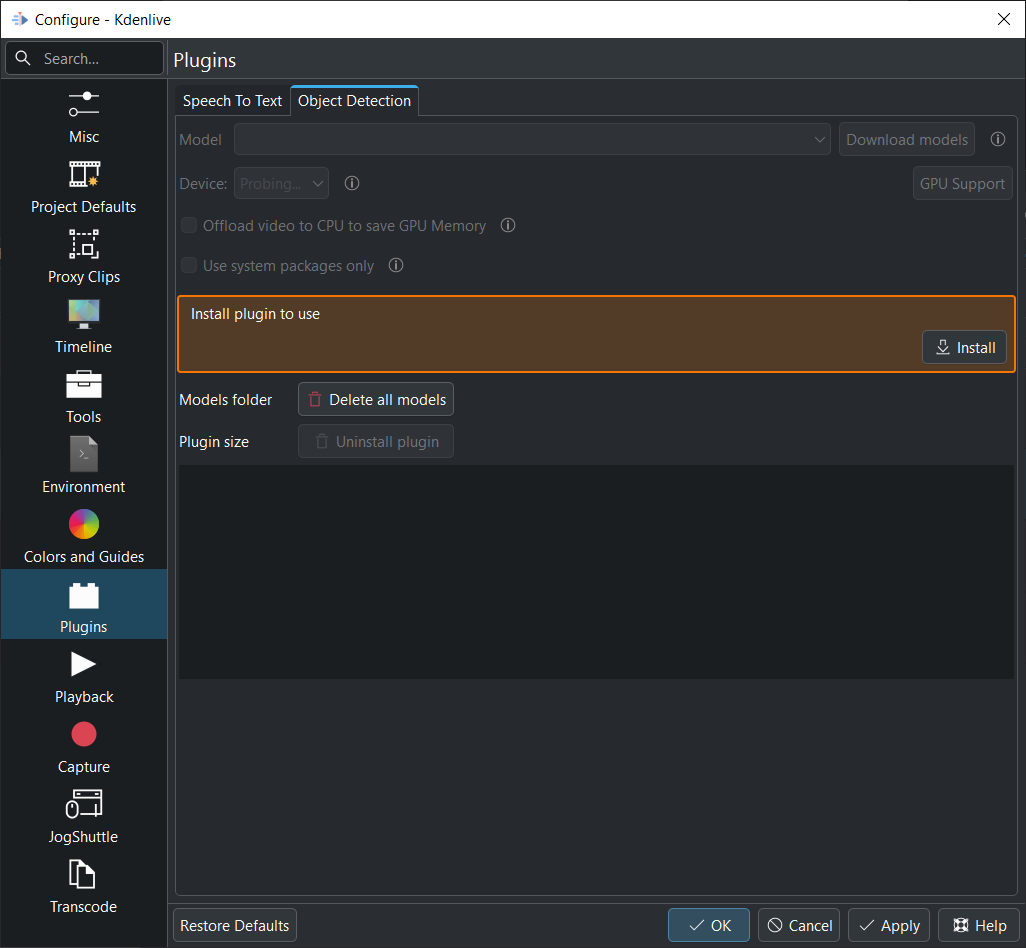
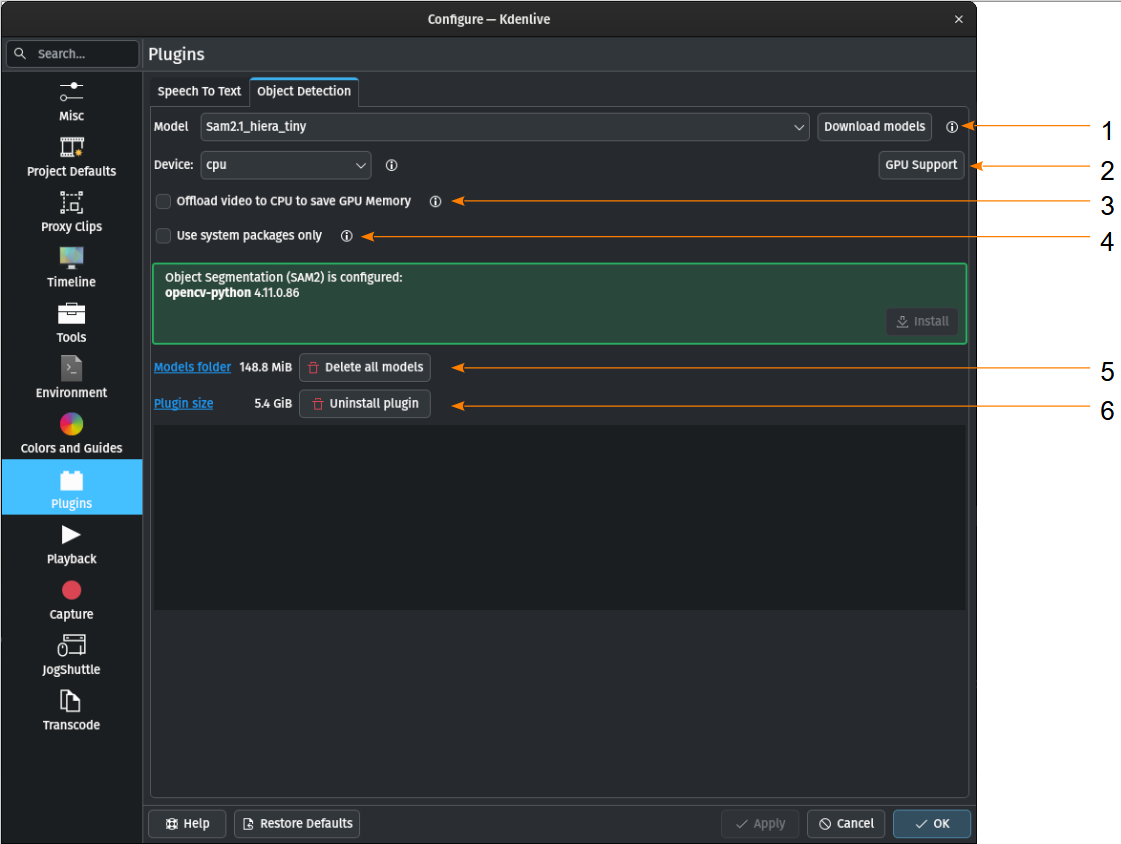
Rilevamento degli oggetti
La prima volta che utilizzi il rilevamento degli oggetti devi installare l’estensione.
L’estensione viene installata nella cartella:
- Linux:
~/.local/share/kdenlive/venv-sam- Windows:
%LocalAppData%\kdenlive\venv-sam
If all is properly installed it should look like so:
Quando tutto è configurato correttamente, viene visualizzata questa schermata: tutto verde!
- 1:
Modello Puoi scaricare vari modelli per il rilevamento degli oggetti.
- 2:
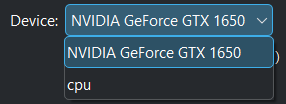
Device You can switch between using the CPU or your GPU for object detection. A GPU supporting CUDA is required for GPU object detection. Kdenlive tries to find your graphic card automatically. If the graphic card supports CUDA (Nvidia GPU) it will install the necessary driver so you can use it. If your graphic card doesn’t support CUDA or is not detected by Kdenlive you only see CPU. GPU Support If your Nvidia GPU is not listed, try installing an alternative by following these steps.
- 3:
Offload video to CPU to save GPU Memory If you have long clips on which Kdenlive has to detect objects you may get a crash. If enabled, this offloads some of the memory used to the RAM instead of the GPU memory.
- 4:
Usa solo i pacchetti di sistema Quando è abilitata, Kdenlive utilizzerà la versione di SAM2 installata nel sistema. Solo per utenti esperti, dato che bisogna installare correttamente tutto da soli.
- 5:
Models folder When you click on the link the folder will be opened where the SAM2 models are stored including the size of this folder. Delete all models will delete the content of the model folder.
- 6:
Plugin size When you click on the link the folder will be opened where the venv-sam Python scripts are stored including the size of this folder. Uninstall plugin will uninstall venv-sam Python.
Installazione manuale della GPU
Se Kdenlive non rileva automaticamente la tua GPU NVIDIA, puoi provare a installarla manualmente.
L’accelerazione GPU funziona solo con CUDA (Compute Unified Device Architecture), che è un’architettura computazionale parallela proprietaria di NVIDIA.
Controlla la versione di CUDA installata:
apri una shell di comandi (in Windows: Windows+R, digita cmd e premi Invio)
Digita nvidia-smi –-version
Dovresti ottenere qualcosa del genere:
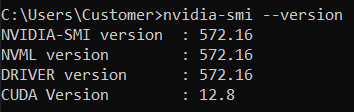
Qui la versione CUDA è 12.8
Ora fai clic su Supporto GPU
Puoi selezionare una versione di CUDA uguale o inferiore a quella rilevata
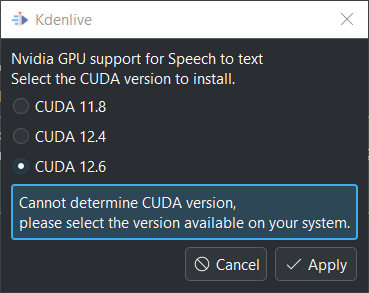
Seleziona una versione di CUDA che sia inferiore a quella rilevata.
Fai clic su Applica
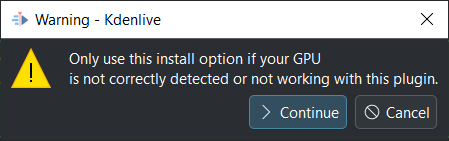
Nella finestra successiva fai clic su Continua
Kdenlive starts downloading all necessary files for using the GPU. Once finished you should see your GPU under Device like so:
Installazione della GPU riuscita