Marcadores de secuencia
Los marcadores de secuencia en la imagen de abajo son los indicadores rojos. No deben ser confundidos con los Marcadores de medios (amarillos en la imagen). Los marcadores de secuencia podrán ser configurados para permanecer fijos o desplazarse al mover los clips en la línea de tiempo. Los Marcadores de medios pertenecen a éstos, se mostrarán sobre los clips en la línea de tiempo y se moverán junto a ellos.
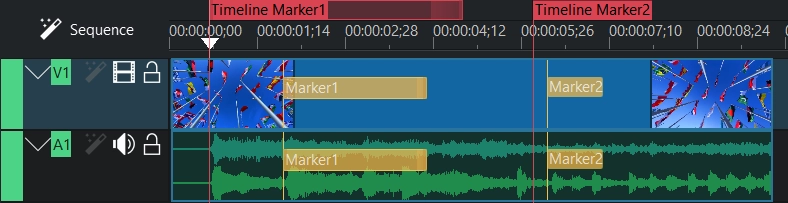
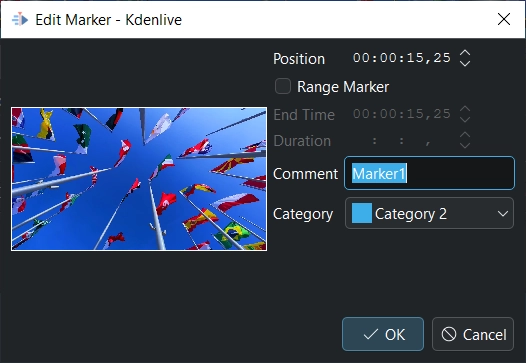
Los marcadores de secuencia podrán ser usados para demarcar ciertos instantes (Marcador 2) o rangos de tiempo (Marcador 1).
Los marcadores de secuencia podrán ser usados para definir regiones a ser procesadas. Ver Procesamiento usando marcadores.
Los marcadores de secuencia también podrán ser usados para definir capítulos al producir videos para YouTube. Ver Procesamiento usando marcadores.
3 formas de agregar marcadores de secuencia
Los siguientes procedimientos permiten agregar un marcador de secuencia en la ubicación del cursor de tiempo de la línea de tiempo:
Menú
Hacer clic derecho sobre la regla de tiempo y escoger Agregar/Eliminar marcador (secuencia) desde el menú
Hacer clic derecho sobre la línea de tiempo y escoger Agregar/Eliminar marcador (secuencia) desde el menú
Teclado
Usar el atajo G para agregar un marcador de secuencia.
0 a 9 (en el teclado numérico), cada número tendrá un color diferente
Ratón
Hacer doble clic en la parte superior de la regla de tiempo para agregar un marcador de secuencia en ese punto
Menú contextual de la regla de tiempo
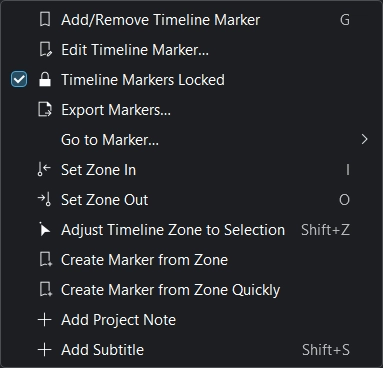
Agregar/Eliminar marcador (secuencia)
Editar marcador (secuencia)…: Ver Reubicación y edición de marcadores
Bloquear marcadores (secuencia): Ver Reubicación y edición de marcadores
Exportar marcadores…: Abrirá el diálogo Exportar marcadores.
Ir a marcador. Permite seleccionar un marcador de secuencia a donde saltará el cursor de tiempo.
Marcar inicio/fin de zona: Ver también Previsualización de la línea de tiempo.
Ajustar zona a selección
Crear marcador desde zona
Crear marcador desde zona (rápido)
Agregar nota al proyecto: Ver Notas del proyecto
Agregar subtítulo: Ver Subtítulos
Marcadores de secuencia con rango
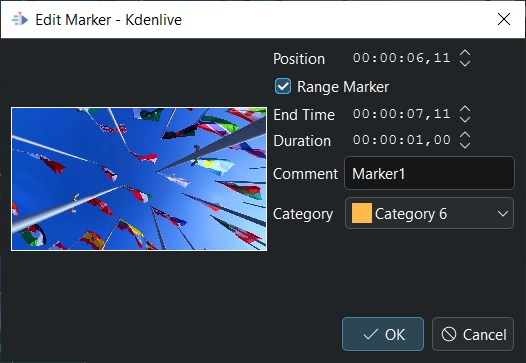
En el diálogo Editar marcador será posible activar la opción Marcador de rango que permitirá definir una Duración para el marcador. La duración predeterminada es de 1 segundo.
Administración de marcadores y categorías
Categorías
Al comenzar un nuevo proyecto, las categorías a ser usadas en el mismo son extraídas desde la sección Categorías de marcadores dentro de la sección Colores y marcadores de las preferencias de Kdenlive. Estas categorías serán usadas tanto para marcadores de secuencia como de medios.
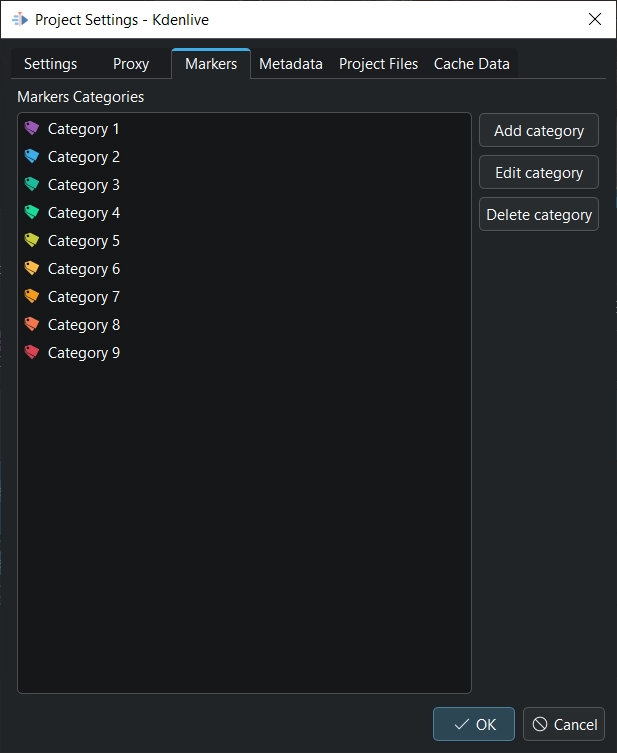
Podrán agregarse, editarse o borrarse categorías específicas para cada proyecto, desde el diálogo
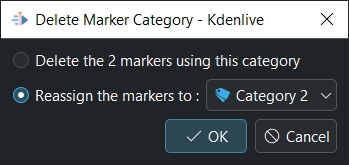
Borrar categoría Al intentar borrar una categoría que se encuentre siendo usada por marcadores del proyecto activo, Kdenlive consultará si también se desean borrar dichos marcadores o si deberán ser reasignados a otra de las categorías existentes.
Panel Marcadores
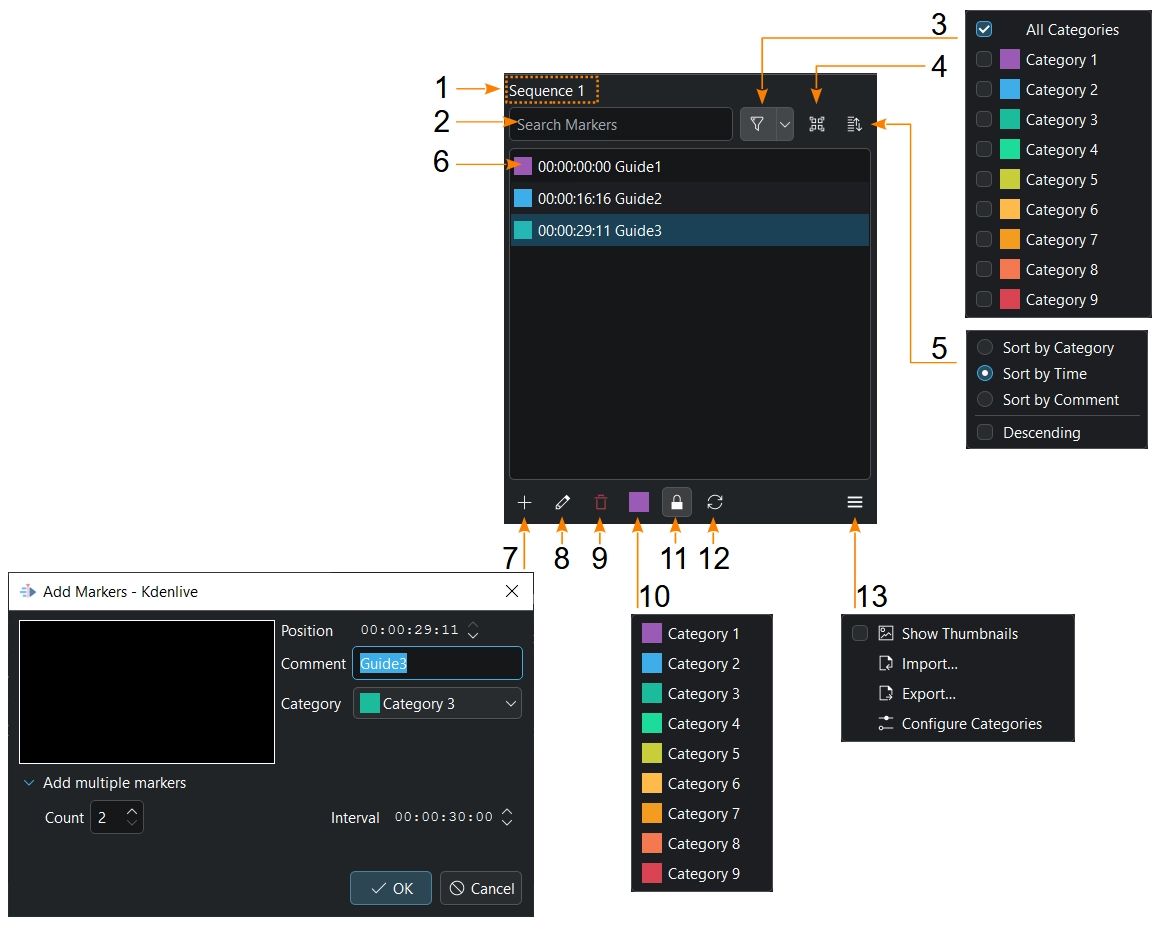
abre el panel de marcadores, desde donde será posible administrarlos.
- 1:
Muestra el objeto seleccionado: Nombre del clip, Nombre de secuencia
- 2:
Buscar marcadores. Si se ingresara, por ejemplo, el número 2 se mostrarán únicamente los nombres que contuvieran dicho número en la lista, así como en la línea de tiempo y en el monitor correspondiente.
- 3:
Mostrará solo las categorías escogidas en el menú desplegable en la lista, así como en la línea de tiempo y en el monitor correspondiente.
- 4:
Mostrará los marcadores de todo el proyecto (medios y secuencias)
- 5:
Permitirá ordenar por categoría, tiempo o comentario y cambiar entre ascendente o descendente.
- 6:
Al hacer clic sobre un marcador o pulsar flecha arriba o abajo, este se seleccionará y el cursor de tiempo saltará a la posición del mismo en la línea de tiempo o el monitor de medios. Selección múltiple: será posible seleccionar varios marcadores pulsando Mayús para agregar un rango de marcadores o Ctrl para agregar marcadores individuales a la selección. Ctrl+A seleccionará todos los marcadores. Doble clic sobre un marcador o pulsar F2 para abrir la ventana Editar marcador (secuencia) o Editar marcador.
- 7:
Agregar marcador. Solo mediante este método se tendrá la posibilidad de agregar múltiples marcadores, usando un intervalo para espaciarlos.
- 8:
Editar el marcador seleccionado. Ejecuta la misma acción que al hacer doble clic sobre un marcador de la lista (punto 4) o en la regla de tiempo.
- 9:
Borrar marcador. Borrará los marcadores seleccionados.
- 10:
Permitirá definir una categoría predeterminada para los nuevos marcadores a ser creados.
- 11:
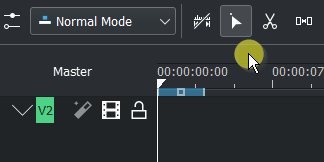
(Solo para marcadores de secuencia) Bloquear marcadores (secuencia). Este modo estará activado cuando el fondo del botón se muestre en gris claro (tal como aparece en la imagen).
- 12:
Refrescará todas las miniaturas, cuando se encuentren visibles
- 13:
Mostrar miniaturas. Permitirá alternar la visualización de miniaturas para los marcadores. Importar…/Exportar… marcadores o Configurar las categorías de marcadores usadas en el proyecto.
Será posible introducir un comentario en cada marcador y hacer que se muestre, usando la función Edición en el menú o haciendo clic en el botón Edición. Usando la opción o al hacer clic sobre el ícono Mostrar comentarios de marcadores en la Barra de estado se podrá alternar la visualización general de los comentarios de todos los marcadores.
Exportación de marcadores como descripción de capítulos
Los marcadores pueden demarcar capítulos o distintas secciones de un video, durante su edición. En caso de enviar videos editados a plataformas como YouTube, los marcadores podrán ser exportados como marcas de capítulos que podrán ser detectadas por YouTube. Esto puede ser realizado utilizando el botón Copiar al portapapeles y luego pegando el contenido del portapapeles directamente en la sección apropiada de la interfaz web de YouTube.
Hacer clic derecho en la regla de tiempo y escoger Exportar marcadores… o o . Luego aparecerá el diálogo Exportar marcadores.
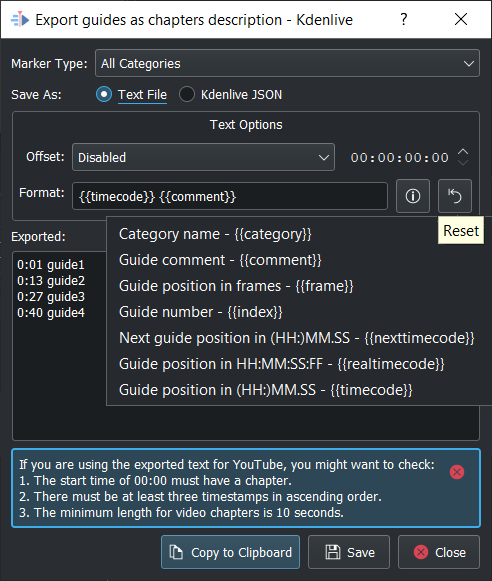
Tipo de marcador: Escoger la categoría de marcadores que será usada para definir los capítulos exportados (y usar las otras categorías para otros fines).
Guardar como: Texto (para YouTube) o como archivo de datos JSON que podrá ser reimportado luego.
Desplazamiento: Esta opción permite introducir un desplazamiento general en (hh:mm:ss:ff) a cada marcador.
Formato: Este campo define cómo serán exportadas las marcas de capítulos. Al usar las dos cadenas de formato predeterminadas (tal como se muestra en la imagen), Kdenlive comprobará si el marcador de capítulo concuerda con las guías de formato de YouTube, mostrando una advertencia si no coincidieran.
i: Muestra un menú desplegable con todas las cadenas de exportación posibles. Seleccionar la cadena deseada y Kdenlive la agregará al campo Formato para ser exportada. Agregar espacios entre las cadenas, según sea necesario.
{{timecode}} la posición del marcador, expresada en HH:MM.SS (predeterminada)
{{comment}} el comentario del marcador (predeterminada)
{{frame}} el número de fotograma de cada marcador
{{index}} el número del marcador
{{nexttimecode}} posición del próximo marcador, expresada en HH:MM.SS
{{realtimecode}} posición del marcador, expresada en HH:MM:SS:FF
Restablecer: Restablece las opciones de formato a las predeterminadas: {{timecode}} {{comment}}
Exportado: Muestra lo que será exportado. Para cambiar el texto de los marcadores, será necesario editarlos individualmente usando los medios habituales.
Copiar al portapapeles: Copia los datos mostrados en Exportado al portapapeles, para ser usados en otras aplicaciones (YouTube).
La advertencia dentro del marco azul, solo aparecerá en caso de que alguna de las tres condiciones no esté cumpliéndose.
Reubicación y edición de marcadores
Los marcadores de secuencia podrán ser reubicados haciendo clic y arrastrando (sobre su comentario en la línea de tiempo) hasta la nueva posición deseada.
Los marcadores de secuencia podrán ser reubicados cambiando su opción Posición en el diálogo Editar marcador.
Hacer doble clic sobre el comentario de un marcador en la regla de tiempo para abrir el diálogo Editar marcador (además de la posibilidad desde el Panel Marcadores).
El texto del Comentario así como su Categoría podrán ser modificados en el diálogo Editar .
Desplazamiento de los marcadores de secuencia al usar la herramienta Espaciar
Es posible desplazar los marcadores de secuencia de forma sencilla al mover clips, usando la herramienta Espaciar, y valiéndose de la nueva opción . Mientras se encuentren bloqueados, los marcadores de secuencia permanecerán en su lugar. Cuando estén desbloqueados, los marcadores de secuencia se desplazarán junto con los clips, al moverlos.
