Afbeeldingsreeks
Clips met afbeeldingsreeksen zijn clips gecreëerd vanuit een serie van afbeeldingen (stilbeelden). Deze functionaliteit kunt u gebruiken voor het maken van een animatie vanuit een verzameling van afbeeldingen of voor de creatie van een presentatie met afbeeldingen. Om het eerste te creëren, gebruikt u een korte frameduur, om het laatste te creëren gebruikt u een langere frameduur.
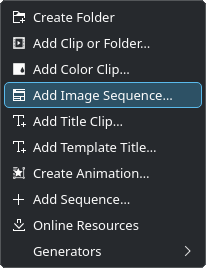
Rechtsklik op een lege plek in de project bin, of klik op de Clip toevoegen-pictogram in de project bin-werkbalk, en selecteer Afbeeldingsreeks toevoegen.

Een afbeeldingsreeks toevoegen
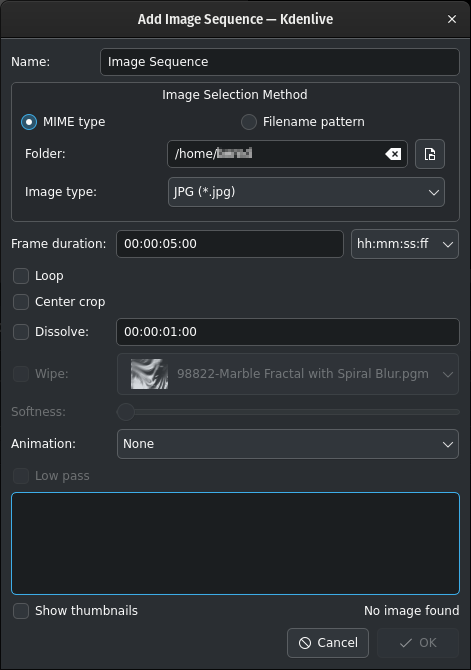
Dit opent een dialoogvenster om verder gegevens in te vullen.

Gegevens van een afbeeldingsreeks
Naam: Geef hier een naam op voor de afbeeldingsreeks. Deze kan later desgewenst in de project bin verandert worden.
MIME-type: Indien ingeschakeld, zullen de afbeeldingen in oplopende volgorde met de hulp van een eenvoudige alfabetische sorteer-methode worden geïmporteerd. Het wordt aangeraden om de afbeeldingen in de gewenste volgorde te krijgen voordat de afbeeldingsreeks wordt toegevoegd.
Bestandsnaampatroon: indien ingeschakeld kunt u naar de eerste afbeelding wijzen die u wilt importeren. De overblijvende afbeeldingen worden in oplopende volgorde geïmporteerd.
Map: Ga naar de locatie van de afbeeldingen die uw afbeeldingsreeks zullen gaan vormen en selecteer de eerste afbeelding. De daaropvolgende afbeeldingen die in de presentatie zullen worden gebruiktworden gebaseerd op een soort bestandsnaam-algoritme dat probeert te voorspellen wat de volgende bestandsnaam zal zijn.
Frameduur: Stel hier in hoelang elke afbeelding getoond word. Selecteer in de keuzelijst welke methode u wilt gebruiken. De standaardinstelling wordt de hh:mm:ss:ff gebruikt; als alternatief kan frames worden gebruikt.
Lus: Indien ingeschakeld, kan in de tijdlijn de tijdsduur van de afbeeldingsreeks langer gemaakt worden door verslepen. Indien niet ingeschakeld dan is de tijdsduur van de afbeeldingsreeks net zolang als het aantal frames vermenigvuldigt met de tijdsduur van een frame.
Middelpunt bijsnijden: Indien ingeschakeld, vult automatisch het videobeeld met de afbeeldingen terwijl het hoogte/breedte-verhouding wordt behouden door in te zoomen op de afbeelding en aan elke zijde evenveel af te snijden totdat het beeld volledig is gevuld. Zonder dit is ingeschakeld, zal er niet op de afbeelding worden ingezoomd maar verschijnen er zwarte balken als de oriëntatie van de foto of de hoogte/breedte-verhouding niet met de video’s overeenkomen.
Oplossen: Indien ingeschakeld, kan de tijdsduur van de overgang (methode is afhankelijk van de geselecteerde methode bij Frameduur), Selecteer het type Vegen, en pas het aan met de Gladheid-schuifknop.
Animatie: Indien ingeschakeld, dan voegt het een langzame pan en zoom effecten toe die bekend staan als het Ken Burns Effect[1]. Er kan gekozen worden uit Geen (geen animatie), Pan, Pan en Zoom, of Zoom. Elke optie heeft ook een laag doorlaat filter om ruis in de afbeeldingen te verminderen dat kan optreden tijdens deze bewerkingen. Laag doorlaat filtering is veel trager, daarom is het verstandig om het uit te schakelen om een voorbeeld te bekijken, om het daarna in te schakelen voor het uiteindelijke renderen.
Het tekstvak onderaan het venster toont de bestanden die in de afbeeldingsreeks worden gebruikt. Schakel Pictogrammen tonen in om de voorbeeldweergave voor de bestanden te laten zien.
Als op OK wordt gedrukt, dan wordt van alle geselecteerde afbeeldingen een videobestand gemaakt en aan de project bin toegevoegd.
U kunt daarna deze video naar de tijdlijn slepen.
Om de eigenschappen van de afbeeldingsreeks te wijzigen en om Laag doorlaat in te schakelen, dubbelklikt of rechtsklikt men op de afbeeldingsreeks in de project bin en selecteert Clip eigenschappen.