Algemene instellingen
De eerste tab in het dialoogvenster voor projectinstellingen is voor de algemene projectinstellingen. Hier is ook belangrijke informatie over het project te vinden.
Indeling en bediening

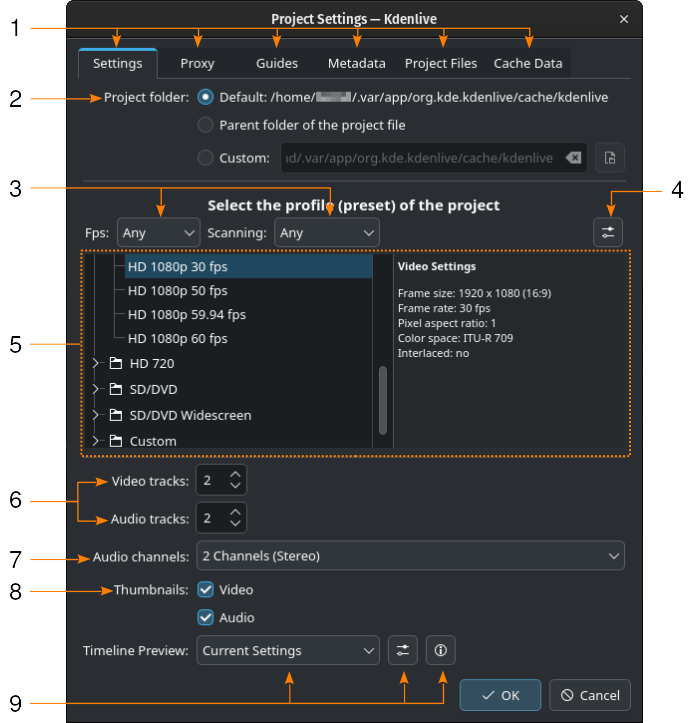
Het dialoogvenster voor de projectinstellingen
- 1:
De beschikbare tabs voor de verschillende instellingen zijn: Instellingen, Proxy, Markeringen, Metadata, Projectbestanden, and Gegevens in de cache. De twee laatste zijn alleen benaderbaar via .
- 2:
Definieert hoe de projectmap wordt opgezet
- 3:
Filtert de lijst met beschikbare projectprofielen bij fps of de scan-methode
- 4:
Opent het dialoogvenster voor het creëren van nieuwe projectprofielen
- 5:
Lijst met alle beschikbare projectprofielen (links) en de details daarvan (rechts)
- 6:
Definieert hoeveel video en audio tracks aanwezig zullen zijn bij de creatie van het project. Later kunnen in de tijdlijn tracks toegevoegd en verwijdert worden.
- 7:
Definieert het aantal audio kanalen
- 8:
Definieert of er in de tijdlijn miniaturen van de clips aanwezig zullen zijn
- 9:
Selecteer welk profiel u wilt gebruiken voor de miniaturen-functionaliteit
Projectmap
Zoals aanbevolen in de sectie Snel aan de gang zou u een nieuwe map voor uw project moeten aanmaken. Deze map zal alle tijdelijke bestanden bevatten die gebruikt worden tijdens het bewerken van uw project (miniaturen, proxy-clips, etc).
Zie ook
Standaard |
Laat Kdenlive bepalen wat de beste locatie voor de projectmap is |
Hoofdmap van het projectbestand |
Gebruikt de map waarin de map is met het |
Aangepast |
Voer hier het pad naar de map in, of klik op het |
Projectprofiel / voorinstelling
Het projectprofiel (of voorkeur) zal het format van uw project definiëren, zoals de afmetingen (of frame size) en de hoogte/breedte-verhouding,de framesnelheid (frame rate) (of fps), de kleurruimte, en of de frames interlaced zijn.
U kunt de afrolmenu’s gebruiken om de lijst van profielen op Fps (frames per seconde) of Scannen (Interlaced of Progressief) te filteren.
U moet zorgvuldig uw projectprofiel kiezen en diegene selecteren die het best bij het gewenste resultaat past. Alle video-bewerkingen in het project (zoals composities maken, transformaties, gebruik van keyframes, enz.) zullen dan dit profiel met de daarbij horende eigenschappen gebruiken.
Als bijvoorbeeld het gewenste resultaat een 4K video is, kies dan een van de 4K-profielen; als u een video wilt creëren dat geschikt is voor social media op een GSM of YouTube Shorts,, kies dan een profiel voor een verticaal resultaat (te vinden in de categorie Aangepast).

Een nieuw projectprofiel aanmaken
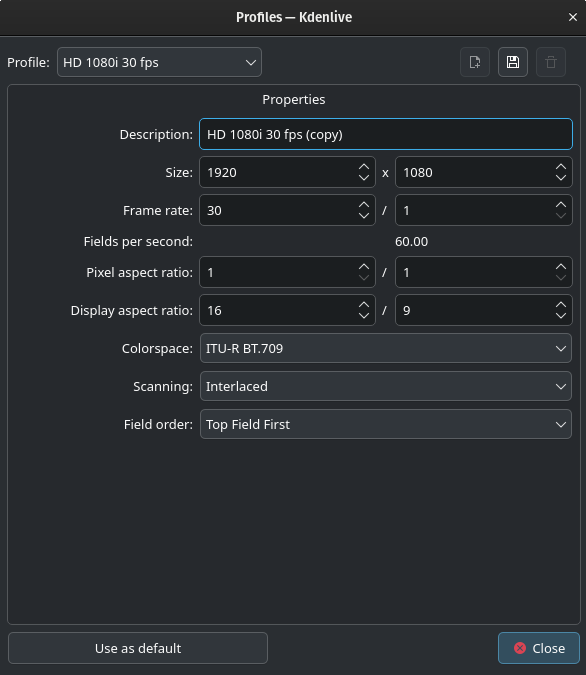
Hier kan de lijst met projectprofielen worden beheert. Klik op de Projectprofielen beheren-pictogram. Standaard zal bij het openen het op dit moment in de lijst geselecteerde profiel worden geopend om bewerkt te kunnen worden. In het geval dat dit profiel in het huidige project wordt gebruikt, zal een foutmelding worden getoond met de mededeling dat het niet kan worden bewerkt als het project is geopend.
Meer informatie kan worden gevonden in de configuratie van projectstandaarden sectie van deze documentatie.
Waarschuwing
Zorg ervoor dat u op het Profiel opslaan-pictogram heeft geklikt voordat u dit venster Sluit. Kdenlive geeft geen waarschuwing als de gewijzigde of nieuw gecreëerde profiel nog niet is opgeslagen.
Tracks
Het standaard aantal audio en video tracks dat uw project zal hebben kan ingesteld worden. Het is altijd mogelijk om later in een bestaand project tracks toe te voegen of te verwijderen.
Audiokanalen
Selecteer hier het aantal audiokanalen per audiotrack. De volgende instellingen zijn mogelijk:
2 kanalen (stereo) |
De standaard en meest gebruikte instelling |
4 kanalen |
|
6 kanalen |
Miniaturen
Indien geselecteerd, worden audio en video miniaturen getoond in de Tijdlijn. Ze kunnen ook ingeschakeld/uitgeschakeld met knoppen op de Statusbalk.
Tijdlijnvoorbeeldweergave
Deze instelling bepaalt welk codec word gebruikt voor de miniaturen-functionaliteit. Selecteer de codec die het best werkt bij uw hardware en de bronnen die u gebruikt in het project.

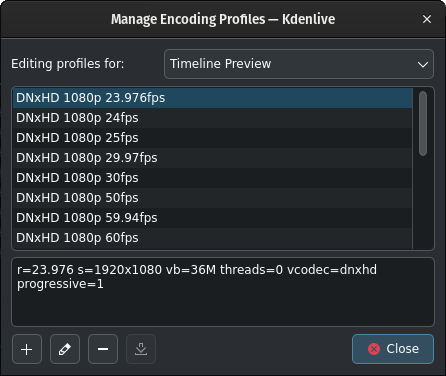
De lijst met beschikbare miniatuur-profielen
De instellingen van de verschillende miniatuur-profielen kunnen ook gewijzigd worden en er kunnen nieuw gecreëerd worden. Klik op het Profielparameters tonen-pictogram om het dialoogvenster te openen.
Als u alleen maar geïnteresseerd bent in de instellingen van het geselecteerde miniatuur-profiel, klik dan op het Informatie-pictogram.