Monitory
Kdenlive uses two monitor widgets to display and play back your videos, images, titles, animations or audio files:
The monitor widgets can be switched on or off by checking and , respectively. Once activated, they can be selected by clicking the corresponding tab which appears at the bottom of the monitor window.
Kdenlive supports an external monitor display using Blackmagicdesign DeckLink cards.
The Monitor klipu plays the clip selected in the Project Bin. The Monitor projektu plays the timeline of the project starting at the position of the playhead.
Ovládání a prvky
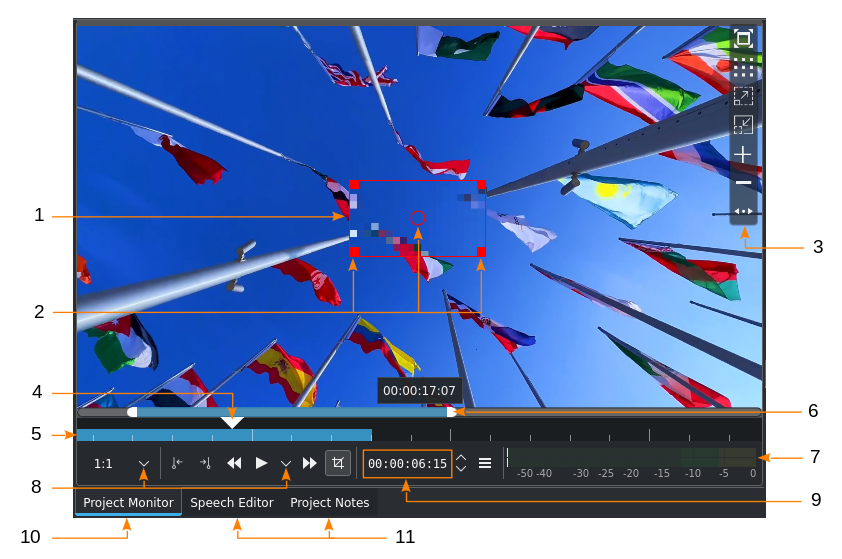
Monitor controls (see this table for more details)
Monitor areas and elements (see this table for more details)
Monitor Display Toolbar
Monitor Display Toolbar and overlay options
The monitor display toolbar appears when you hover over the defined hotspot. By default this is the top right-hand side of the monitor area. Click on  to move the monitor display toolbar to the left-hand side or back. You can switch it off altogether by right-click in the monitor area, and selecting .
The toolbar has the following options:
Ikona |
Popis |
|---|---|
|
Switch full screen. See here for more information. |
|
Change overlay. Click through the different available patterns. You can change the color of the patterns in Colors and Markers. |
|
Přiblížit |
|
Oddálit |
|
Přidat zarážku |
|
Remove guide |
|
Move Toolbar. Click through to move the toolbar from the right (default) to the left and back. |


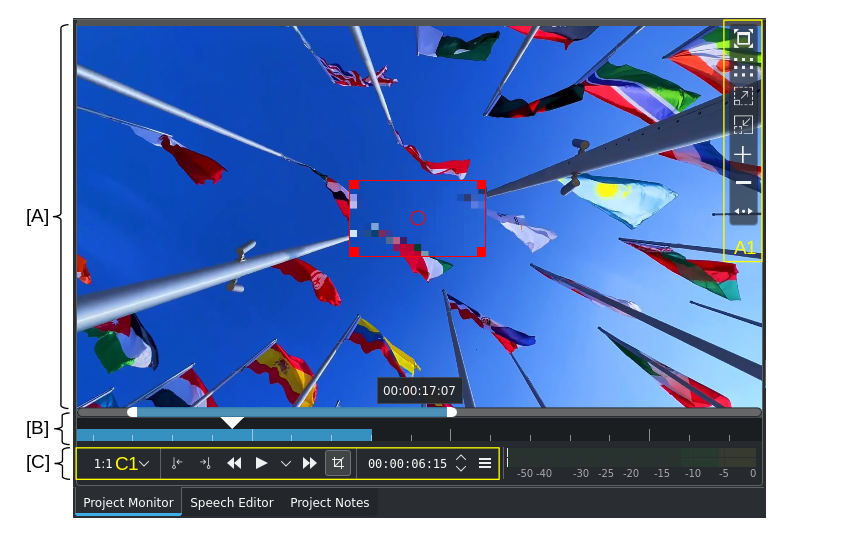
Monitor and Effect Direct Control
Directly changing position and size, grid enabled
Effects which have parameters for X, Y, width, height, opacity (alpha, optional) and rotation, can be controlled directly in the monitor. For example: Transform or Crop by Padding.
Make sure Edit Mode is enabled.
Once such an effect is applied either to a clip in the project bin, a clip in the timeline, a track or on master, the following additional tools are available in the monitor tool bar:
Ikona |
Popis |
|---|---|
|
Enable a grid to which the editing handles will snap. You can change the grid size in Colors and Markers. |
|
Go to the next keyframe. |
|
Go to the previous keyframe. |
|
Add a keyframe |
|
Add automatic keyframe |


Grab the handles to change the size of the clip. Holding Shift maintains the aspect ratio, holding Ctrl resizes in all directions equally (essentially keeping the center position in place).
In the Project Monitor you can cycle through resized clips with Alt+LMB[1]
Poznámka
Once such an effect is applied, the monitor overlay selection panel does not have the  Add Guide/Marker and
  Remove Guide/Marker icons anymore. To show them again disable the effects by clicking on the
  Effects enabled icon in the Effect/Composition Stack header. To enable direct control again, click on the
  Effects Disabled icon.
Direct Control is available for the following effects:
Monitor Change Overlay Color and Grid Size
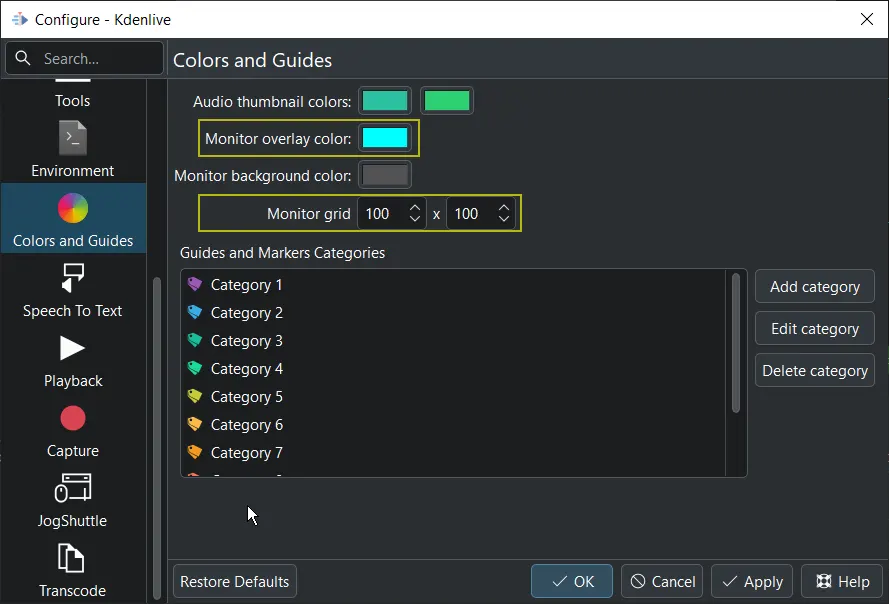
Changing the color of the monitor overlay and grid size
The color of the guide and grid overlay as well as the grid size can be changed in Colors and Markers.
Resizing the Monitor

Resizing the monitor widget
You can resize the monitors by dragging the widget’s edges. Make sure the mouse pointer changes to the sizing shape.
Monitor Zoom Bar
Monitor zoom bar (audio file example)
The timeline rulers of the monitors have zoom bars. To activate, hover over the timeline ruler and use Ctrl+MW[2]. A zoom bar will appear with a scrollbar that has handles on the left and the right. At the same time, the timeline ruler scaling marks will change according to the zoom factor. This is helpful when trying to make frame-accurate cuts or setting zones.
Rozlišení náhledu
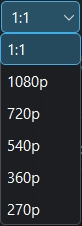
Preview resolutions
Changing the Preview Resolution speeds up the editing experience by scaling the video resolution of the monitors. It can be used instead of proxies or with proxies. Speed improvement depends on your source files.
Playback speed depends on several factors: source material, use of proxies, type and number of effects, and the CPU capabilities. There is limited to no GPU support for video playback. Preview Rendering is highly recommended if playback speed is lacking.
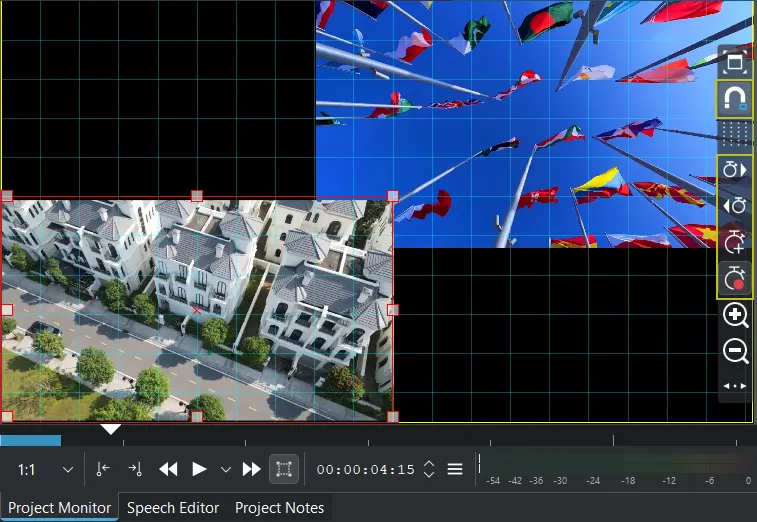
Vícepohledové zobrazení
You enable the multitrack view via or via right-click in the Project Monitor area and selecting Multitrack View or by pressing F12.

The multitrack view interface allows you to select a track in the timeline by clicking on the project monitor. See the section about multicam editing for using it during Editing.
Clip and Project Monitor in Separate Windows
If you want to have the Clip and/or the Project Monitor in their own individual windows click on the respective tab and drag the monitor widget out into its own window. This undocks the widgets from their space. From there you can move them even to other monitors you may have connected.
Moving Clip and Project Monitor to their own independent windows (undocking)
To put the monitors back into the tabbed view click on the monitor’s title bar (enable it via ) and drag the window on top of another widget. See the Customizing the Interface chapter for more details.
Poznámka
There is a small risk that the monitor widget has no title bar (intermittent defect). In this case you will need to reset the Kdenlive settings by deleting ~/.config/kdenliverc (Linux) or C:\Users\<user_name>\AppData\Roaming\kdenlive\kdenlivestaterc (Windows).