Meni Medijska datoteka
Funkcije, nadzorovane iz tega menija, vplivajo na element, izbran na časovnici ali v projektni posodi. Menijske funkcije so na voljo glede na to, ali je posnetek izbran v projektni posodi ali na časovnici.
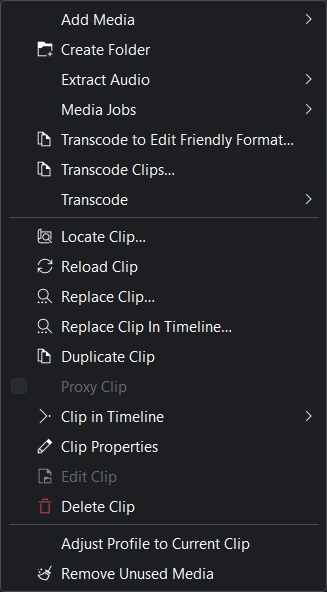
Meni Medijska datoteka v Kdenlive
Dodaj medijsko datoteko
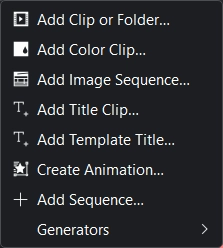
Meni Dodaj medijsko datoteko v programu Kdenlive
Namen tega podmenija je omogočiti dodajanje različnih vrst medijski datotek v v projektno posodo.
Dodaj posnetek ali mapo
Ta funkcija omogoča dodajanje video, zvočnih in (enojnih) slikovnih datotek iz datotečnega sistema. Na voljo je tudi v menijski vrstici v projektni posodi ali ko desno tipko miške kliknete ali dvokliknete prazen prostor v projektni posodi.
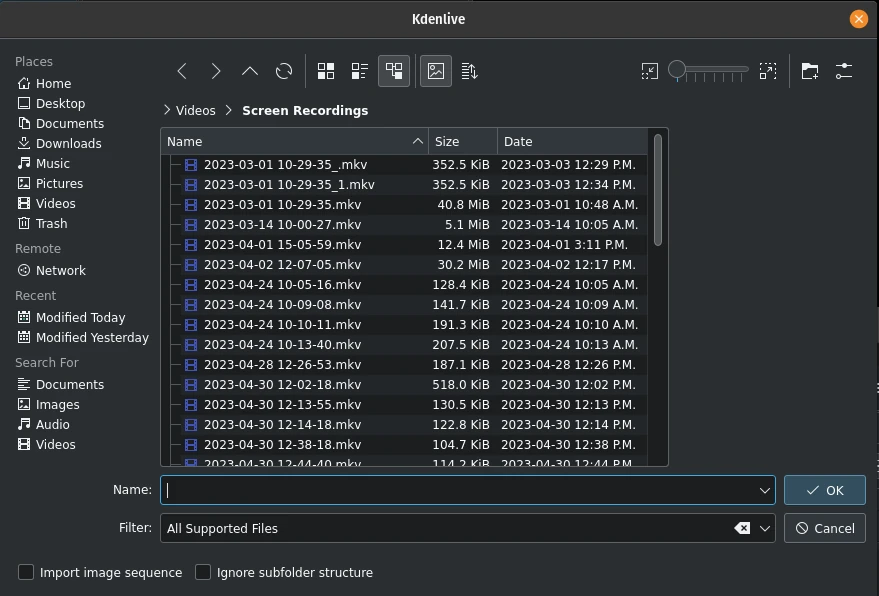
Dodajanje posnetka ali celotne mape
Podrobnejša razlaga te funkcije je na voljo v razdelku clips te dokumentacije.
Dodaj barvni posnetek
Ta funkcija omogoča ustvarjanje posnetka z eno samo barvo.
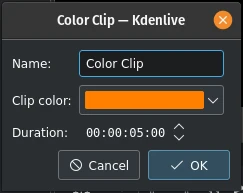
Dodajanje barvnega posnetka
Na voljo je tudi v menijski vrstici projektne posode ter s klikom desne tipke miške v prazen prostor v projektni posodi.
Če vas zanima več podrobnosti, glejte razdelek Barvni posnetki te dokumentacije.
Dodaj zaporedje slik
Ta funkcija v projektno posodo doda niz slik ali fotografij kot en posnetek.
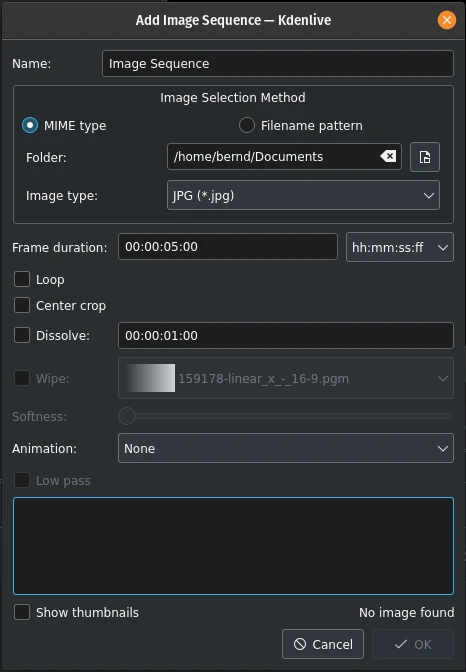
Dodajanje zaporedja slik
Na voljo je tudi v menijski vrstici projektne posode ali s klikom desne tipke miške v prazen prostor v projektni posodi.
Če želite več podrobnosti, glejte razdelek Zaporedje slik v tej dokumentaciji.
Dodaj posnetek naslova
Ta funkcija doda posnetek naslova v projektno posodo. Najprej odpre urejevalnik naslovv, kjer ustvarite posnetek naslova. Ko ga shranite, se prikaže v projektni posodi.
Podrobnejša dokumentacija programa Naslovnik je na voljo v razdelku Posnetki naslovov v dokumentaciji.
Ta funkcija je na voljo tudi v menijski vrstici v projektni posodi ter s klikom desne tipke miške v prazen prostor v projektni posodi.
Dodaj predlogo naslova
Ta funkcija ustvari posnetek napisa na podlagi predloge napisa.
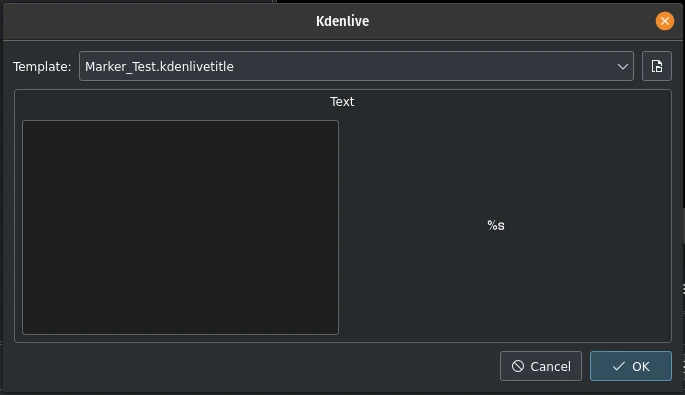
Dodaj predlogo naslova
Predlogo izdelate v programu Naslovnik kot običajen posnetek napisa. Ključna je ograda %s. Nadomestilo jo bo besedilo, ki ga vnesete tukaj.
Ta funkcija je na voljo tudi v menijski vrstici v projektni posodi ter s klikom desne tipke miške v prazen prostor v projektni posodi.
Več podrobnosti o napisih in predlogah najdete v razdelku:doc:/titles_and_graphics/titles/title_template_titles te dokumentacije.
Ustvari animacijo
Ta funkcija ustvari posnetek animacije v posodi projekta in kliče Glaxnimate, program za dejansko ustvarjanje animacije.
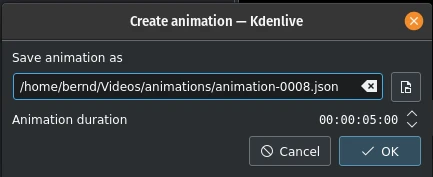
Ustvarjanje animacije
Glaxnimate je treba namestiti na računalnik in pot do njega mora biti nastavljena v .
Ta funkcija je na voljo tudi v menijski vrstici v projektni posodi ter s klikom desne tipke miške v prazen prostor v projektni posodi.
Dodaj zaporedje
Ta funkcija ustvari novo zaporedje v projektni posodi.
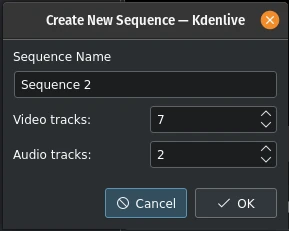
Dodajanje novega zaporedja
Zaporedja so bila uvedena z različico 23.04 in so potrebna za gnezdene časovnice, kjer lahko posnetke montirate ločeno in neodvisno.
Ta funkcija je na voljo tudi v menijski vrstici v projektni posodi ter s klikom desne tipke miške v prazen prostor v projektni posodi.
Za več podrobnosti glejte razdelek Zaporedje te dokumentacije.
Ustvarjalniki
Ta funkcija omogoča ustvarjanje tvorjenih posnetkov v projektni posodi za
Števec
Barvni stolpci (stari testni TV-zaslon)
Beli šum
Ta funkcija je na voljo tudi v menijski vrstici v projektni posodi. Z desno tipko miške lahko tudi kliknete prazen prostor v projektni posodi. Za več podrobnosti si oglejte razdelek Posnetki v tej dokumentaciji.
Ustvari mapo
Ta funkcija ustvari novo mapo v projektni posodi.
Mapa je navidezna mapa in zelo uporabna za organizacijo vaših sredstev. Iz vsake mape lahko ustvarite tudi ločene posode (glejte razdelek Ustvarjanje dodatnih projektnih posod)
Ta funkcija je na voljo tudi v menijski vrstici v projektni posodi ter s klikom desne tipke miške v prazen prostor v projektni posodi.
Več podrobnosti je na voljo v razdelku Ustvari mapo v tej dokumentaciji.
Nasvet
Dober način, da ohranite svojo projektno posodo urejeno, da imajo mape ali ločene posode npr. za vaše posnetke (glavni video), posnetke druge kamere, zvok, slike, SFX in VFX, naslove itn.
Izvleci zvok
Na voljo samo, če je izbrani posnetek videoposnetek z zvočno stezo. Ta funkcija izvleče zvok iz posnetka in ga doda kot 48kHz-datoteko wav v projektno posodo. Postopek se izvede kot opravilo posnetka v projektni posodi in lahko traja nekaj časa. Majhna vrstica napredka pod posnetkom prikazuje napredek.
Ta funkcija je na voljo tudi v kontekstnem meniju posnetka v projektni posodi.
Opravila z medijskimi datotekami
Odpre okno za izbiro različnih možnosti:
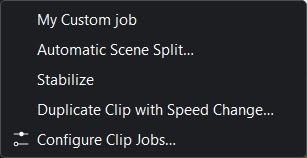
Meni Opravila z medijskimi datotekami
Moje opravilo po meri (v vašem okolju je to morda videti drugače)
Ta funkcija je na voljo tudi v kontekstnem meniju posnetka v projektni posodi.
Izberite posnetek, ki ima tekoča opravila, podrobnosti o opravilih bodo prikazane na ogledu posnetka kot prekrivna plast. S klikom X na prekrivanje z opravili posnetka prekličete opravilo posnetka. Če želite omogočiti prekrivanje posnetka, preberite to.
Samodejna delitev prizora
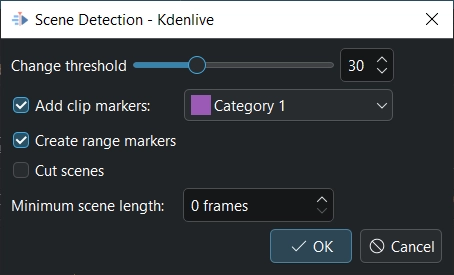
Zaznavanje prizorov
To opravilo zazna spremembe prizora v posnetku in ustvari označevalnike in/ali označevalnike obsega in/ali razreže posnetek na podposnetke oz. kadre. Z nastavitvijo Spremeni prag se določi razlika v video toku, ki naj šteje za spremembo prizora. Morda boste morali eksperimentirati s tem parametrom, da boste dobili zadovoljive rezultate za specifične razmere in izvorni material.
Če želite, da Kdenlive ustvari podposnetke oz. kadre za vsak prizor, potrdite Razreži prizore.

Samodejno zaznavanje prizora z označevalniki
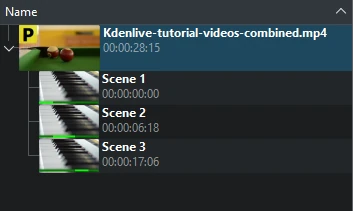
Samodejno zaznavanje prizora z rezi
Stabiliziraj
Ta funkcija uporabi algoritme za stabilizacijo slike v posnetku, kar lahko zmanjša tresenje posnetka. Na voljo je tudi prek kontekstnega menija posnetka v projektni posodi.
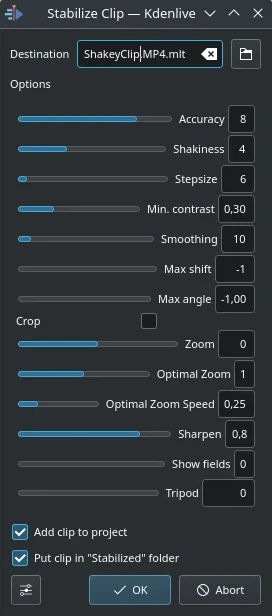
Pogovorno okno Stabiliziraj posnetek v različici 21.12
Na podlagi namigov na tem zaslonu in the docs here je razvidno, kaj pomenijo vse možnosti:
- Natančnost
Natančnost zaznavanja tresljajev. Mora biti >= faktor tresenja. 1: nizko (hitra obdelava). 15: visoka (počasna obdelava). Privzeto: 4. Priporočeno: 8.
- Tresavost
Kako tresoč je videoposnetek? In kako hitra je kamera? 1: malo (hitra obdelava). 10: zelo močno/hitro (počasna obdelava). Privzeto = 4. Opomba: tudi velike vrednosti lahko zmanjšajo natančnost. To je posledica notranjih lastnosti zaznavanja gibanja. Običajno ne potrebujete vrednosti, večje od 7.
- Velikost koraka
Velikost koraka postopka iskanja. Območje okoli minimuma se pregleduje z ločljivostjo 1 slikovne točke. Privzeto = 6.
- Najm. kontrast
Pod tem kontrastom se polslika zavrže. Obseg 0-1. Privzeto = 0,3. Morda boste želeli uporabiti manjšo vrednost za posnetek z zelo nizkim kontrastom.
- Glajenje
Nadzoruje količino glajenja/stabilizacije. Večja kot je vrednost za glajenje, bolj se kompenzirajo premiki kamere. Rezultat je manjša sprememba hitrosti kamere v posnetku. Tehnično je to število sličic za nizkoprepustno filtriranje = (glajenje * 2) + 1.
Na primer pri posnetku s 25 sličicami na sekundo vrednost 12 za faktor glajenja pomeni, da bomo gladili eno sekundo - 12 sličic za trenutno sličico + trenutno sličico (1) + 12 sličic za trenutno sličico. Privzeto = 10.
Demo of the difference (zgoraj: 3, spodaj: 30).
- Najv. zamik
Največje število slikovnih točk za prevajanje slike. Privzeto = -1 (brez omejitve)
- Najv. kot
Največji kot vrtenja v radianih. Privzeto = -1 (brez omejitve).
- Obreži
Če ta možnost ni potrjena, pomeni, da rob preoblikovanih sličic vsebuje slikovne točke iz prejšnjih sličic. Potrjeno = črno ozadje. Privzeto je nepotrjeno.
- Približanje
Dodatna povečava med preoblikovanjem. Odstotek povečave > 0 = povečava, < 0 = pomanjšanje. Tukaj določena povečava je dodatna k optimalni povečavi, ki jo program izračuna, ko je označena možnost optzoom. Privzeto = 0.
- Optimalni zum
Uporabite optimalno povečavo (izračunano iz transformacij). Povzroči povečavo videoposnetka, dokler ni skritih 90 % preoblikovanj. Privzeto je potrjena. Namig: Z možnostjo povečave lahko pogled še dodatno približate.
- Optimalna hitrost zuma
Povečanje na sličico (uporablja se, ko je »Optimalna povečava« = 2)
- Izostri
Izostri preoblikovano sliko. Stopnja izostritve: 0 = brez izostritve. Uporablja filter razostritve z matriko 5x5. Privzeto = 0,8.
- Pokaži polja
0 = ne riše ničesar, 1 ali 2 = prikaže polslike in preoblikovanja. Uporabite 1 ali 2 za predogled, kaj bo postopek naredil. Oglejte si ta |primer|. Privzeto = 0. Vrednosti tega parametra, ki niso enake nič, pri izvajanju Kdenlive niso pomembne - uporabite nič.
- Stativ
Način navideznega stativa (=relativno=0, glajenje=0)
Tukaj so primeri izvajanja učinka stabilizacije - prekodiral jih je izvorni avtor - Georg Martius.
Podvoji posnetek s spremembo hitrosti
Ta funkcija je na voljo samo za posnetke, izbrane v projektni posodi, in jo lahko izberete v kontekstnem meniju posnetka. [1]
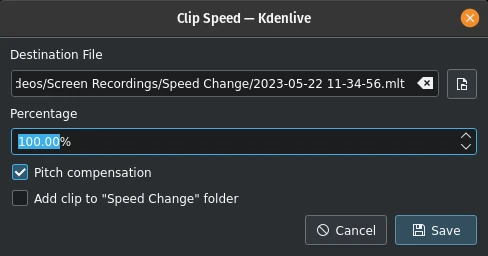
Podvoji posnetek s spremembo hitrosti
Vrednosti nad 100 % pospešijo posnetek navzgor, vrednosti pod 100 % pa ga upočasnijo. Zvok v posnetku je tudi obrnjen.
Izberite Kompenzacija višine tona, da se izognete učinku Mikija Miške v govorjeni besedi, ko pohitrite posnetek. Če potrdite možnost Dodaj posnetek v mapo »Sprememba hitrosti«, v projektni mapi ustvari mapo »Sprememba hitrosti« in posnetek doda vanjo.
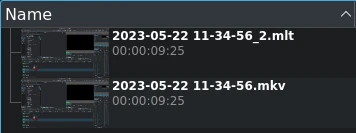
Podvoji posnetek s spremembo hitrosti v projektni posodi
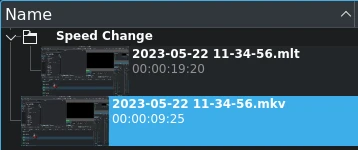
Enako kot zgoraj, vendar z mapo Spremenjena hitrost
Ko kliknete na Shrani, se v projektni posodi ustvari nov posnetek. Ima ime datoteke, ki ste ga navedli v pogovornem oknu, s končnico .mlt.
Ta posnetek lahko dodate na časovnico kot katerikoli drug posnetek in ko ga predvajate, se predvaja videoposnetek izvornega posnetka z novo hitrostjo (ali v obratni smeri, če je bila vnesena negativna vrednost %).
Prilagodi posle posnetkov
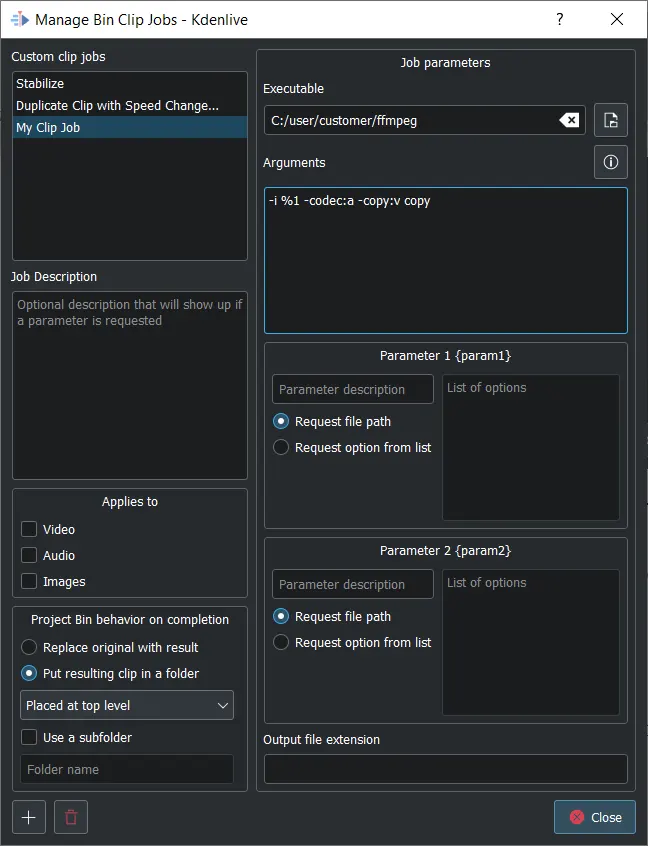
Pogovorno okno Upravljaj posle posnetkov posode
Odpre se pogovorno okno Upravljaj opravila posnetkov posode. Tu lahko ustvarite in upravljate svoja opravila, ki jih lahko nato uporabite za posnetke v projektni posodi. Izberite izvršilno datoteko, ki jo želite priklicati, in vnesite argumente, ki jih je treba posredovati izvršilni datoteki. %1 se nadomesti s potjo do izvornega posnetka. Če ne določite končnice izhodne datoteke, bo uporabljena končnica izvorne datoteke.
Če ne želite, da se izvirni posnetek zamenja z rezultatom, izberite, ali naj bo rezultatni posnetek Postavi v mapo izvornega posnetka, Postavi na vrhnjo raven ali naj Kdenlive Uporabi podmapo za njegovo shranjevanje. V slednjem primeru morate vnesti ime mape.
Na voljo imate lahko pot izvornega posnetka {source} ter 2 nastavljiva parametra {param1} in {param2}. Izhodna datoteka bo nadomestila {output}. Argumenti morajo biti: {source} {param1} {output}
Kliknite  , da ustvarite novo opravilo s posnetki po meri. Če ga želite izbrisati, ga najprej izberite in nato kliknite ikono
  .
.
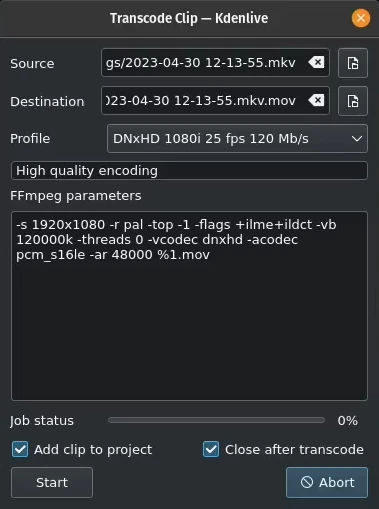
Prekodiraj v montaži prijazen zapis
Prekodiraj v montaži prijazen zapis
To odpre pogovorno okno, v katerem lahko izberete obliko, primerno za montažo, če izvorno gradivo ni primerno za nelinearno montažo videoposnetkov. Ta funkcija je na voljo tudi v kontekstem meniju posnetka(-ov), izbranega v projektni posodi.
Za to funkcijo lahko izberete več kot en posnetek v projektni posodi.
Na voljo je več formatov, nekateri so brez izgub (ustvarjajo ogromne datoteke), pri nekaterih se kakovost nekoliko poslabša.
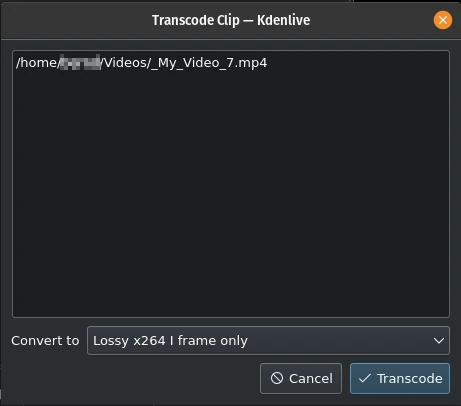
Prekodiraj posnetke
Prekodiraj posnetke
S tem pretvorite video ali zvočni posnetek iz enega kodeka/zapisa v drugega.
Izberite eno izvorno datoteko ali več izvornih datotek in profil, ki predstavlja želeni ciljni kodek/zapis. Po potrebi spremenite ciljno pot in ime datoteke in kliknite . Sicer izberite , da zaprete okna.
Prekodiranje posnetka mora biti hitrejše od nalaganja posnetka v časovnico in ponovno kodiranje v drugo obliko zapisa.
nadzira, če naj bo po pretvorbi novi posnetek dodan v projektno posodo.
Ne potrdite tega polja, če je po pretvorbi potrebno pretvarjati še v drug zapis.
Prekodiraj
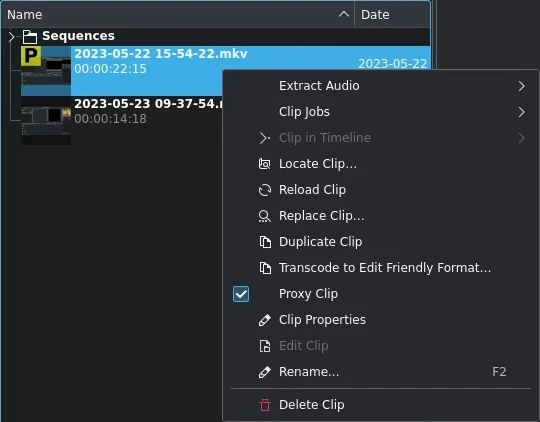
S to funkcijo lahko izvirno gradivo prekodirate v različne druge formate. Ta funkcija je na voljo tudi v kontekstnem meniju posnetka, izbranega v projektni posodi.
S seznama, ki je na voljo, izberite profil prekodiranja, da izbrani posnetek prekodirate v drug video zapis. Možnosti so pod nadzorom Nastavitve prekodiranja. Prekodiranje opravi program ffmpeg.

Opravilo prekodiranja v teku
Med izvajanjem opravila za prekodiranje se v projektni posodi na sličicah posnetkov prikaže vrstica napredka, na vrhu projektne posode pa se prikaže element menija s seznamom opravil.
Najdi posnetek
Poišči posnetek odpre sistemski brskalnik po datotekah na mestu datotečnega sistema, kjer je shranjen izbrani posnetek. Uporabno za iskanje virov posnetkov iz projektne posode.
Ta funkcija je na voljo tudi v kontekstnem meniju posnetka, izbranega v projektni posodi.
Upoštevajte, da glede na vrsto posnetka nekateri elementi menija niso prikazani.
Znova naloži posnetek
Z možnostjo Ponovno naloži posnetek se posnetek ponovno uvozi iz datotečnega sistema v Kdenlive. To je uporabno, kadar montirate ali spreminjate posnetek zunaj Kdenlive in želite, da ga Kdenlive posodobi v projektu.
Ta funkcija je na voljo tudi v kontekstnem meniju posnetka, izbranega v projektni posodi.
Zamenjaj posnetek
S funkcijo Zamenjaj posnetek lahko izberete drugo datoteko, vendar ohranite vse njegove pojavitve na časovnici. To je lahko koristno, če delate s posnetki ograd (npr. nizke ločljivosti ali v predlogah projekta) in na koncu, pred izrisovanjem, posnetek nadomestite s končnim posnetkom.
Če izberete samo zvokovno datoteko, vas Kdenlive vpraša, ali želite spremeniti le zvočni del posnetka (ali obratno). To je uporabno, če ste optimizirali zvok z zunanjim programom in želite posodobiti video posnetek.

Vprašanje, ali želite spremeniti le zvočni del posnetka
Ta funkcija je na voljo tudi v kontekstnem meniju posnetka, izbranega v projektni posodi.
Opomba
Prepričajte se, da je nadomestni posnetek vsaj enako dolg/trajanje. V nasprotnem primeru lahko pride do neželenih vrzeli na časovnici. Če so na teh posnetkih uporabljeni učinki, morajo imeti nadomestni posnetki enake mere, da preprečite neželeno vedenje učinkov.
Zamenjaj posnetek na časovnici
S to funkcijo lahko zamenjate posnetek, ki je na časovnici, z drugim posnetkom. To je koristno, ko delate s začasnimi posnetki ali nizkoločljivostnimi posnetki, ki jih radi zamenjali s končnim posnetkom pred izrisovanjem.
Za to zamenjavo morate izbrati 2 posnetka (nadomestni posnetek in izvirni posnetek).
Podvoji posnetek
Ta funkcija ustvari kopijo posnetka v projektni posodi. To je lahko koristno pri uporabi učinkov na posnetkih, saj vam omogoča, da imate isto izvorno datoteko z dvema različnima nizoma uporabljenih učinkov ali enega z drugim brez učinkov.
Ta funkcija je na voljo tudi v kontekstnem meniju posnetka, izbranega v projektni posodi.
Posredni posnetek
Posredni posnetek
Če so v nastavitvah projekta omogočeni posredni posnetki, bo ta funkcija ustvarila posredni posnetek za izbrane posnetke. Rumeni kvadrat s črko P bo označeval, da je posnetek v projektni posodi dejansko posredni posnetek (pričakujte nižjo kakovost pri predvajanju v ogledu posnetka ali ogledu projekta). Pri končnem izrisovanju bodo nadomestni posnetki nadomeščeni z izvornimi datotekami.
Ta postavka menija je preklopna, kar pomeni, da se bo Kdenlive vrnil k izvornemu posnetku, če je izbrani posnetek že posredni posnetek.
Ta funkcija je na voljo tudi v kontekstnem meniju posnetka, izbranega v projektni posodi.
Posnetek na časovnici
Funkcije, nadzorovane iz tega menija, vplivajo na posnetek, izbran na časovnici. To je v nasprotju s funkcijami kontekstnega menija, ki vplivajo na posnetke, izbrane v projektni posodi.
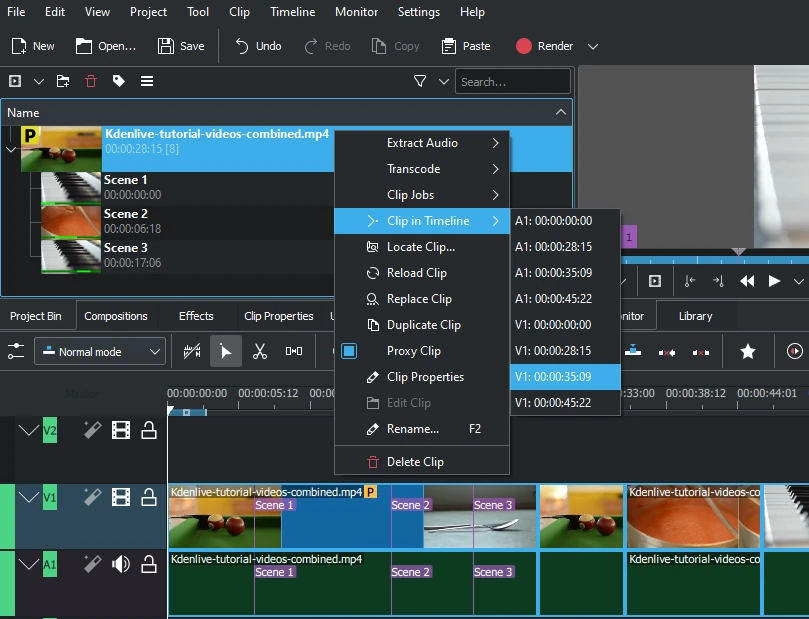
Iskanje vseh pojavitev posnetka
Z izbiro menija Posnetek na časovnici se prikaže okno s seznamom vseh primerkov izbranega posnetka, ki so označeni s stezo (A za zvok, V za video) in položajem na časovnici. S klikom vnosa na seznamu se predvajalna glava prestavi na začetek navedenega posnetka.
V primeru smo kliknili tretji videoposnetek, ki se nahaja na video stezi 1 pri oznaki 00:35;09, in predvajalna glava je zdaj na začetku tega posnetka.
Ta možnost bo siva, če se posnetek ne nahaja na časovnici.
Oglejte si tudi Posnetek v projektni posodi, ki je na voljo v kontekstnem meniju posnetka na časovnici.
Lastnosti posnetka
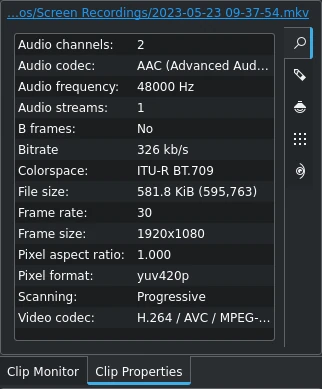
Lastnosti posnetka
Ta element menija odpre gradnik Lastnosti posnetka in prikaže lastnosti izbranega posnetka v projektni posodi. Glede na vrsto posnetka vključuje informacije o zvočnem toku, video toku, razmerju stranic, merah ali velikosti sličice, hitrosti posnetka itn.
Ta funkcija je na voljo tudi v kontekstnem meniju posnetka, izbranega v projektni posodi.
Za več podrobnosti glejte poglavje Lastnosti posnetka.
Uredi posnetek
Ta funkcija je na voljo za naslednje vrste posnetkov:
zvok
slika
animacija
video
Odpre posnetek v zunanjem programu, določenem pod Privzeti programi, primeren za urejanje.
Ta funkcija je na voljo tudi v kontekstnem meniju posnetka, izbranega v projektni posodi.
Če pot ni nastavljena, se prikaže pojavno okno za določitev poti do zunanje programske opreme na vašem računalniku:
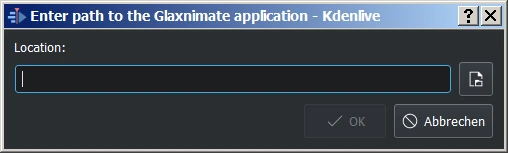
Manjkajoča pot za Glaxnimate
Ko je pot nastavljena, se program zažene in odpre izbrani posnetek. Vnesena pot se samodejno doda privzetim programom v .
Podrobnosti o namestitvi potrebne zunanje programske opreme in nastavljanju poti: glejte poglavje Privzete aplikacije.
Nasvet
Ta možnost je za video posnetke osivela, ker je Kdenlive program za montažo videoposnetkov - zunanja programska oprema ureja samo zvočne posnetke, slike in animacije.
Izbriši posnetek
Ta funkcija odstrani posnetek iz projektne posode. Ne izbriše ga iz datotečnega sistema. Če se posnetek uporablja na časovnici, se prikaže opozorilno sporočilo, in če kliknete Nadaljuj, se izbrišejo vse pojavitve tega posnetka na časovnici.
Ta funkcija je na voljo tudi v kontekstnem meniju posnetka, izbranega v projektni posodi.
Prilagodi profil trenutnemu posnetku
Ta funkcija ponuja predlagani profil projekta, ki bi bil najbolj primeren za trenutno izbrani posnetek v projektni posodi.

Prilagajanje profila projekta lastnostim posnetka
Odstrani neuporabljene medijske datoteke
S to funkcijo lahko odstranite neuporabljene posnetke iz projektne posode.
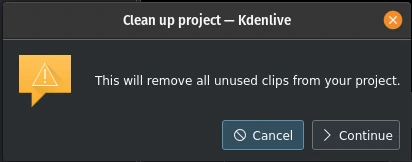
Čiščenje projekta
To dejanje lahko razveljavite z , prek zgodovine razveljavitev ali s privzeto tipkovno bližnjico krmilka+Z.
Opomba
To se razlikuje od gumba Izbriši datoteke na zavihku Projektne datoteke pogovornega okna Nastavitve projekta, ki s trdega diska izbriše datoteke, ki jih projekt ne uporablja.