Monitores
Kdenlive utiliza dos paneles para visualizar y reproducir archivos de video, imagen, títulos, animación o audio:
Los paneles de monitor podrán ser mostrados u ocultados mediante las opciones y , respectivamente. Una vez visibles, podrán ser seleccionados haciendo clic sobre su correspondiente pestaña, que aparecerá en la parte inferior del área en donde se encuentren empotrados.
Kdenlive soporta la visualización en un monitor externo, usando placas Blackmagicdesign DeckLink.
El Monitor de medios reproducirá el medio seleccionado en el panel Medios. El Monitor de secuencias reproducirá la secuencia activa en la línea de tiempo, desde la posición actual del cursor de tiempo.
Controles y elementos
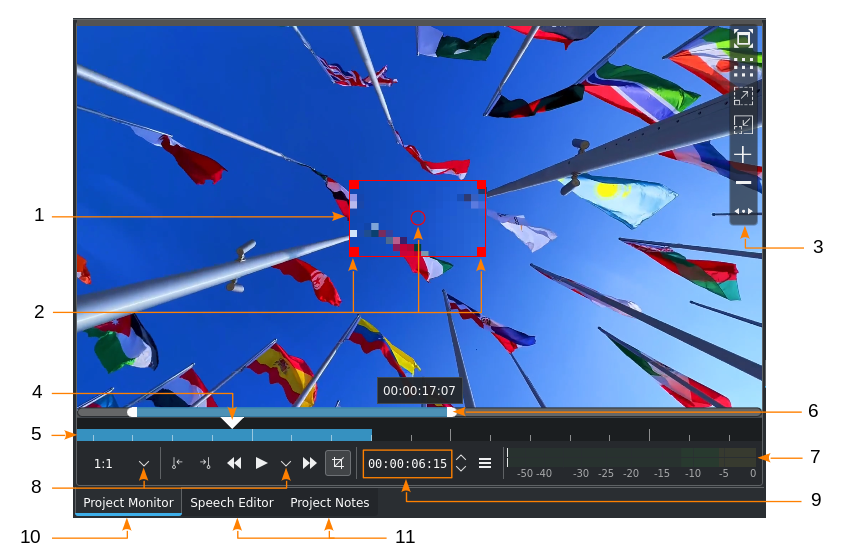
Controles de los monitores (ver esta tabla para más detalles)
Elementos y áreas de los monitores (ver esta tabla para más detalles)
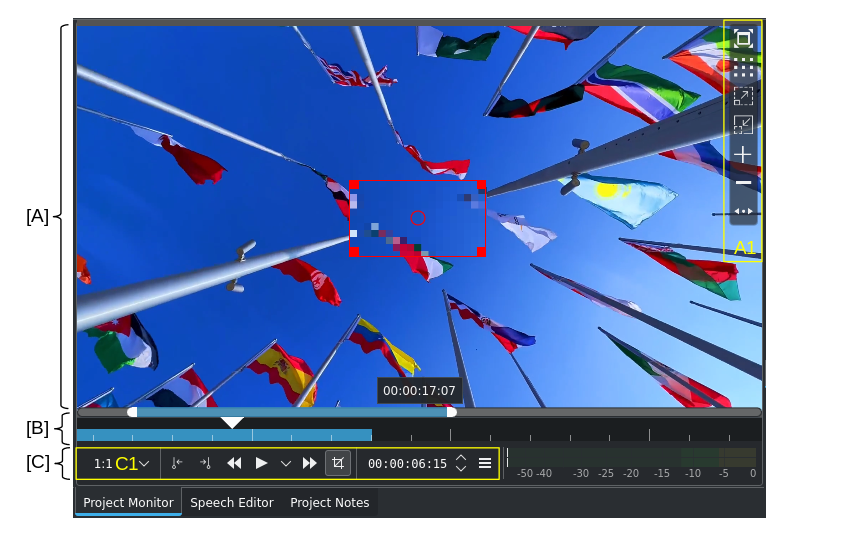
Barra de herramientas del Monitor
La Barra de herramientas del monitor, mostrando las opciones de sobreimpresión
La Barra de herramientas del monitor aparece al pasar el puntero del ratón sobre el área sensible definida. De forma predeterminada es el lado derecho del área de imagen del monitor. Será posible mover el área sensible hacia el lado izquierdo (o nuevamente al derecho) haciendo clic sobre el ícono  . Será posible desactivar completamente esta barra haciendo clic derecho sobre el área de imagen del monitor y desmarcando la opción .
La barra de herramientas contiene las siguientes opciones:
Ícono |
Descripción |
|---|---|
|
Switch full screen. See here for more information. |
|
Guías de composición. Permite recorrer cíclicamente los diferentes patrones de guía disponibles. Será posible modificar el color de las guías de los monitores mediante la sección Colores y marcadores. |
|
Ampliar |
|
Reducir |
|
Agregar marcador |
|
Eliminar marcador |
|
Mover barra de herramientas. Hacer clic para mover la barra de herramientas desde la derecha (predeterminado) hacia la izquierda (o de vuelta a la derecha). |


Control directo de efectos en el monitor
Cambiando directamente la posición y el tamaño, con una cuadrícula activa
Los efectos que contengan parámetros para posición X e Y, ancho, altura, opacidad (alfa, opcional) y rotación, podrán ser controlados directamente desde el monitor. Por ejemplo: Transformar o Recortar y rellenar.
Asegurarse de que el Modo de edición se encuentre activo.
Las siguientes opciones se mostrarán en la barra de herramientas del monitor, una vez que uno de estos efectos hubiera sido aplicado a un medio del panel de Medios, un clip de la línea de tiempo, a una pista o a la secuencia activa por completo:
Ícono |
Descripción |
|---|---|
|
Activa una cuadrícula a la cual se adherirán las asas de edición. Será posible modificar el tamaño de la cuadrícula en el diálogo Colores y marcadores. |
|
Ir al clave siguiente. |
|
Ir al clave anterior. |
|
Agregar un clave |
|
Agregar claves de forma automática |


Arrastrar las asas para cambiar el tamaño del medio/clip. Manteniendo pulsada la tecla Mayús se preservará la proporción durante la escala, manteniendo pulsada Ctrl el cambio de tamaño ocurrirá de igual manera en todas las direcciones (manteniendo el centro en su lugar).
En el Monitor de secuencias, será posible recorrer cíclicamente los clips redimensionados usando Alt+botón Izq[1]
Nota
Una vez que un efecto de este tipo haya sido aplicado, la barra lateral de herramientas del monitor ya no mostrará los botones  Agregar marcador ni
  Eliminar marcador. Para volver a mostrarlos, deshabilitar los efectos haciendo clic en el botón
  Efectos habilitados en el Encabezado del panel Opciones de efectos/composición. Para volver a habilitar el control directo nuevamente, hacer clic en el botón
  Efectos deshabilitados.
Existe la posibilidad de tener un control directo en el monitor sobre los siguientes efectos:
Cambiar color de sobreimpresos y tamaño de cuadrícula
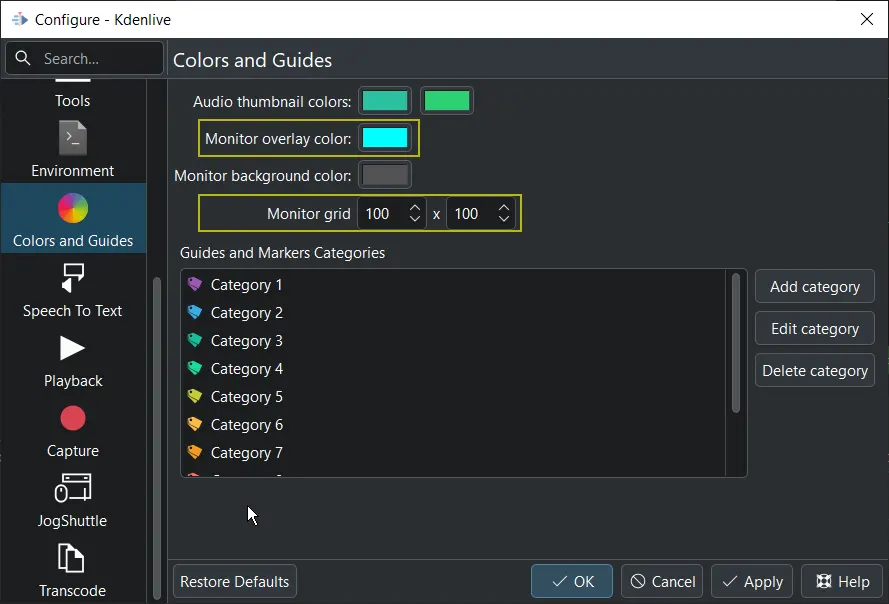
Cambiando el color de los sobreimpresos y la cuadrícula de los monitores
El color de las guías sobreimpresas, así como el tamaño de la cuadrícula podrán ser modificados en la sección Colores y marcadores de las preferencias.
Redimensión de los monitores
Redimensión del panel de Monitor
Es posible redimensionar los monitores arrastrando los bordes del panel. Asegurarse de que la forma del puntero haya cambiado a la forma que indica redimensión, antes de arrastrar.
Barra de ampliación del monitor
Barra de ampliación del Monitor (en el ejemplo se muestra un archivo de sonido)
Las reglas de tiempo de los monitores contienen barras de ampliación. Para activarlas, posar el puntero del ratón sobre la regla de tiempo del monitor y usar Ctrl+RR[2]. Aparecerá una barra de ampliación, con una barra de desplazamiento que tiene asas en sus extremos. Al mismo tiempo, las marcas de escala de la regla de tiempo cambiarán de acuerdo al factor de ampliación escogido. Esto resultará útil cuando se intente realizar cortes precisos o durante el establecimiento de los límites de la zona.
Resolución de previsualización
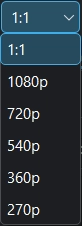
Resoluciones disponibles
La resolución de previsualización permitirá agilizar la experiencia de edición, escalando la resolución del video en los monitores. Puede ser utilizada como alternativa al uso de medios de reemplazo o usarse en conjunto con estos. La mejora en la velocidad dependerá de las características de los archivos originales.
La velocidad de reproducción dependerá, en última instancia, de una combinación de varios factores, tales como: el tipo de material original, uso de reemplazos, tipo y cantidad de efectos aplicados, así como de la potencia de la CPU. El soporte de GPU para la reproducción es virtualmente inexistente en el programa. Es altamente recomendable el uso del procesamiento de Previsualización en la Línea de tiempo, cuando la velocidad de reproducción sea deficiente.
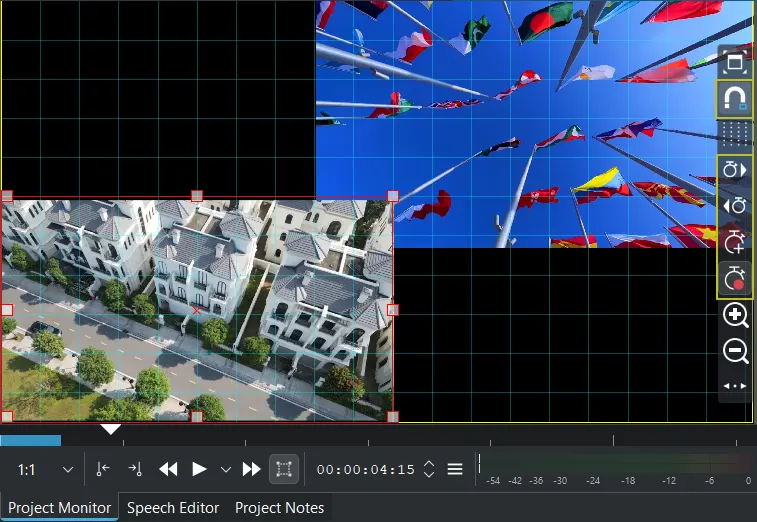
Vista multipista
Será posible habilitar una vista multipista mediante el menú o a través del menú contextual del Monitor de secuencias, seleccionando la opción Vista multipista o presionando F12.
La interfaz de la vista multipista permite seleccionar una pista de la línea de tiempo haciendo clic sobre un área del Monitor de secuencias. Ver la sección sobre edición multicámara, para su uso durante la edición.
Monitores en ventanas flotantes
Si se deseara tener el Monitor de medios o el Monitor de secuencias en sus propias ventanas individuales flotantes, será posible arrastrarlos desde las pestañas respectivas de sus paneles hacia un lugar en donde no queden empotrados. Luego podrán ser movidos hacia otros monitores secundarios, si los hubiera en el sistema.
Desempotrando los dos monitores a sus propias ventanas flotantes
Para volver a empotrar los monitores en la interfaz, hacer clic sobre la barra de título del monitor (activarla mediante el menú ) y arrastrar la ventana sobre o al lado de uno de los paneles de la interfaz. Ver la sección Personalización de la interfaz para más detalles.
Nota
Existe un reducido riesgo de que la ventana del monitor no tuviera una barra de título (puede suceder intermitentemente). En este caso será necesario restablecer las preferencias de Kdenlive, borrando el archivo ~/.config/kdenliverc (en Linux) o C:\Users\<nombre_de_usuario>\AppData\Roaming\kdenlive\kdenlivestaterc (en Windows).